Your own store and your first ads, built step by step on the real screens
Where you are
Ira's media plan is signed. Now it is your turn. Many of you already have a product, a supplier rate and your first stock.
The goal
A store that can take an order, three ads live at ₹1,000 a day, and a one-page results report.
The money
Your ad budget of ₹3,000 to ₹5,000. Everything bigger in Part 4 uses a practice account.
The rule
Hands first. Every step is a guided walkthrough of the real Shopify or Meta screen: press Next, or the highlighted spot, and the screen moves to the next click. A ChatGPT prompt sits beside it for when you are stuck.
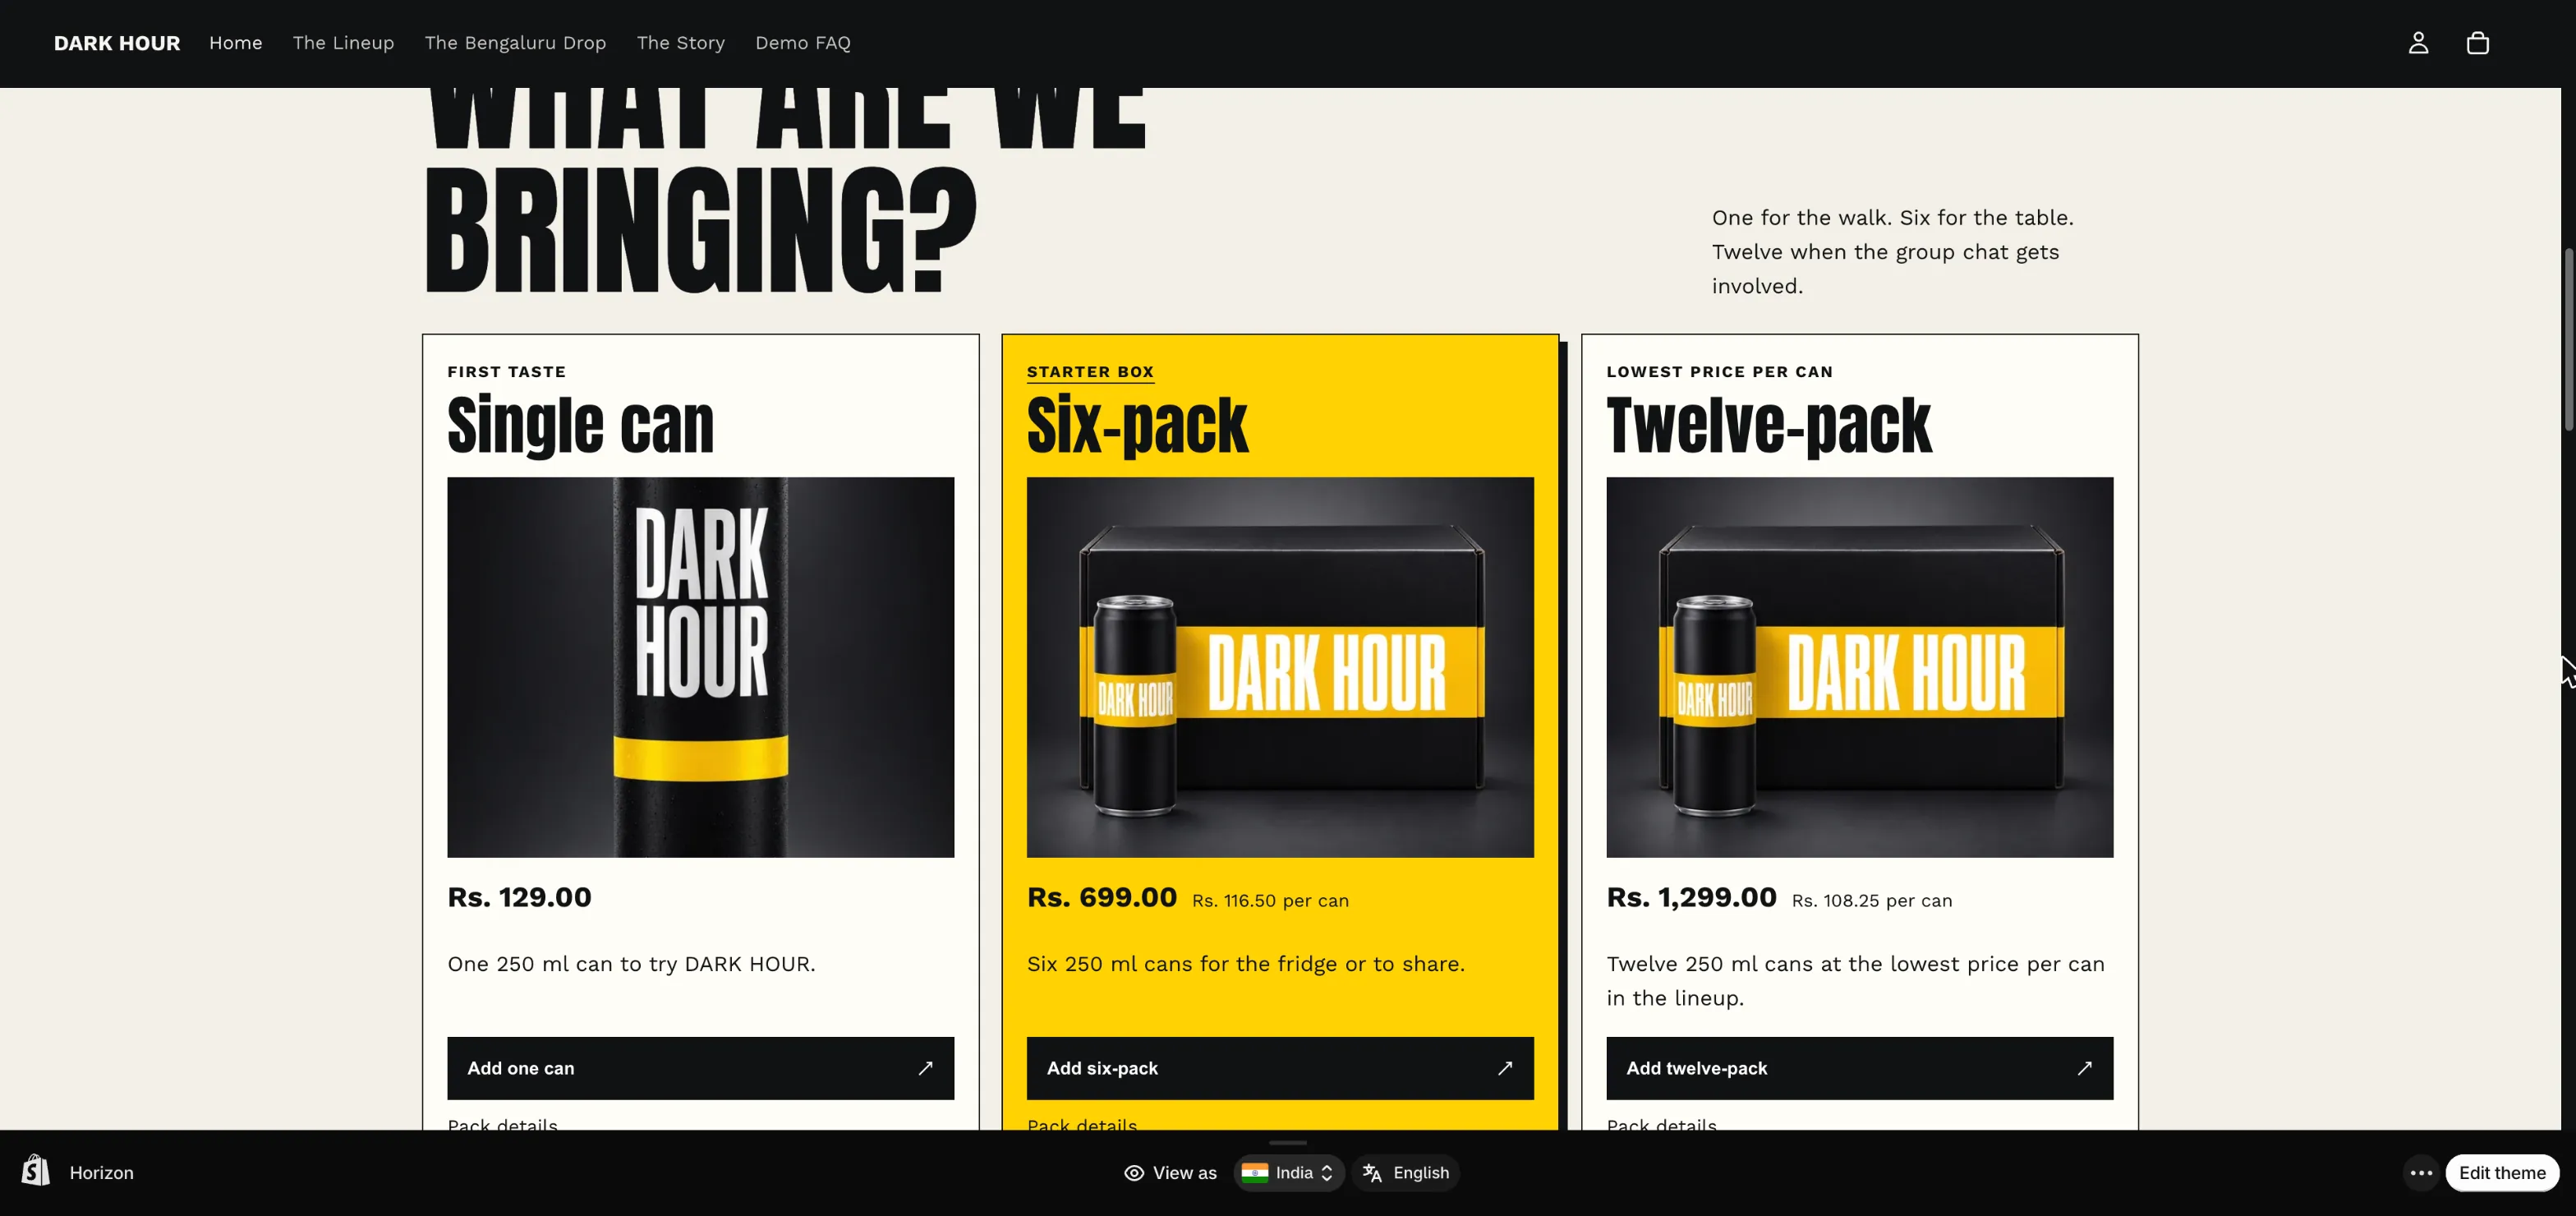
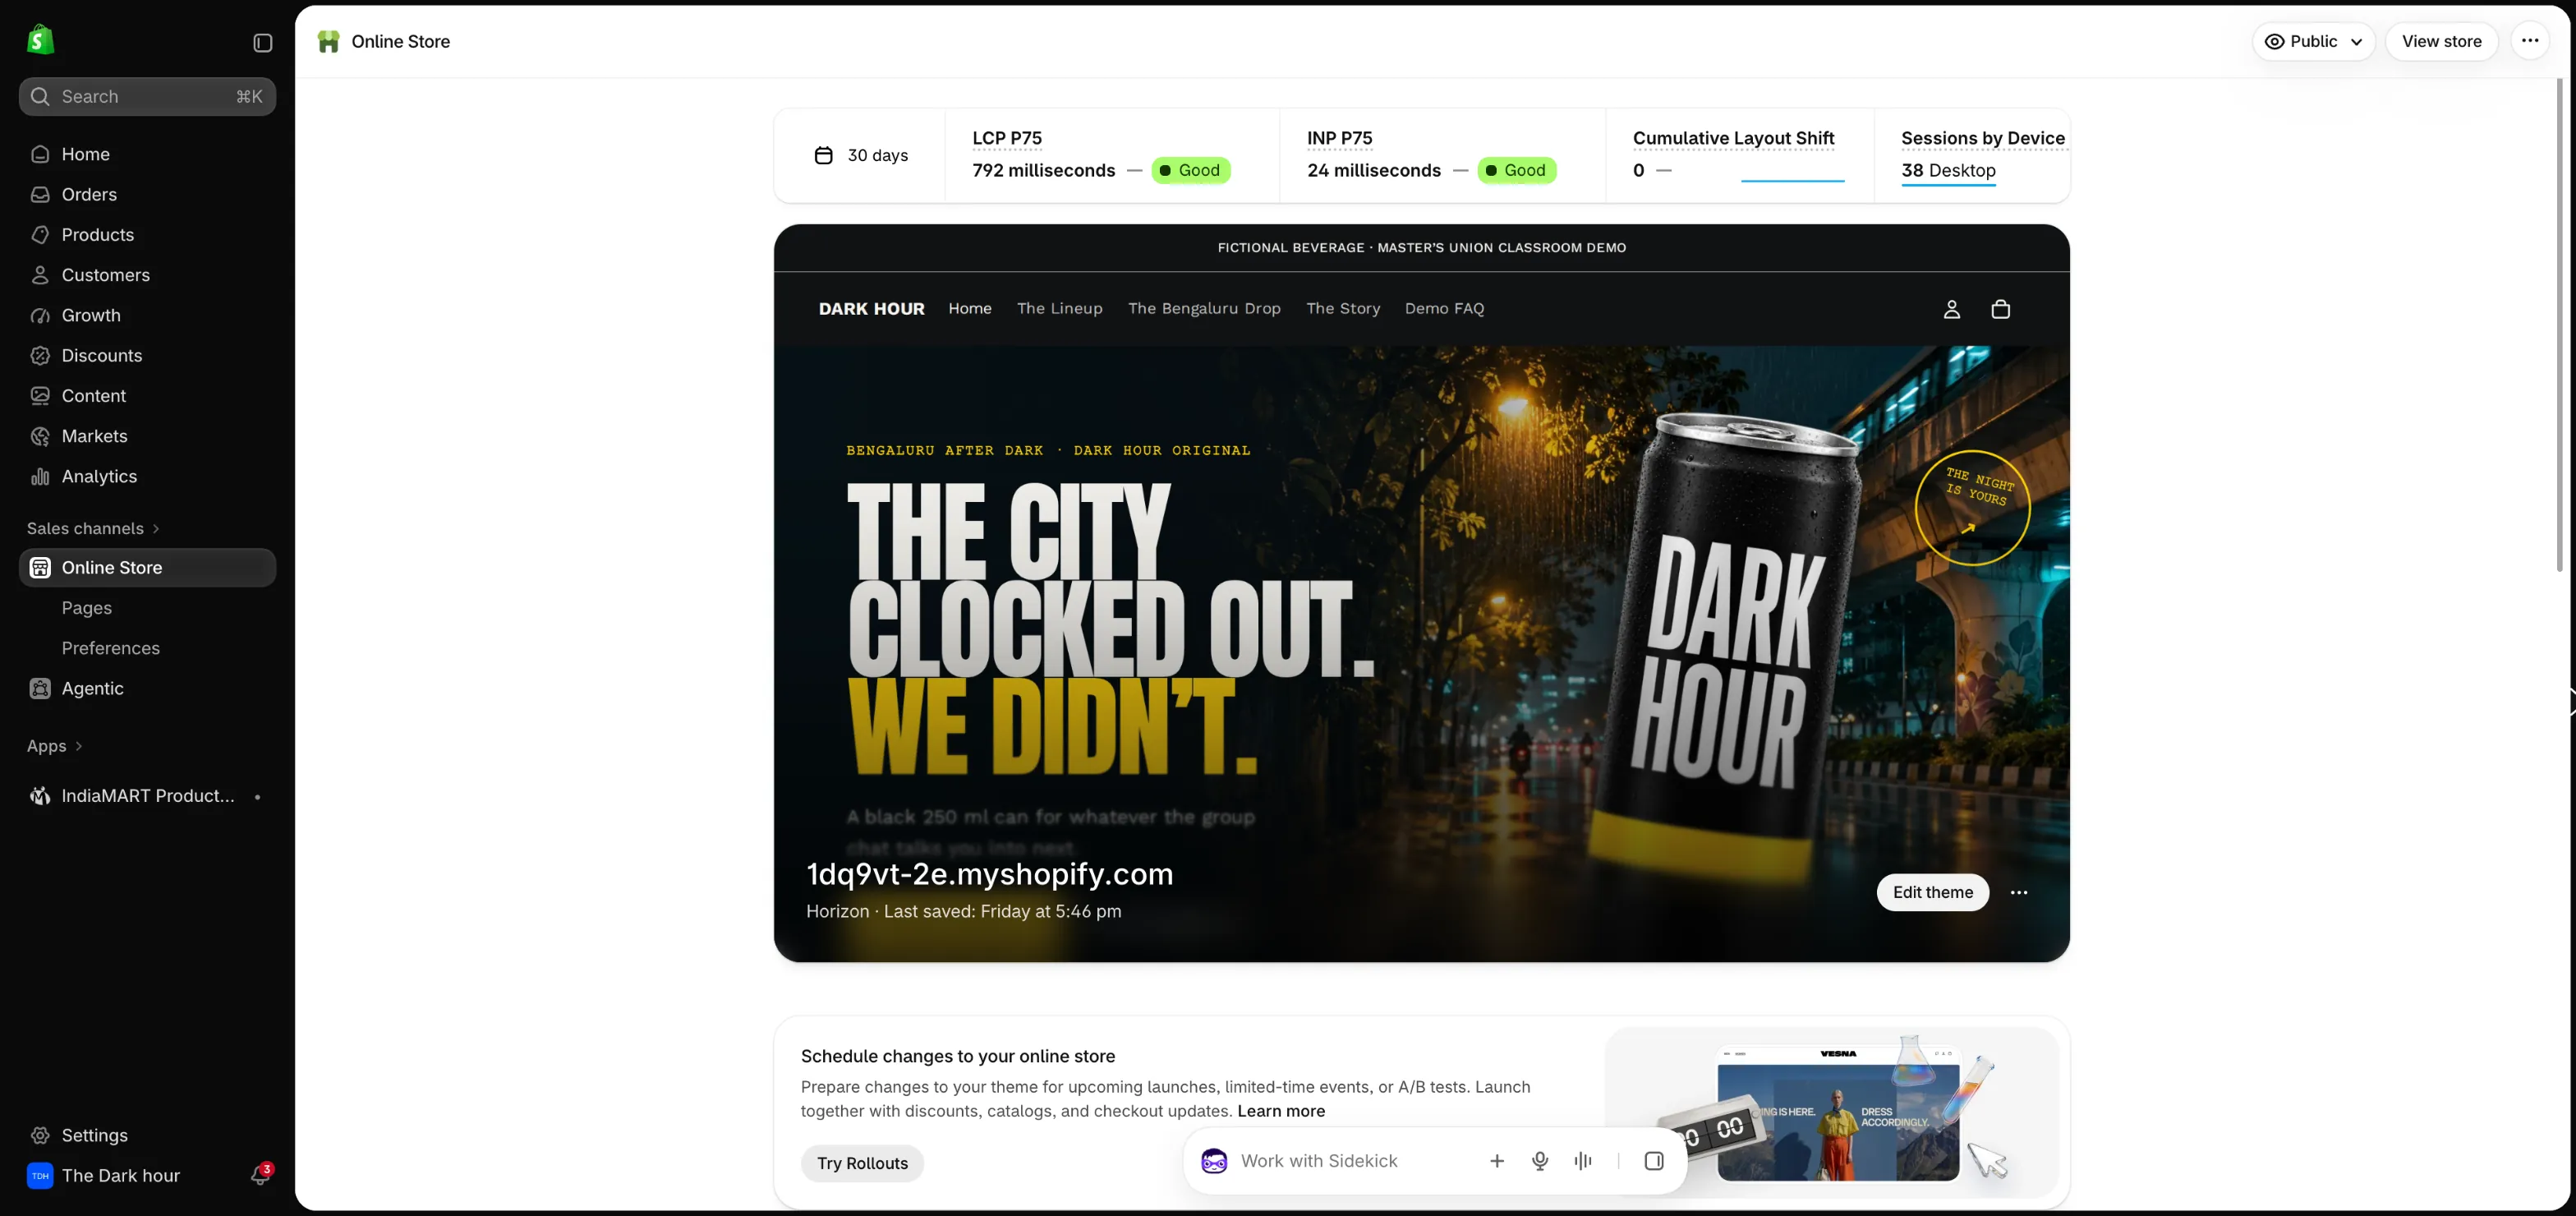
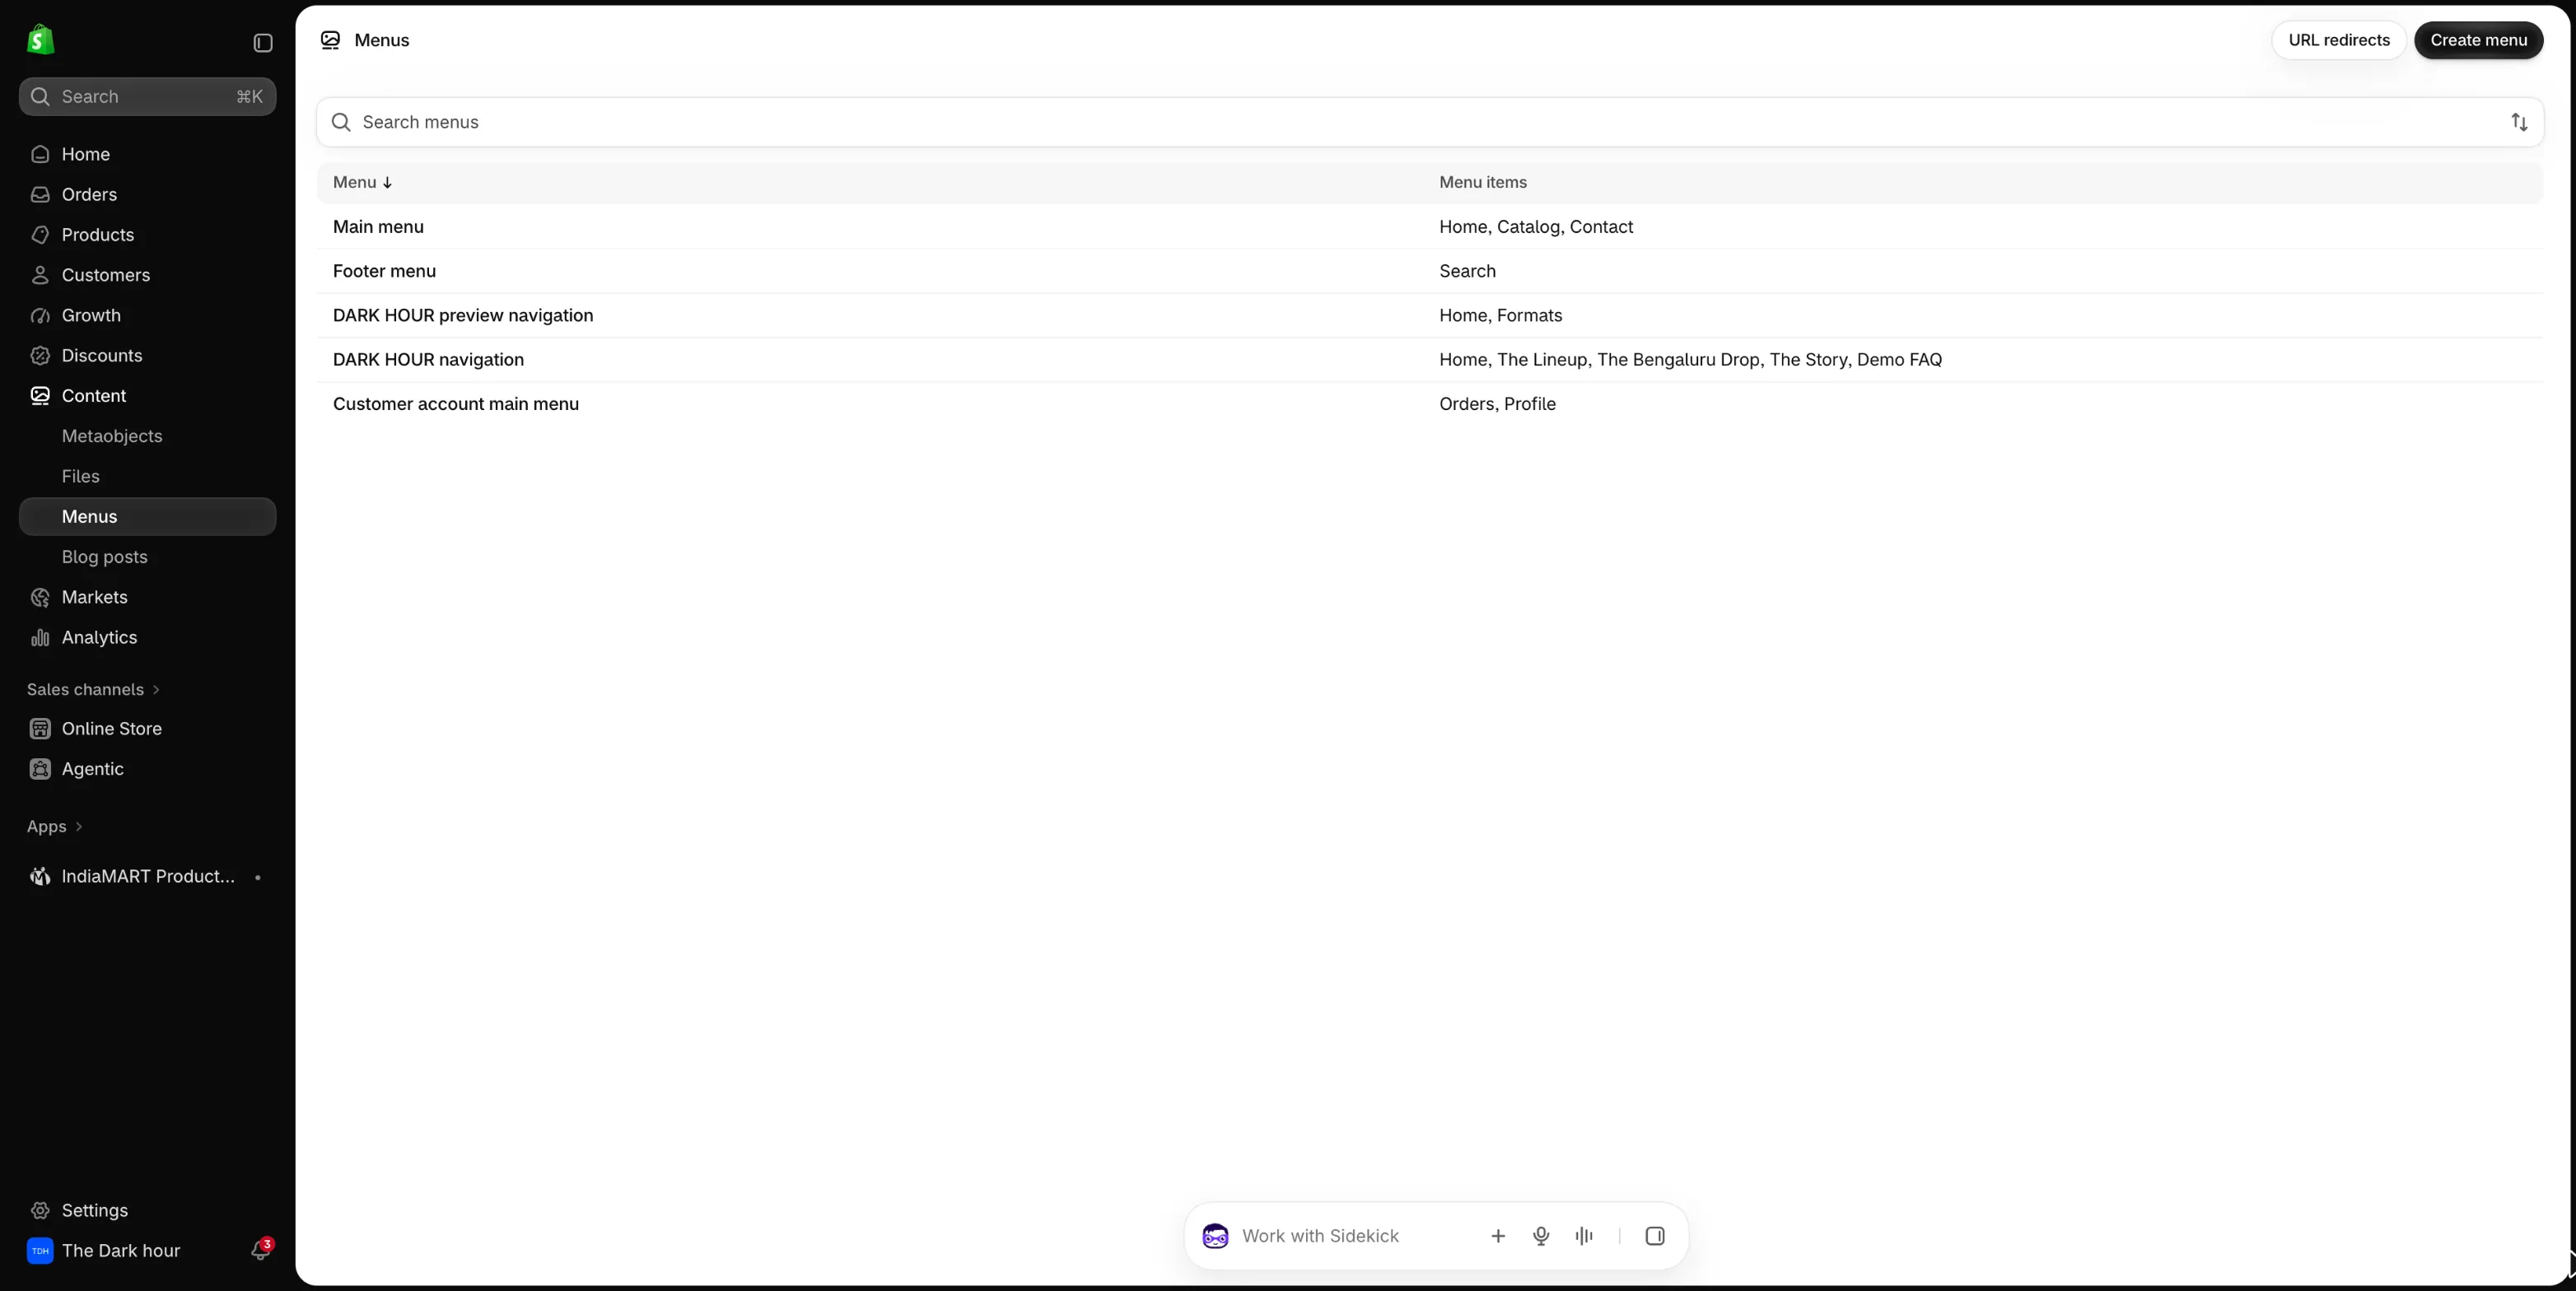
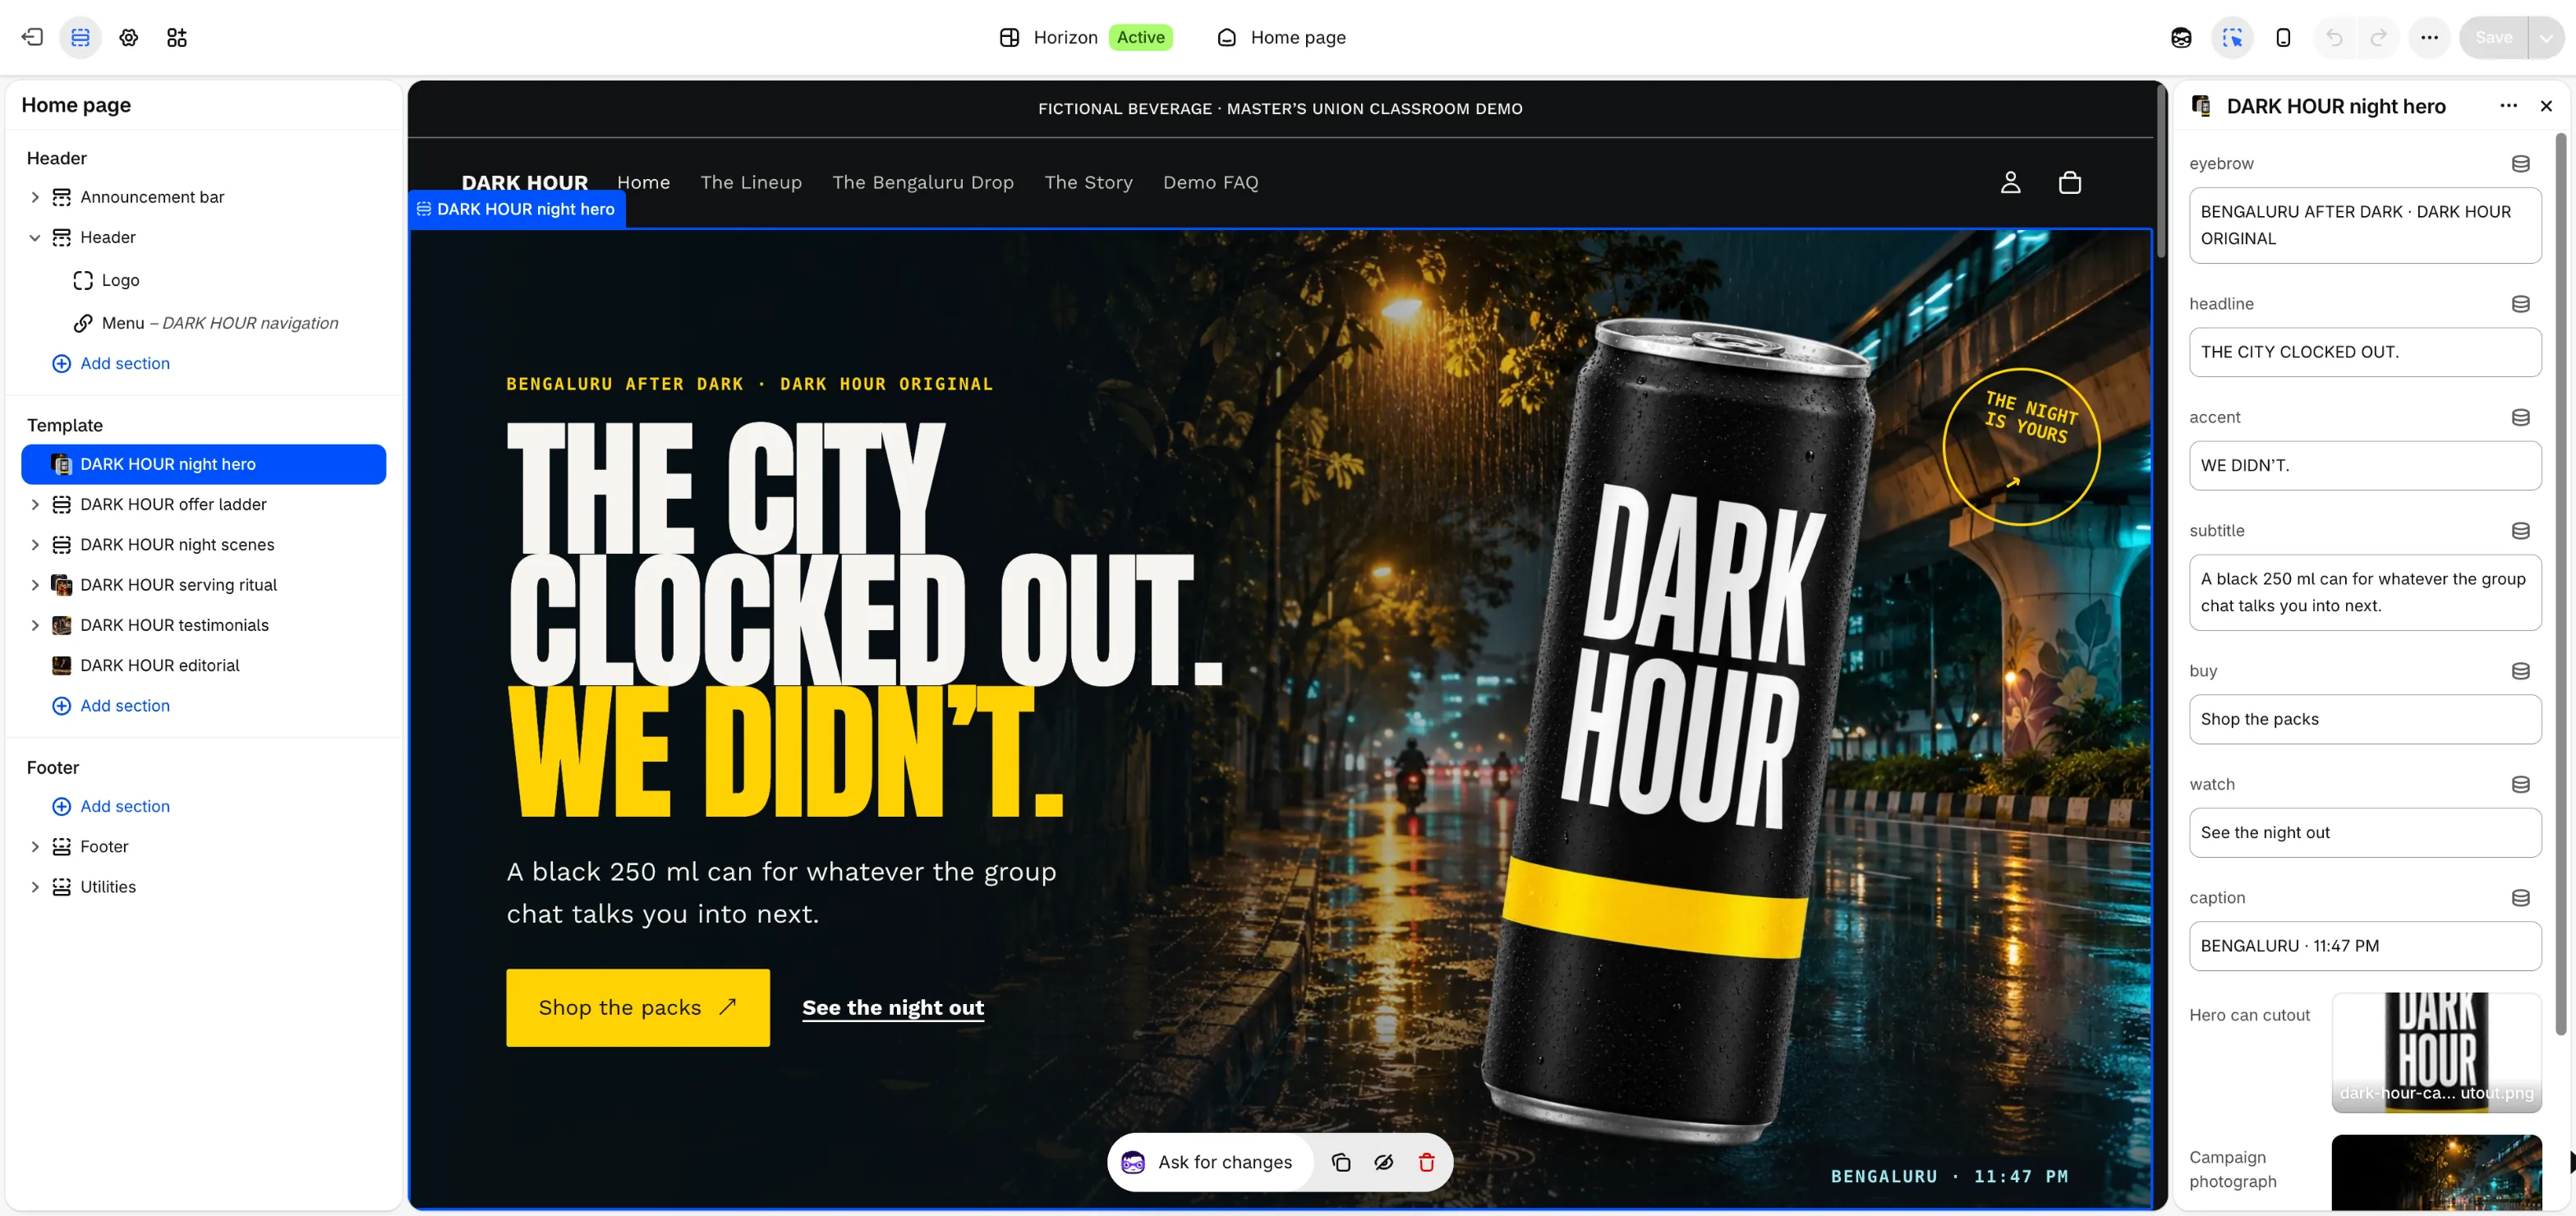
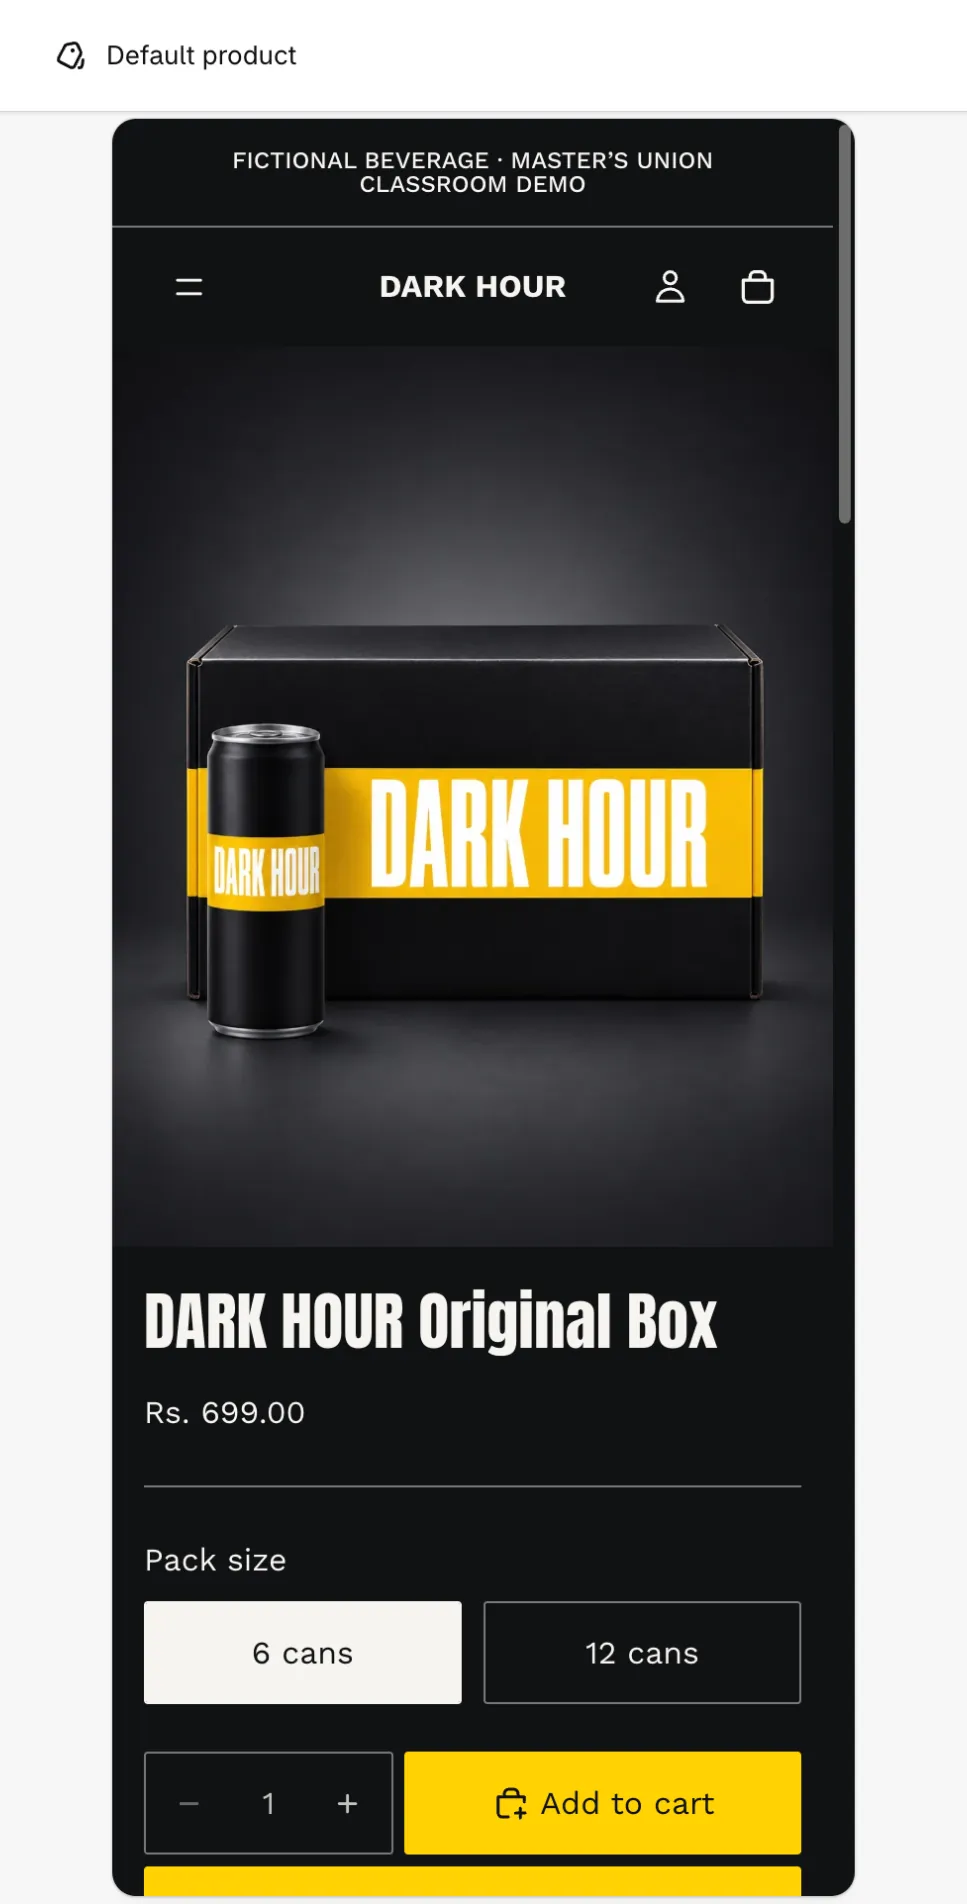
The Dark Hour store, built for this class on Shopify. Every screen in this lab comes from building it.
What the curriculum says you will be able to do
Session 4Learn the foundational elements of campaign planning, including platform setup, goal setting, and the RACE framework.
Session 5Understand audience psychology, need states, and how to build and target audiences for dropshipping using Meta platforms.
Session 6Learn how to measure, attribute, and optimize campaign performance using analytics and e-commerce metrics.
The four parts, and what you will be able to do after each
The tools you will use
ShopifyRazorpayFacebook Page + Instagram professional accountMeta Ads ManagerMeta Ad LibraryChatGPT + Shopify pluginApify (optional)Instagram Edits or Canva for creatives
Personal details, account notices and other campaigns in these screenshots are blurred. Shopify plans and billing follow Masters' Union's instructions and are not covered here.
Part 1 · Session 3, second half
Set up a store that could take a real order today
You have a product and a supplier. In this part you turn an empty Shopify account into a store with your details, payments, a first product and stock, and you connect it to ChatGPT. Every step shows the real screen first.
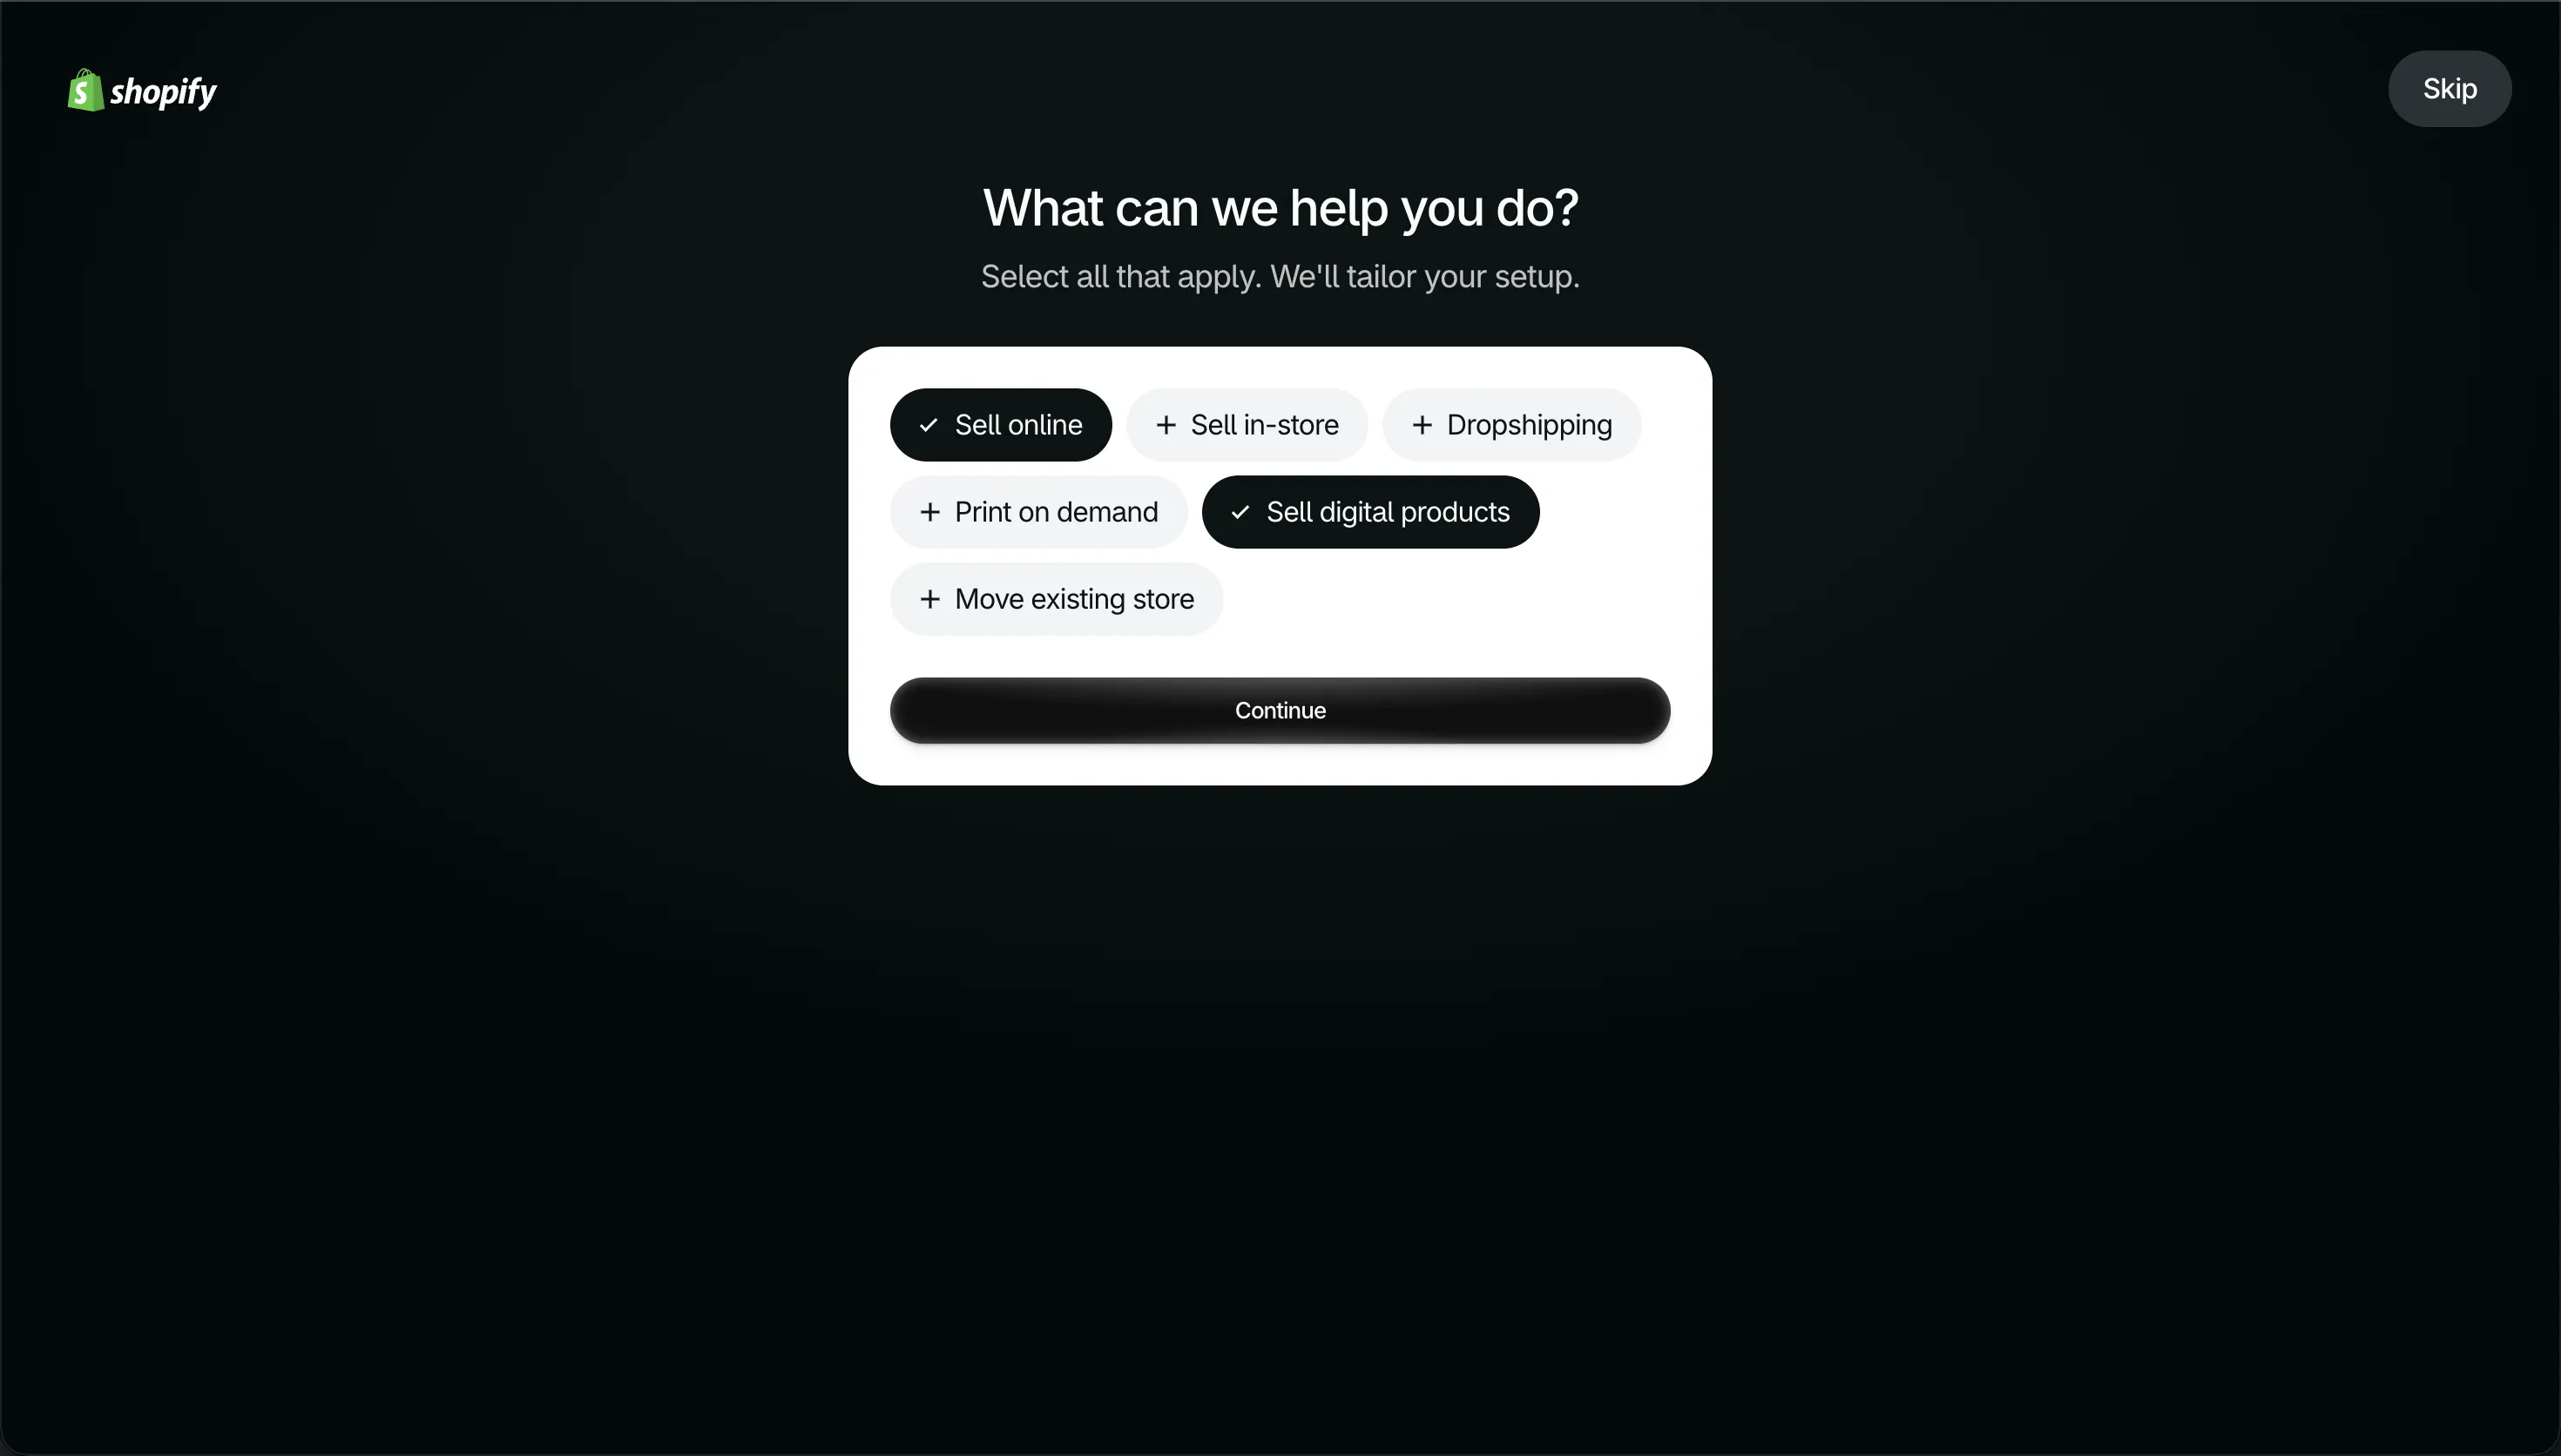
Step 1Sign up → What can we help you do?
Tell Shopify what you sell, then follow Masters' Union for the plan
1 / 3
Use ← → keys
1of 3
1Select Sell onlineThis is your store on the web. It decides which setup cards Shopify shows you next.
2Select other options only if they applyThis store also ticked Sell digital products. Leave it off unless you sell downloads.
3Press ContinueIf a plan or billing screen appears next, follow the instruction Masters' Union gives for your account.
Why it mattersShopify shapes your dashboard around this answer, so a wrong pick sends you to the wrong setup steps.
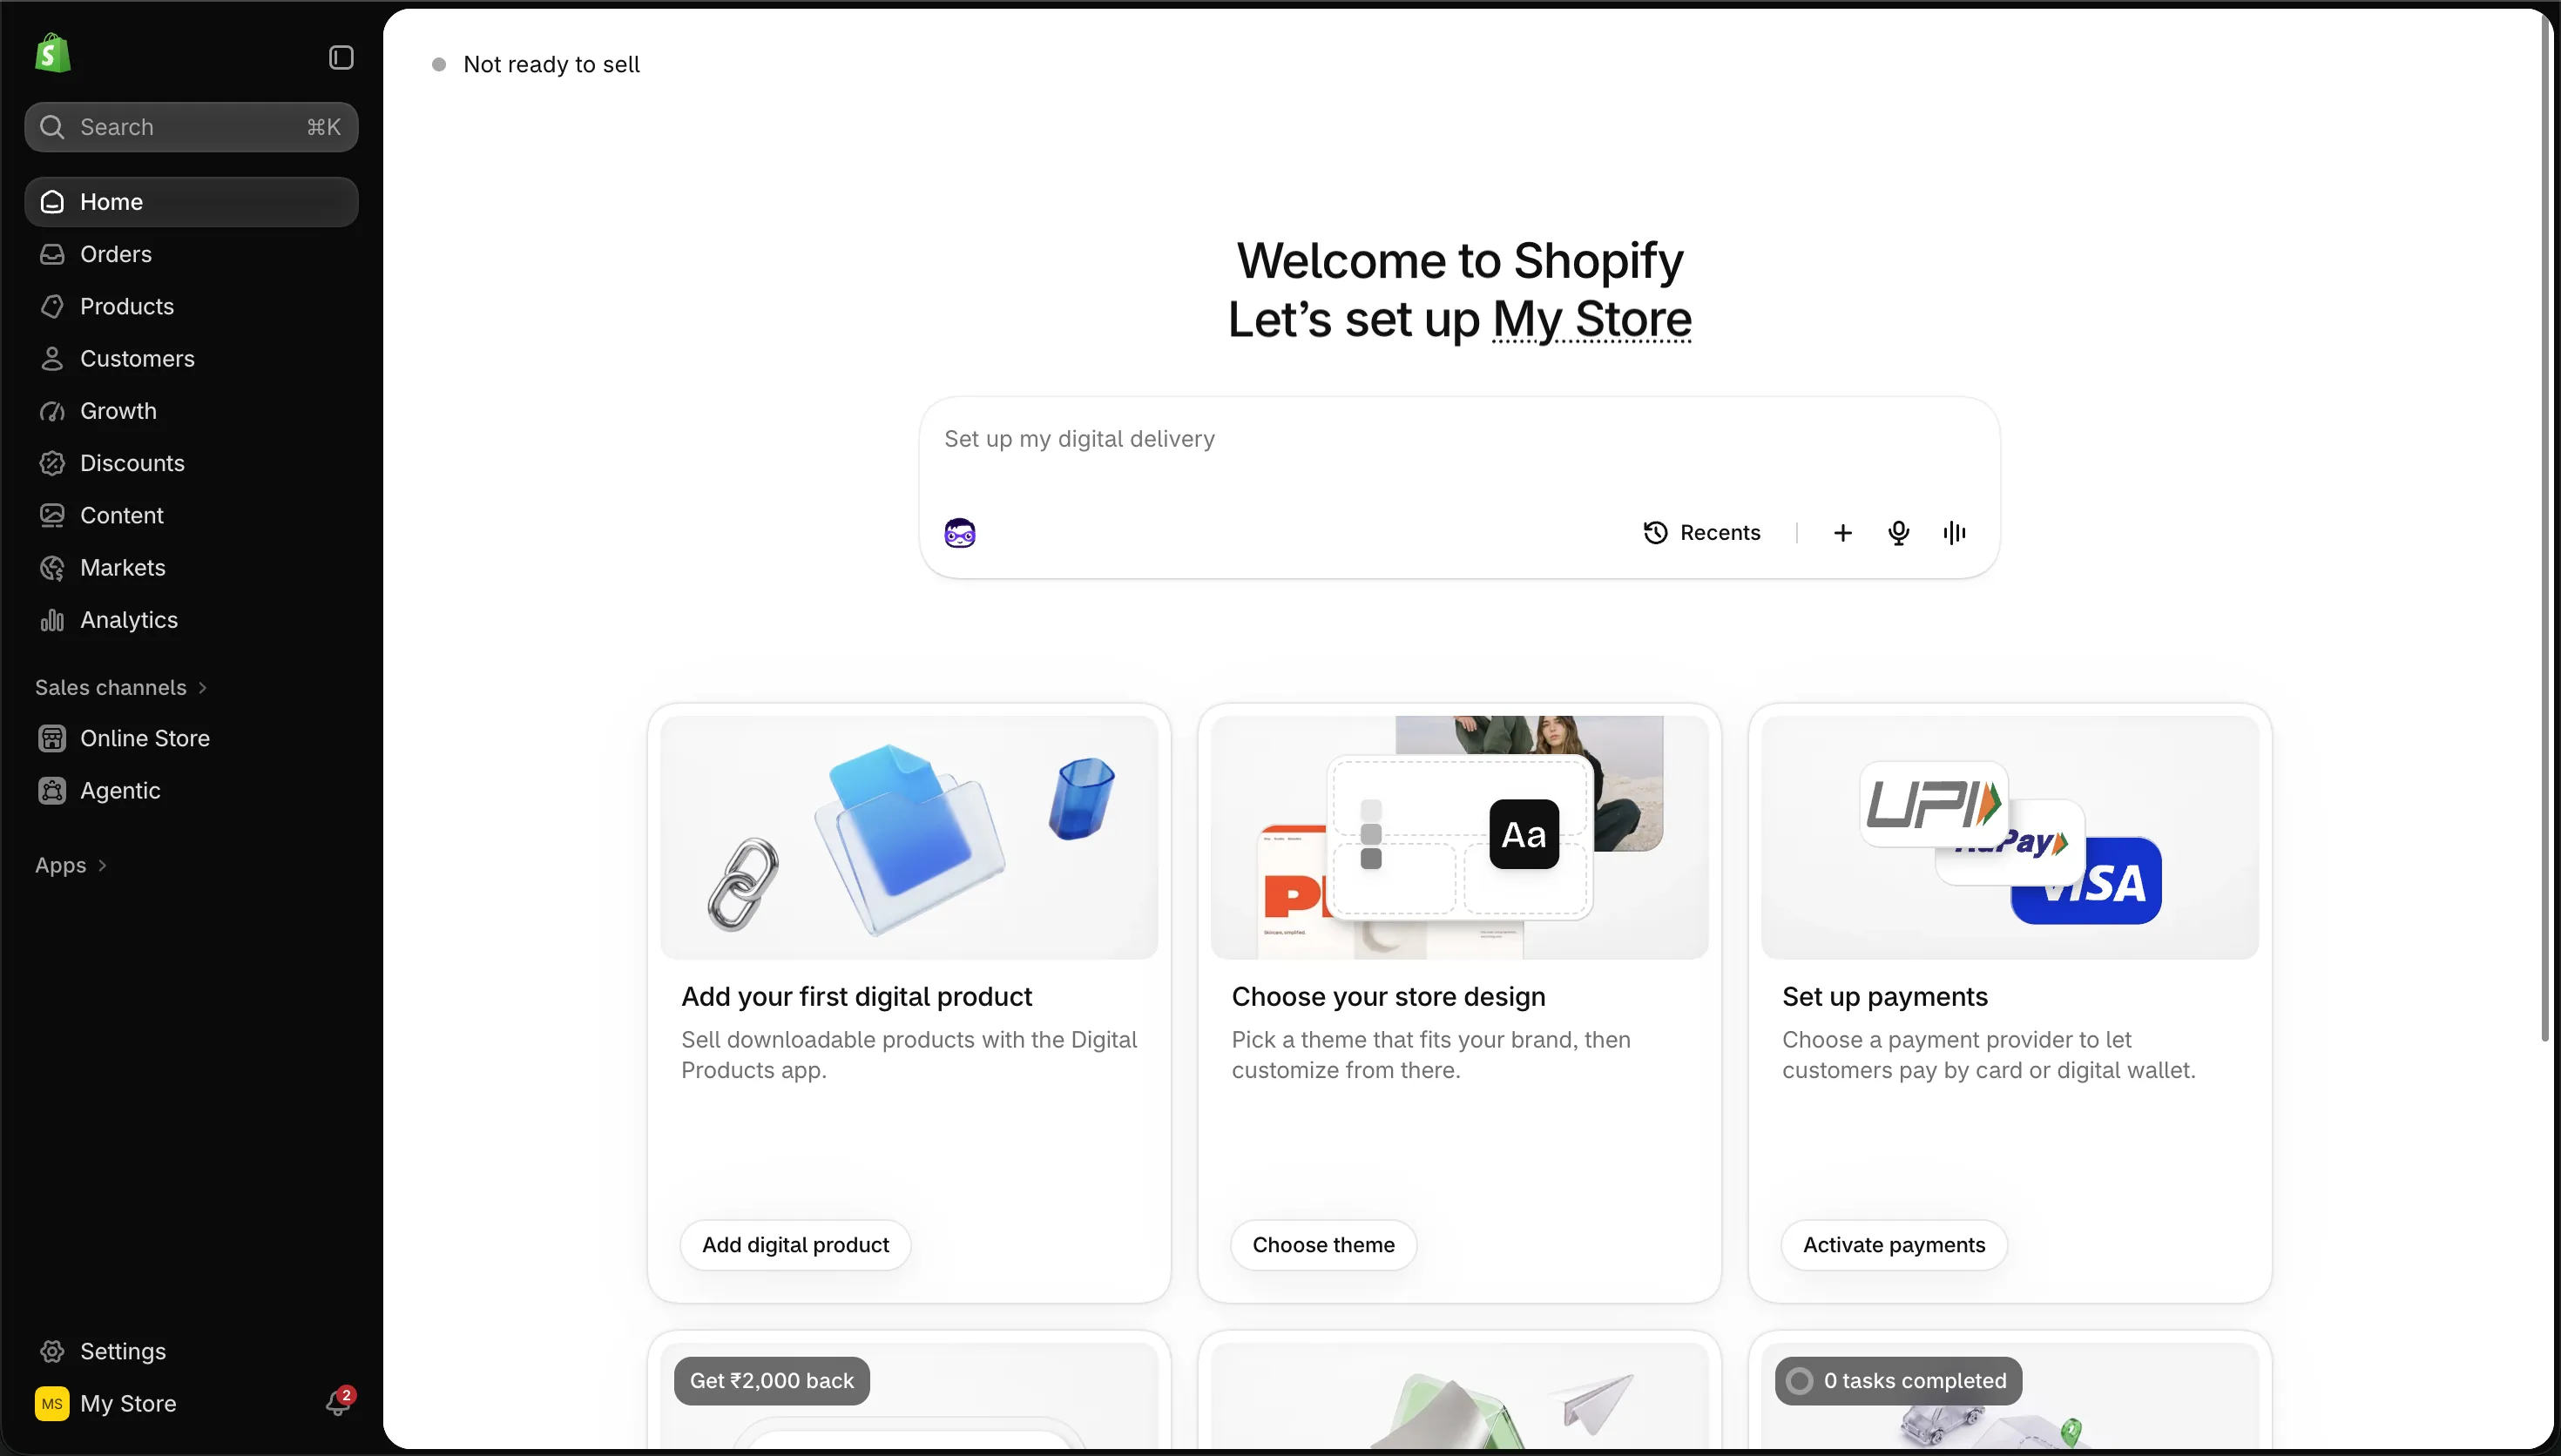
Step 2Shopify admin → Home
Learn the five places on the dashboard before you click anything
1 / 5
Use ← → keys
1of 5
1The left sidebar is your mapProducts, Orders and Customers are where the daily work happens.
2This bar is Sidekick, Shopify's AI assistantAsk it setup questions in plain English, right inside your admin.
3The setup cards show Shopify's recommended orderProduct, store design, then payments. Work through them left to right.
4Activate payments lives here tooYou will do it in step 4, so customers can pay by UPI and card.
5Settings, bottom leftStore details, payments, shipping and policies all live inside it.
Why it mattersEvery later step in this Build Lab starts from one of these five places.
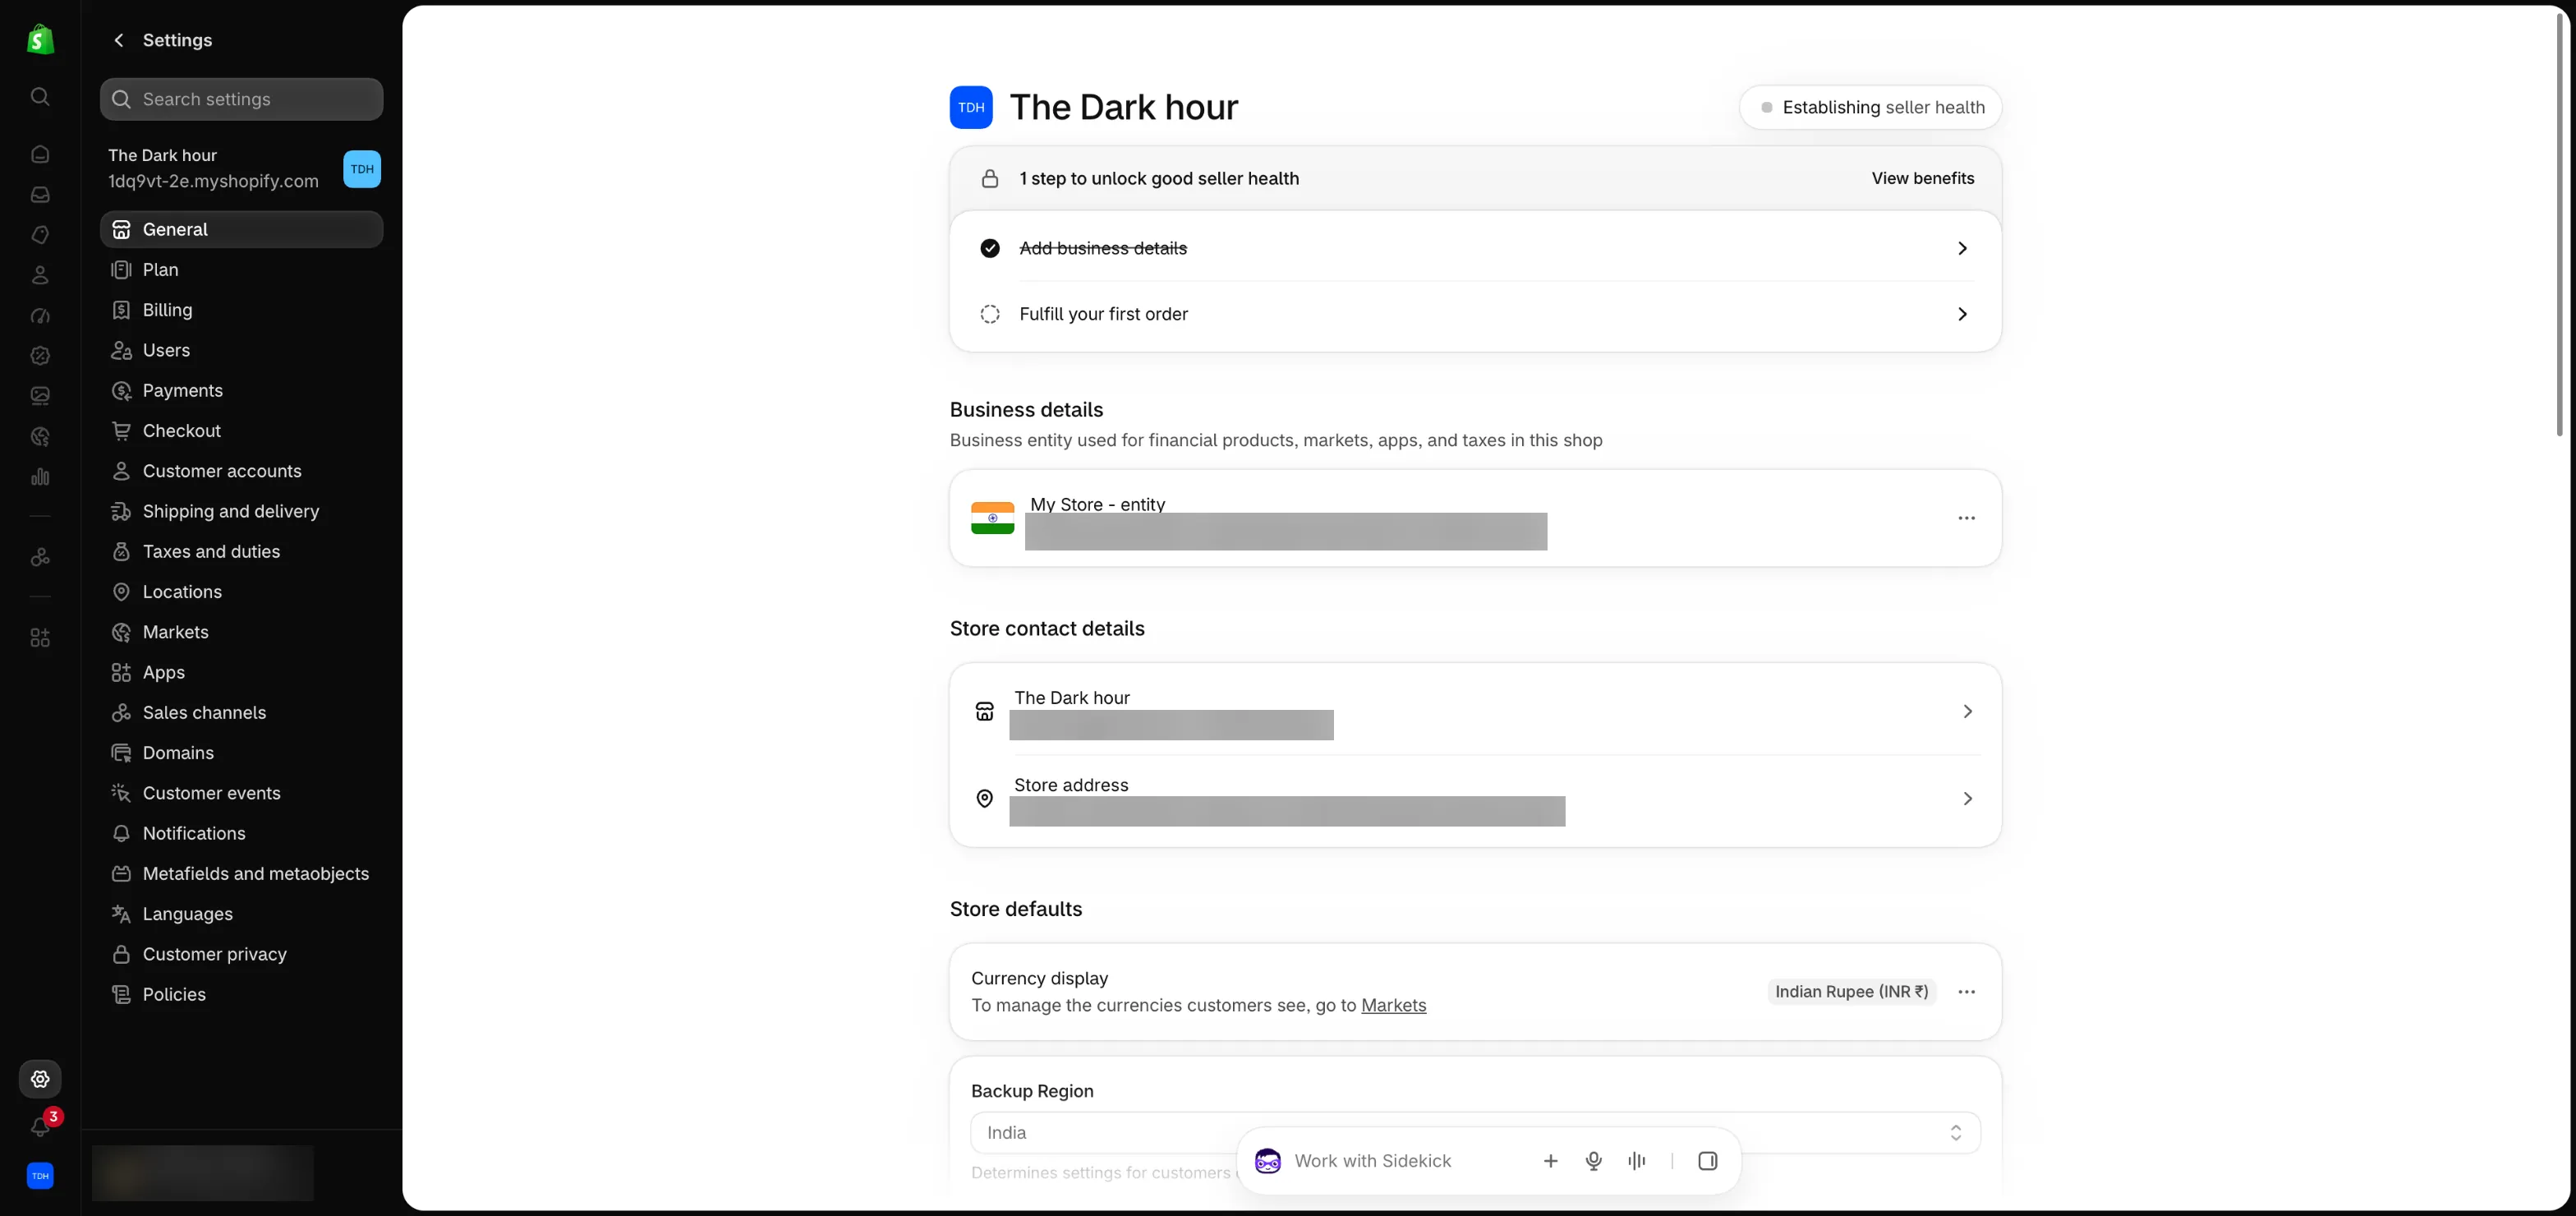
Step 3Settings → General
Fill in the store details that customers and Meta will check
1 / 4
Use ← → keys
1of 4
1Open Business detailsAdd who legally runs the store. Payment providers and Meta both check this.
2Click the store name rowSet the name buyers see, plus an email and phone you will answer. ChatGPT cannot rename a store, so this is always done by hand.
3Add the store addressIt prints on invoices and on your policy pages.
4Check the currency reads Indian Rupee (INR ₹)Prices, checkout and ad reports then all count in rupees. Set the time zone to India further down this page.
Why it mattersMeta reviews the website behind every ad. A store with no contact details looks unsafe to Meta and to buyers.
ChatGPT laneFill the [brackets], paste into ChatGPT
Step 4Settings → Payments → Choose a provider
Switch on payments with Razorpay, and keep test mode on while you practise
1 / 10
Use ← → keys
1of 10
1Shopify Payments is not available in IndiaSo you pick a third-party provider. Sidekick says the same. Razorpay is the common choice.
2Open the Razorpay app from Settings, then PaymentsCheck the name and the developer, Razorpay Payments, before you install anything.
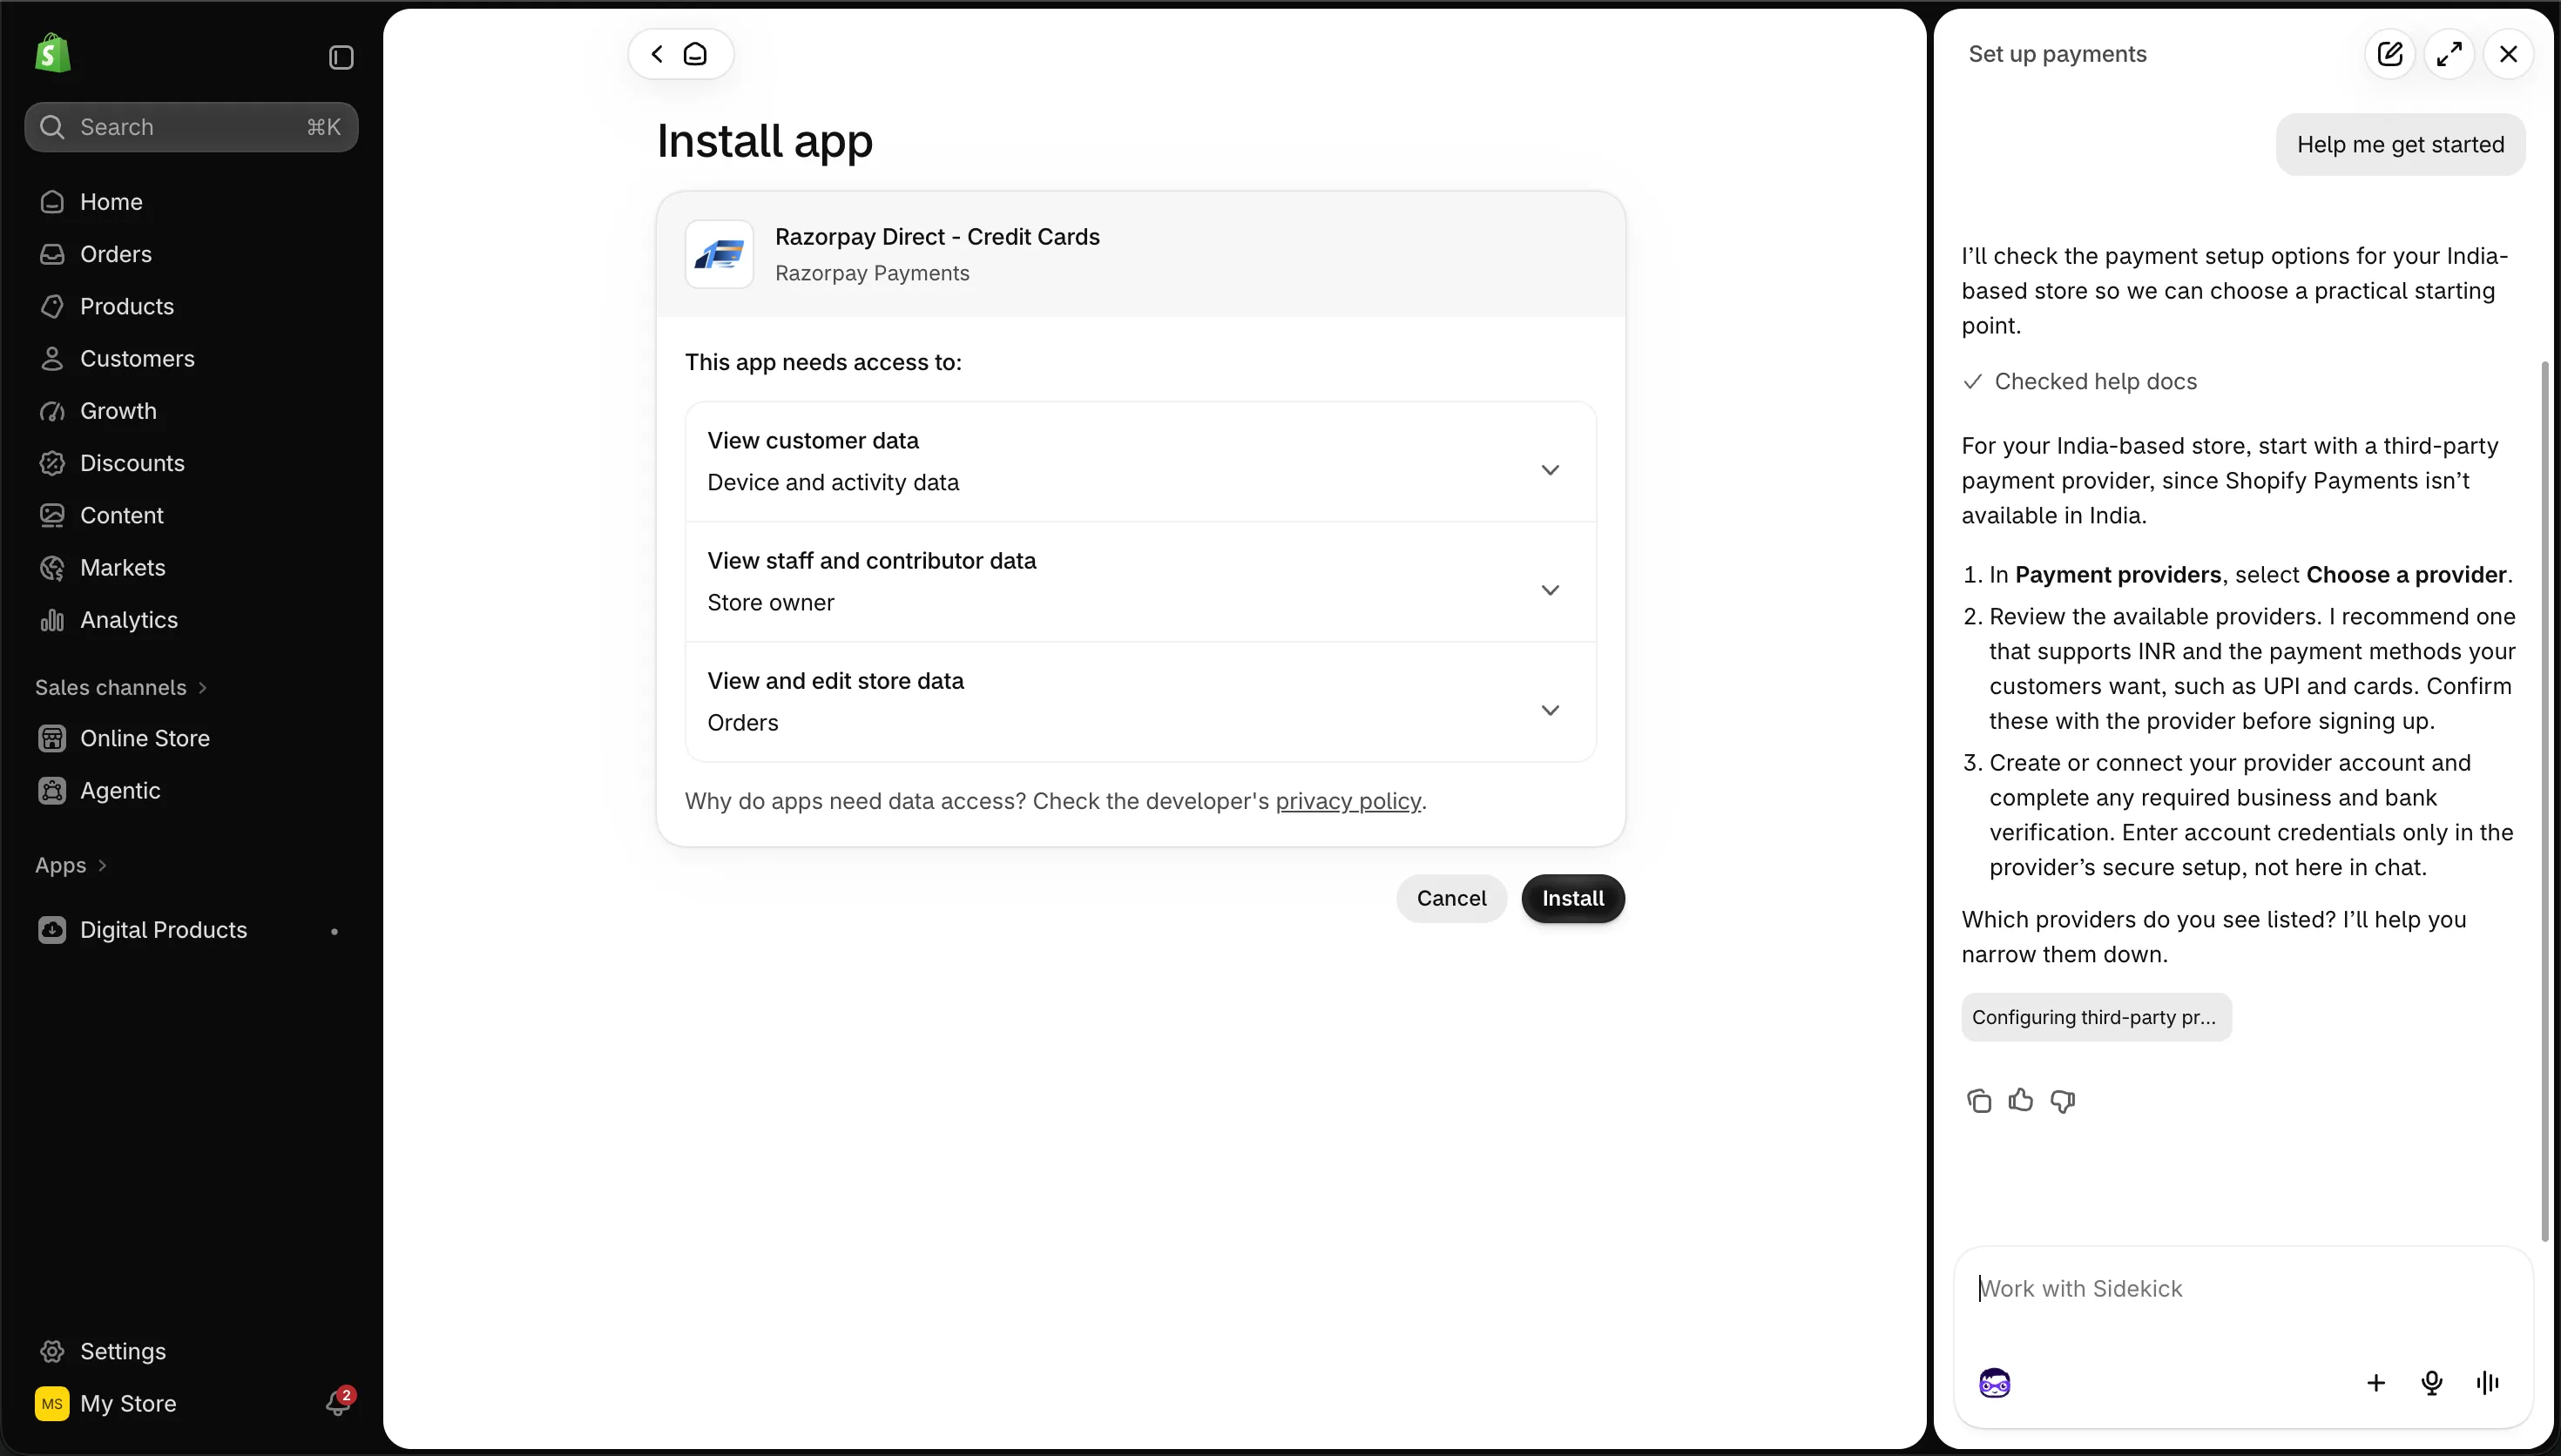
3Read what the app will be able to seeCustomer, staff and order data. A payment app needs orders to mark them paid.
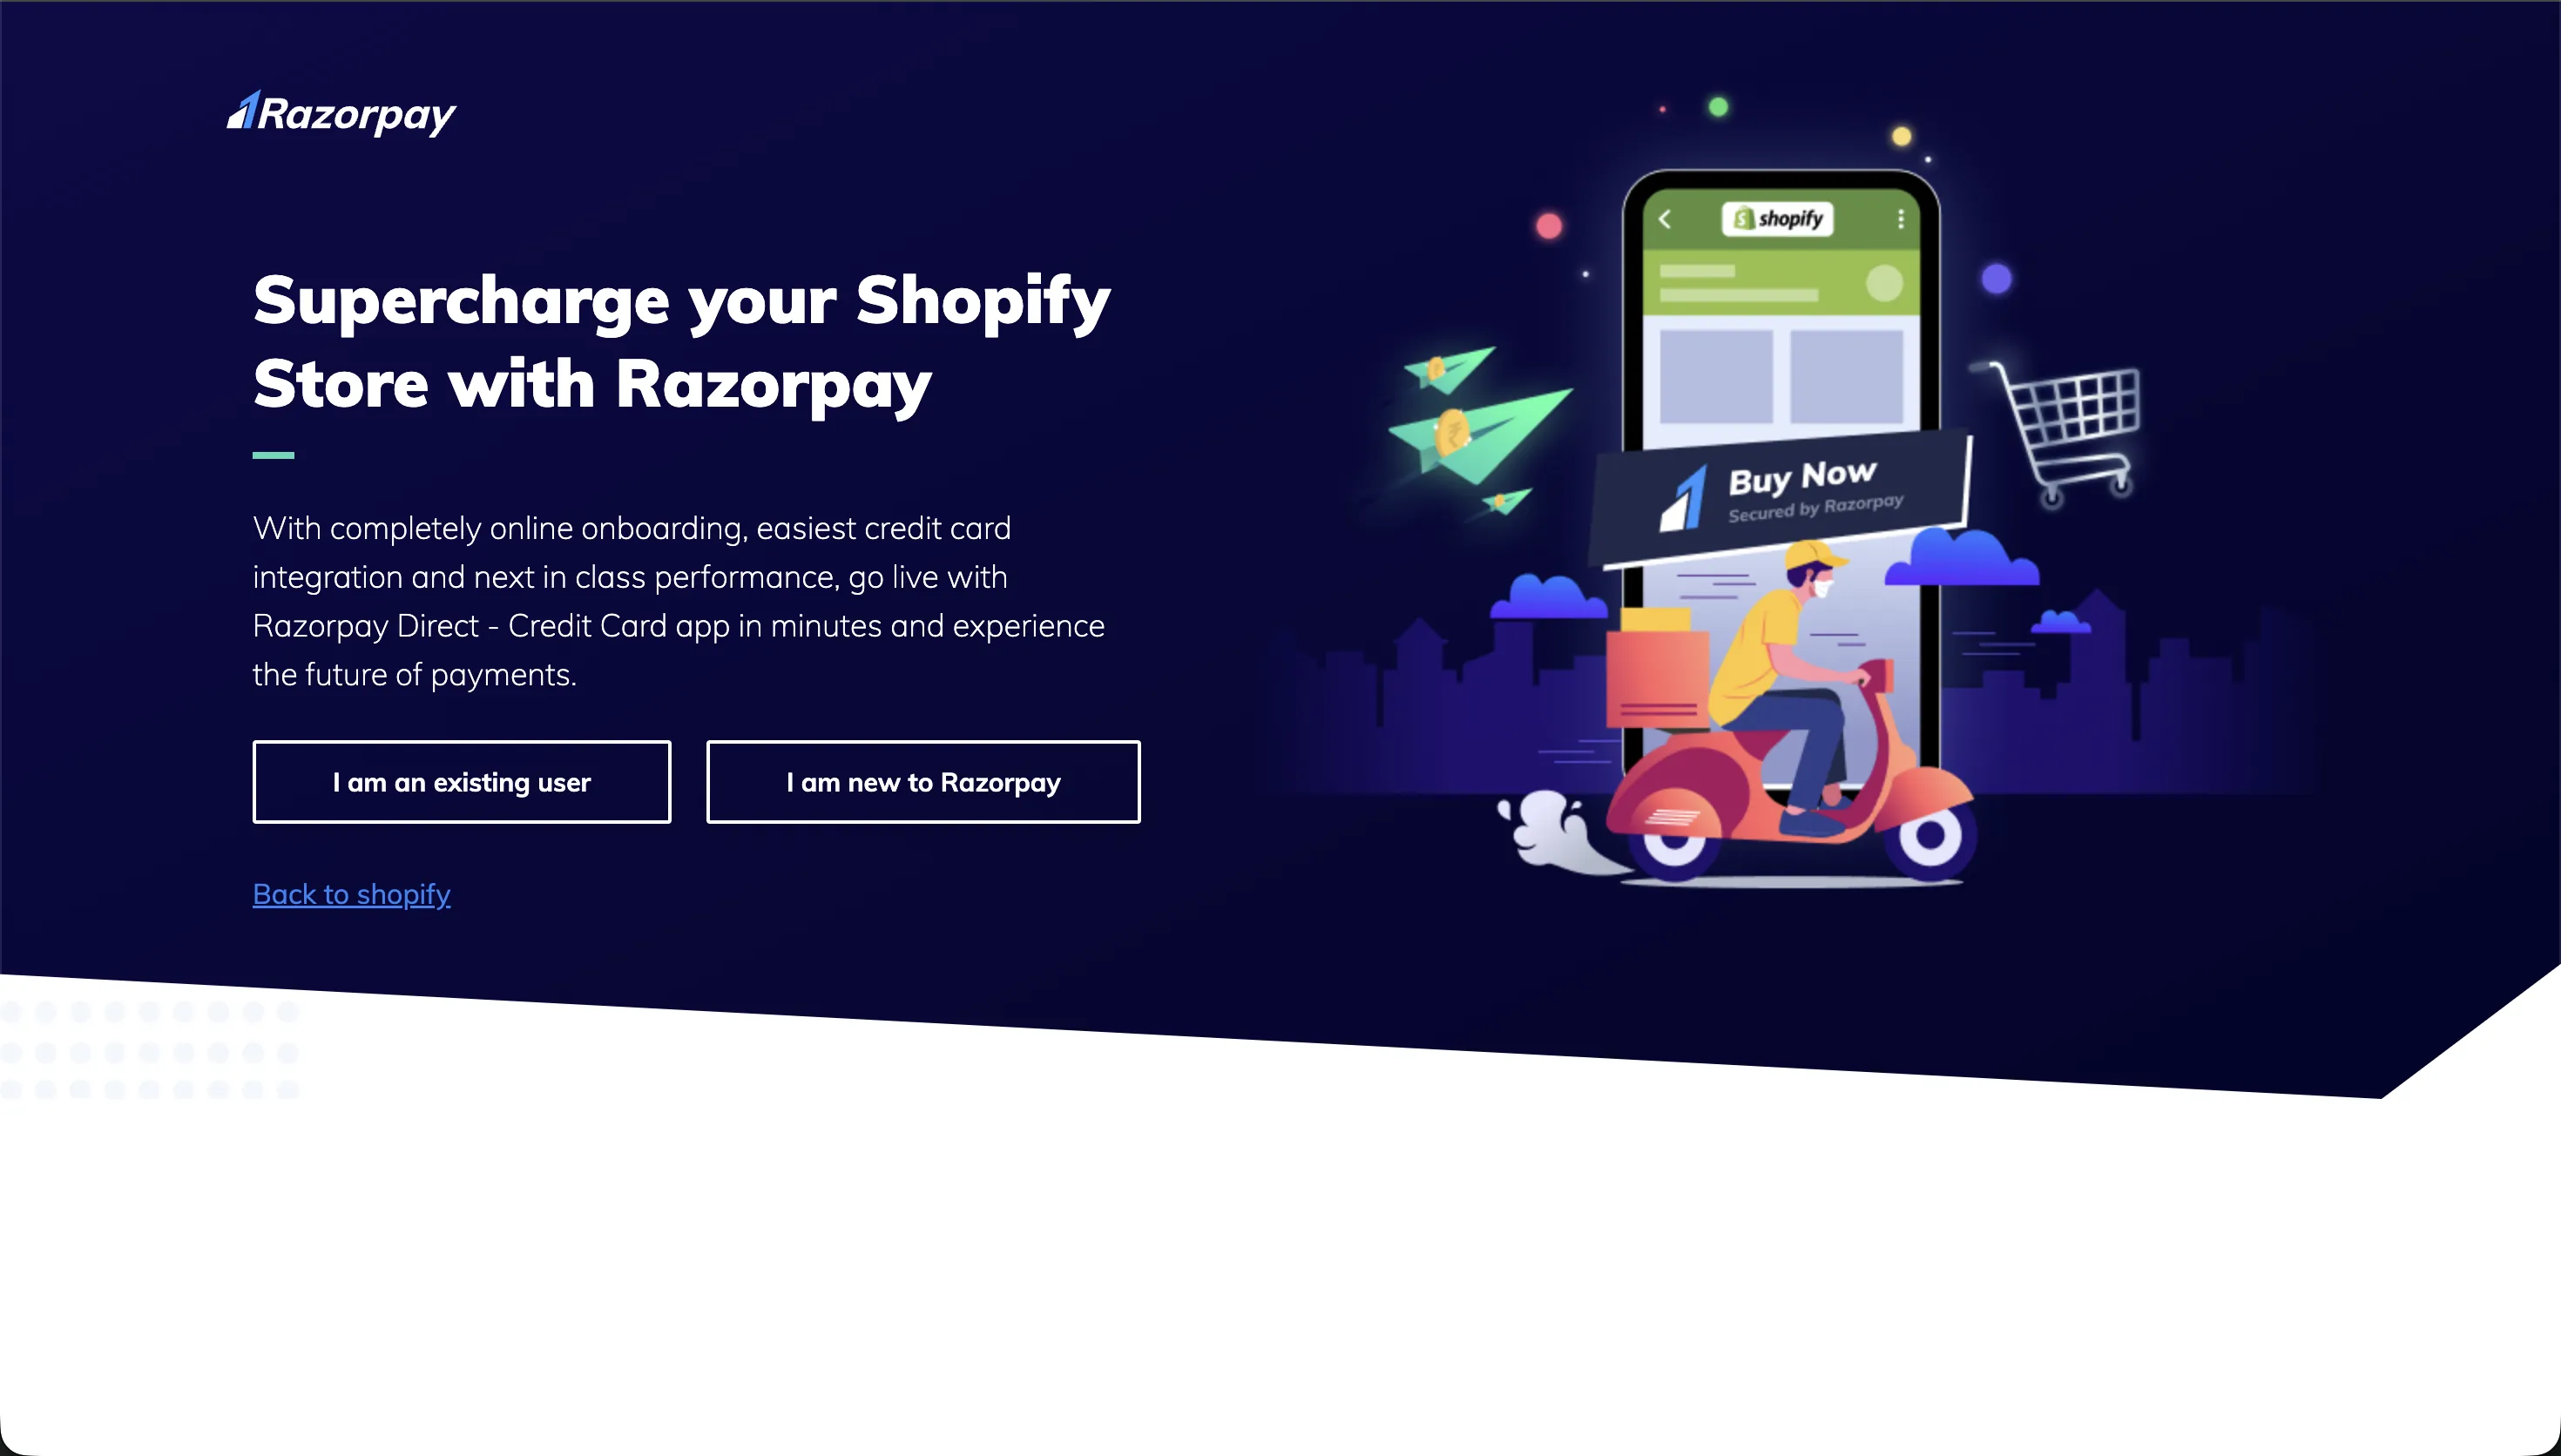
4Press InstallShopify hands you over to Razorpay's own page next.
5Choose I am new to Razorpay, or log inKYC and bank details go on Razorpay's secure page only. Never paste them into a chat with an AI.
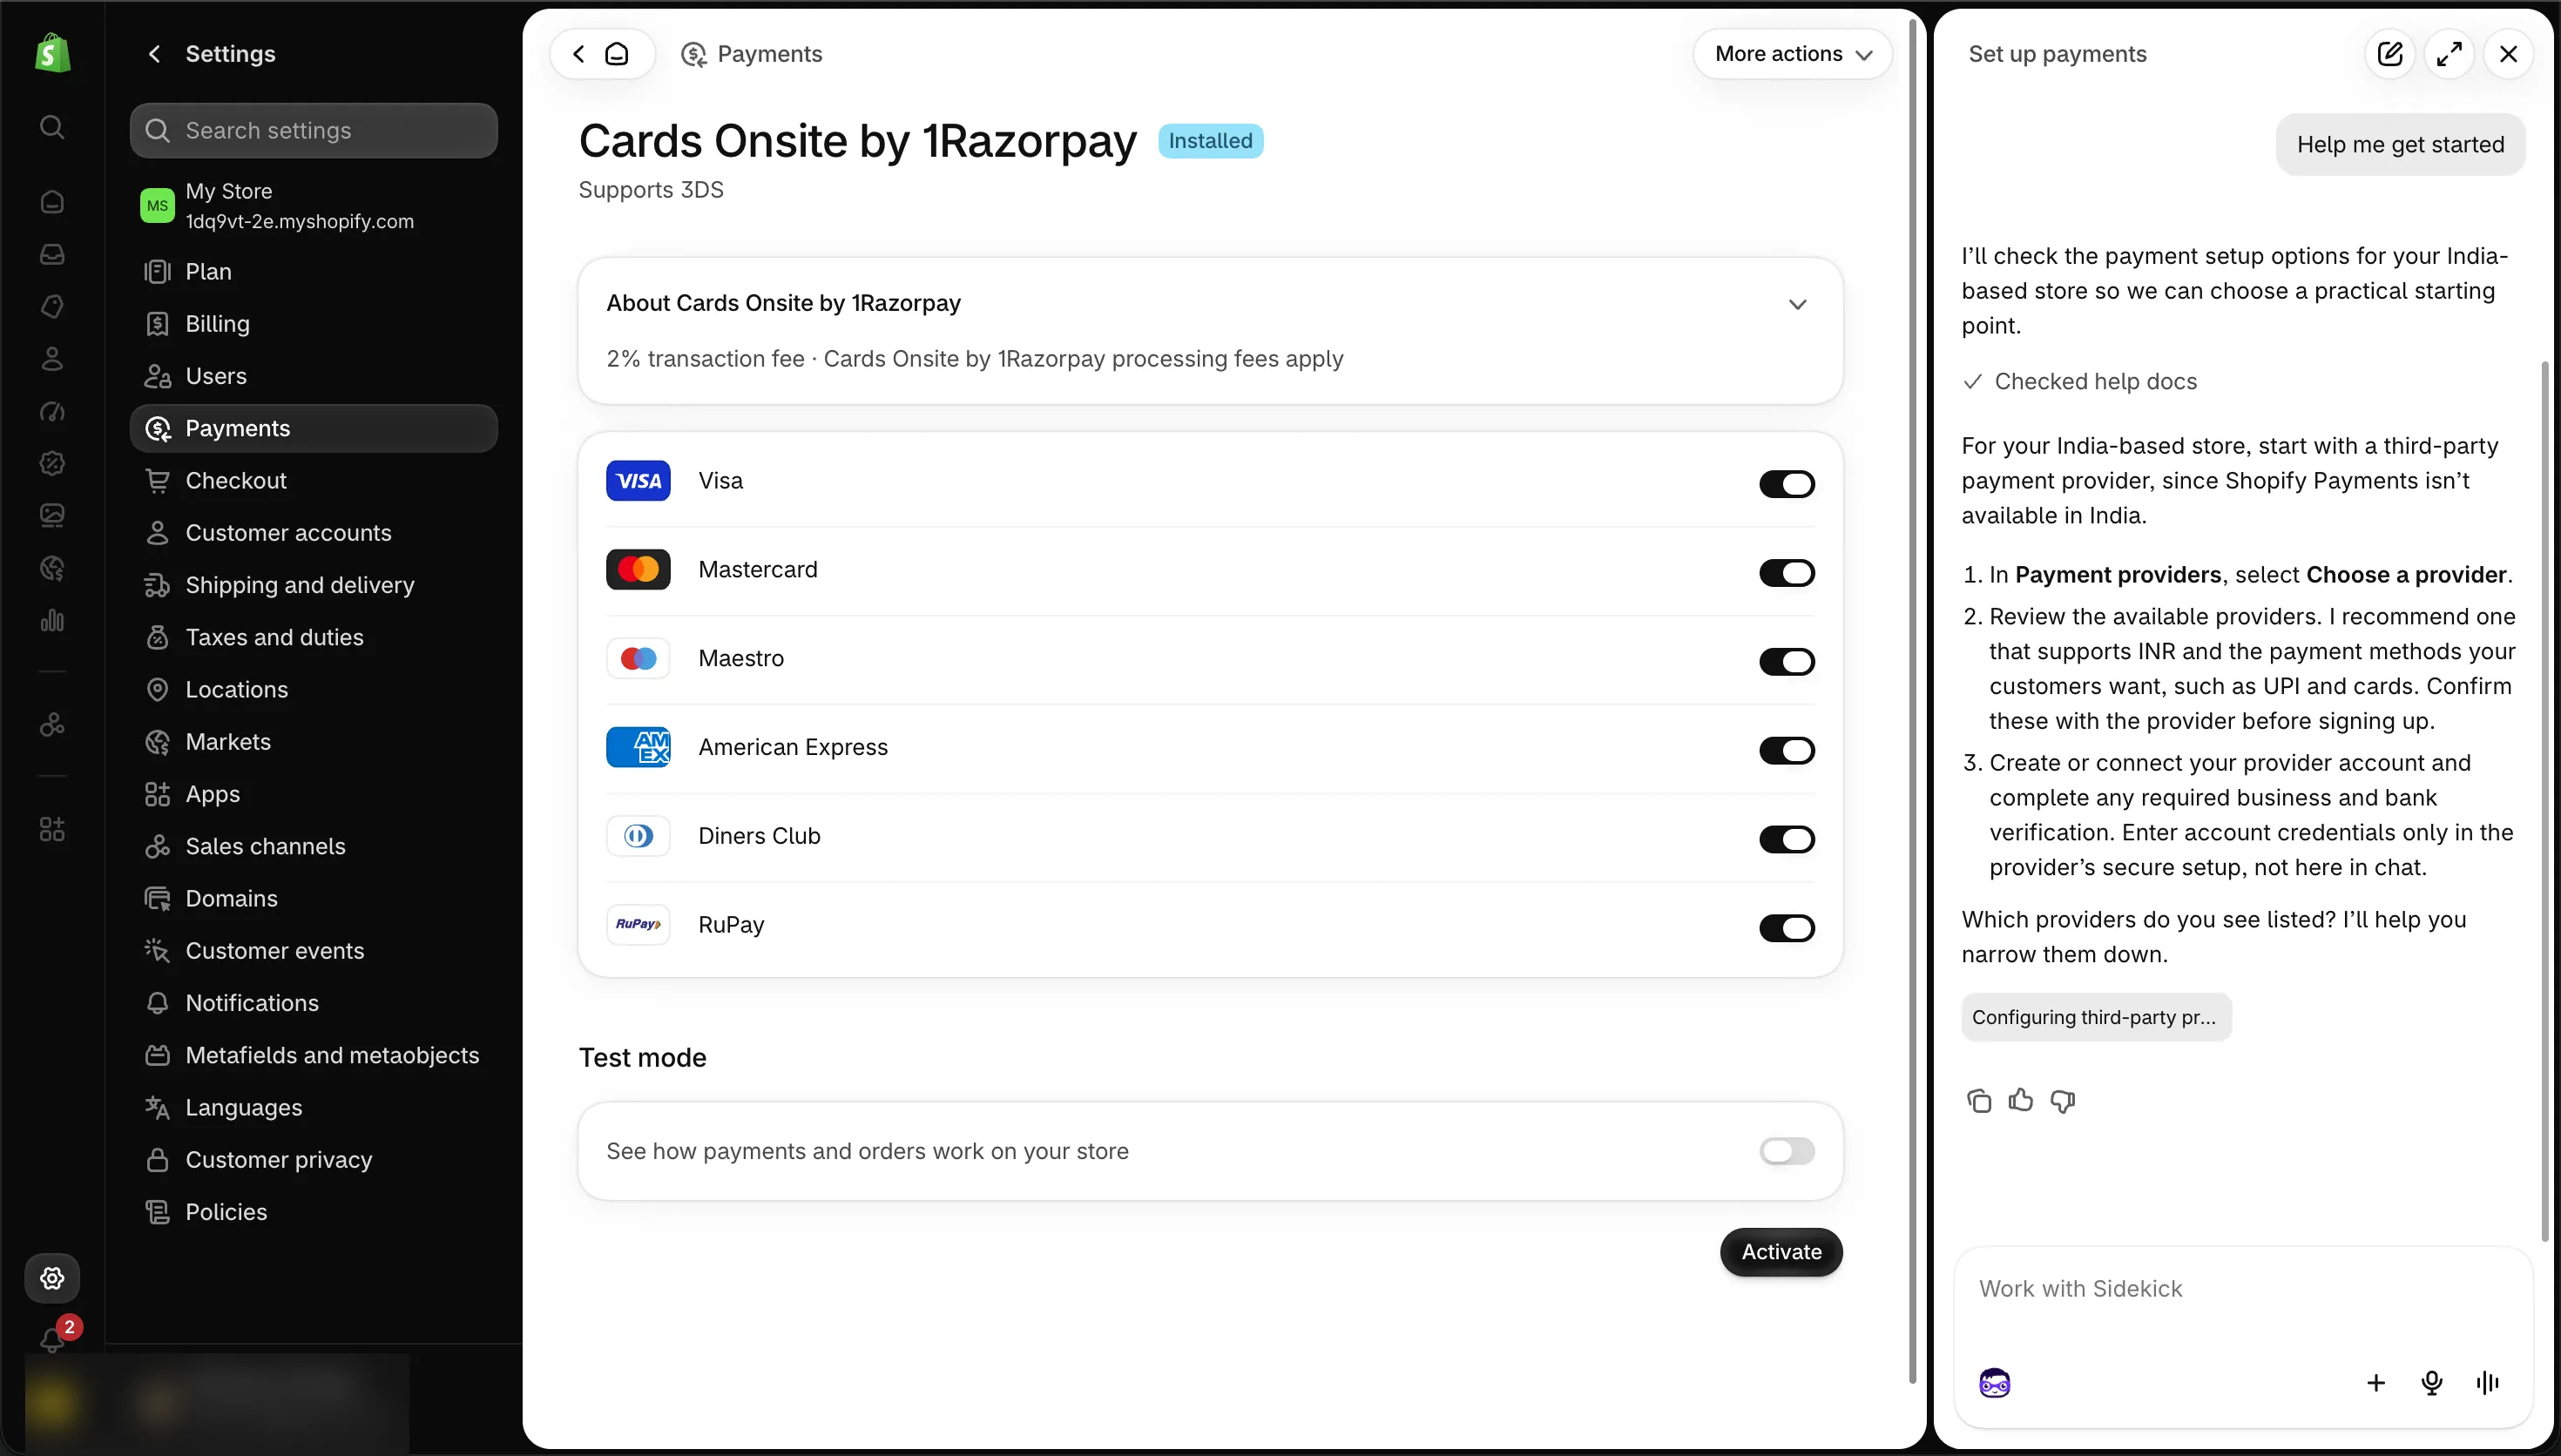
6Back in Shopify: Settings, then PaymentsYour provider now shows up here.
7Check the provider says InstalledIf it does not, open Razorpay's page again and finish the onboarding.
8Turn on the card networks you want to acceptVisa, Mastercard and RuPay cover most Indian cards. Check with your provider which other methods, such as UPI, it supports.
9Turn Test mode on while you practiseYou can place orders without real money and see the whole checkout work.
10Press ActivateRemember to switch test mode off before real ads go live.
Why it mattersA store that cannot take money cannot be tested. Test mode lets you run one full order end to end before any ad spends a rupee.
ChatGPT laneFill the [brackets], paste into ChatGPT
Step 5Products → Add product
Add your first product the way a buyer reads it
1 / 10
Use ← → keys
1of 10
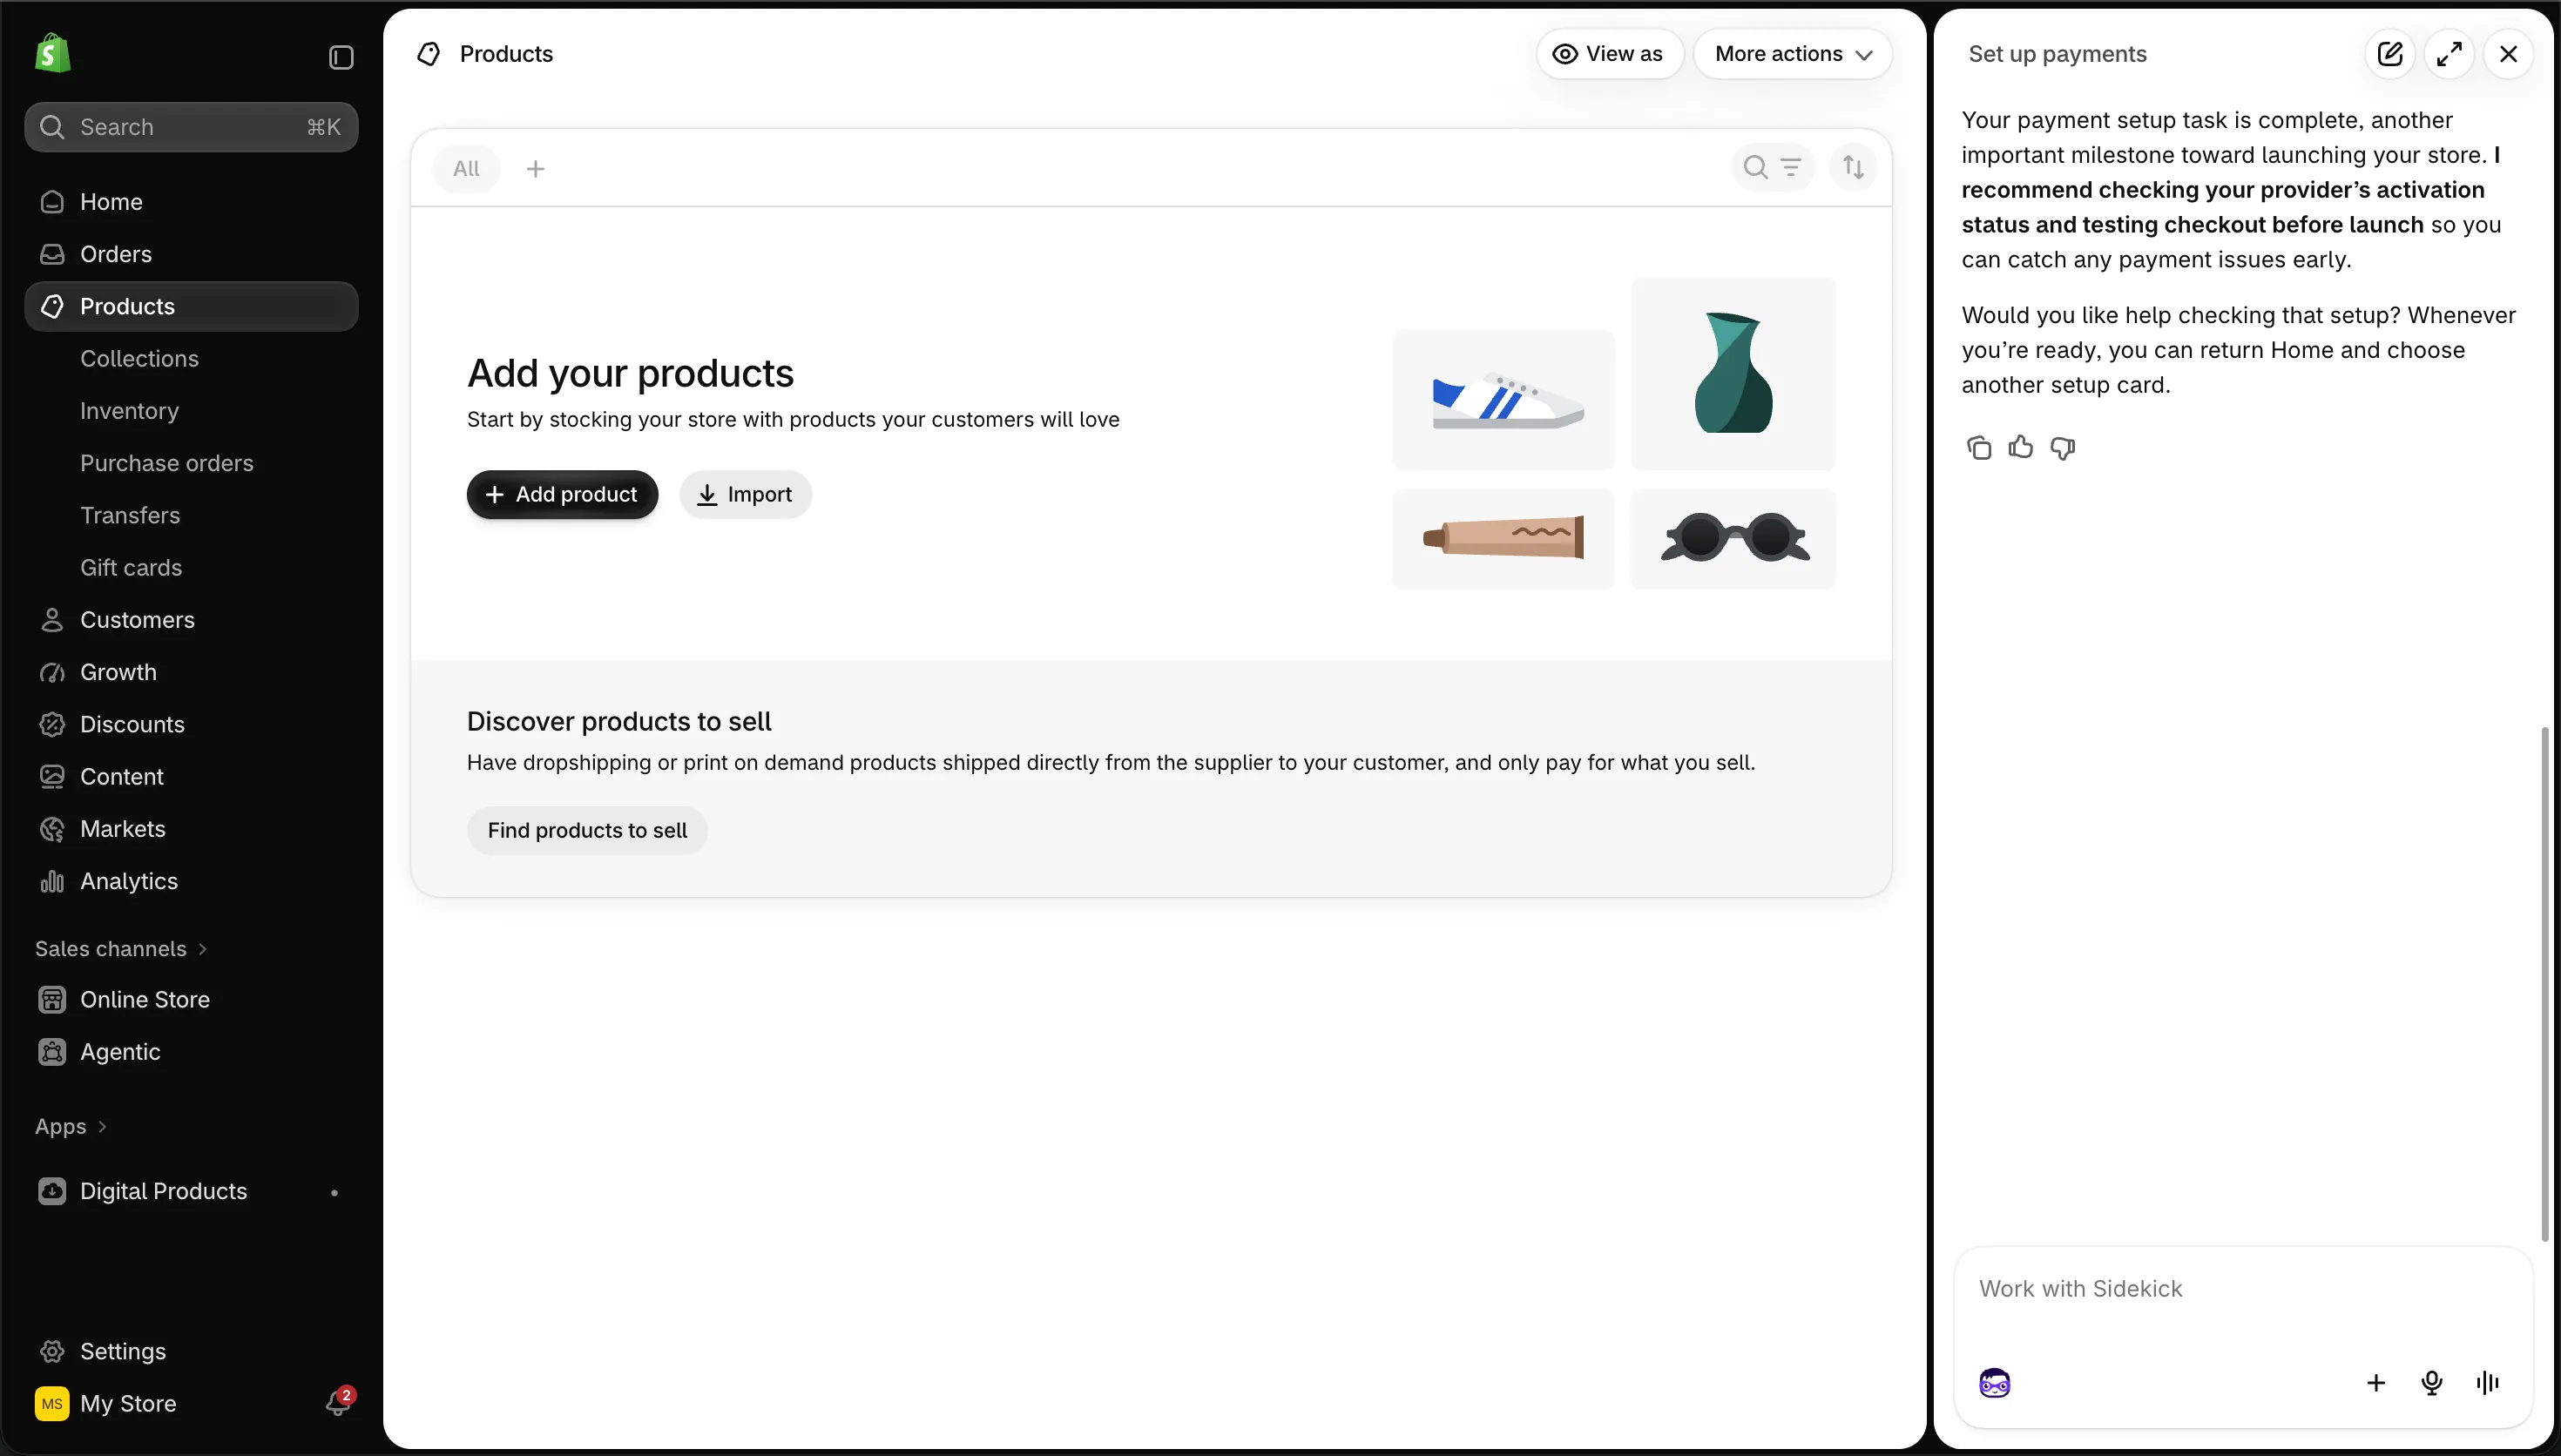
1Click Products in the sidebarEvery product, collection and stock count lives under it.
2Open Products, then press Add productOn an empty store the button sits in the middle of the page.
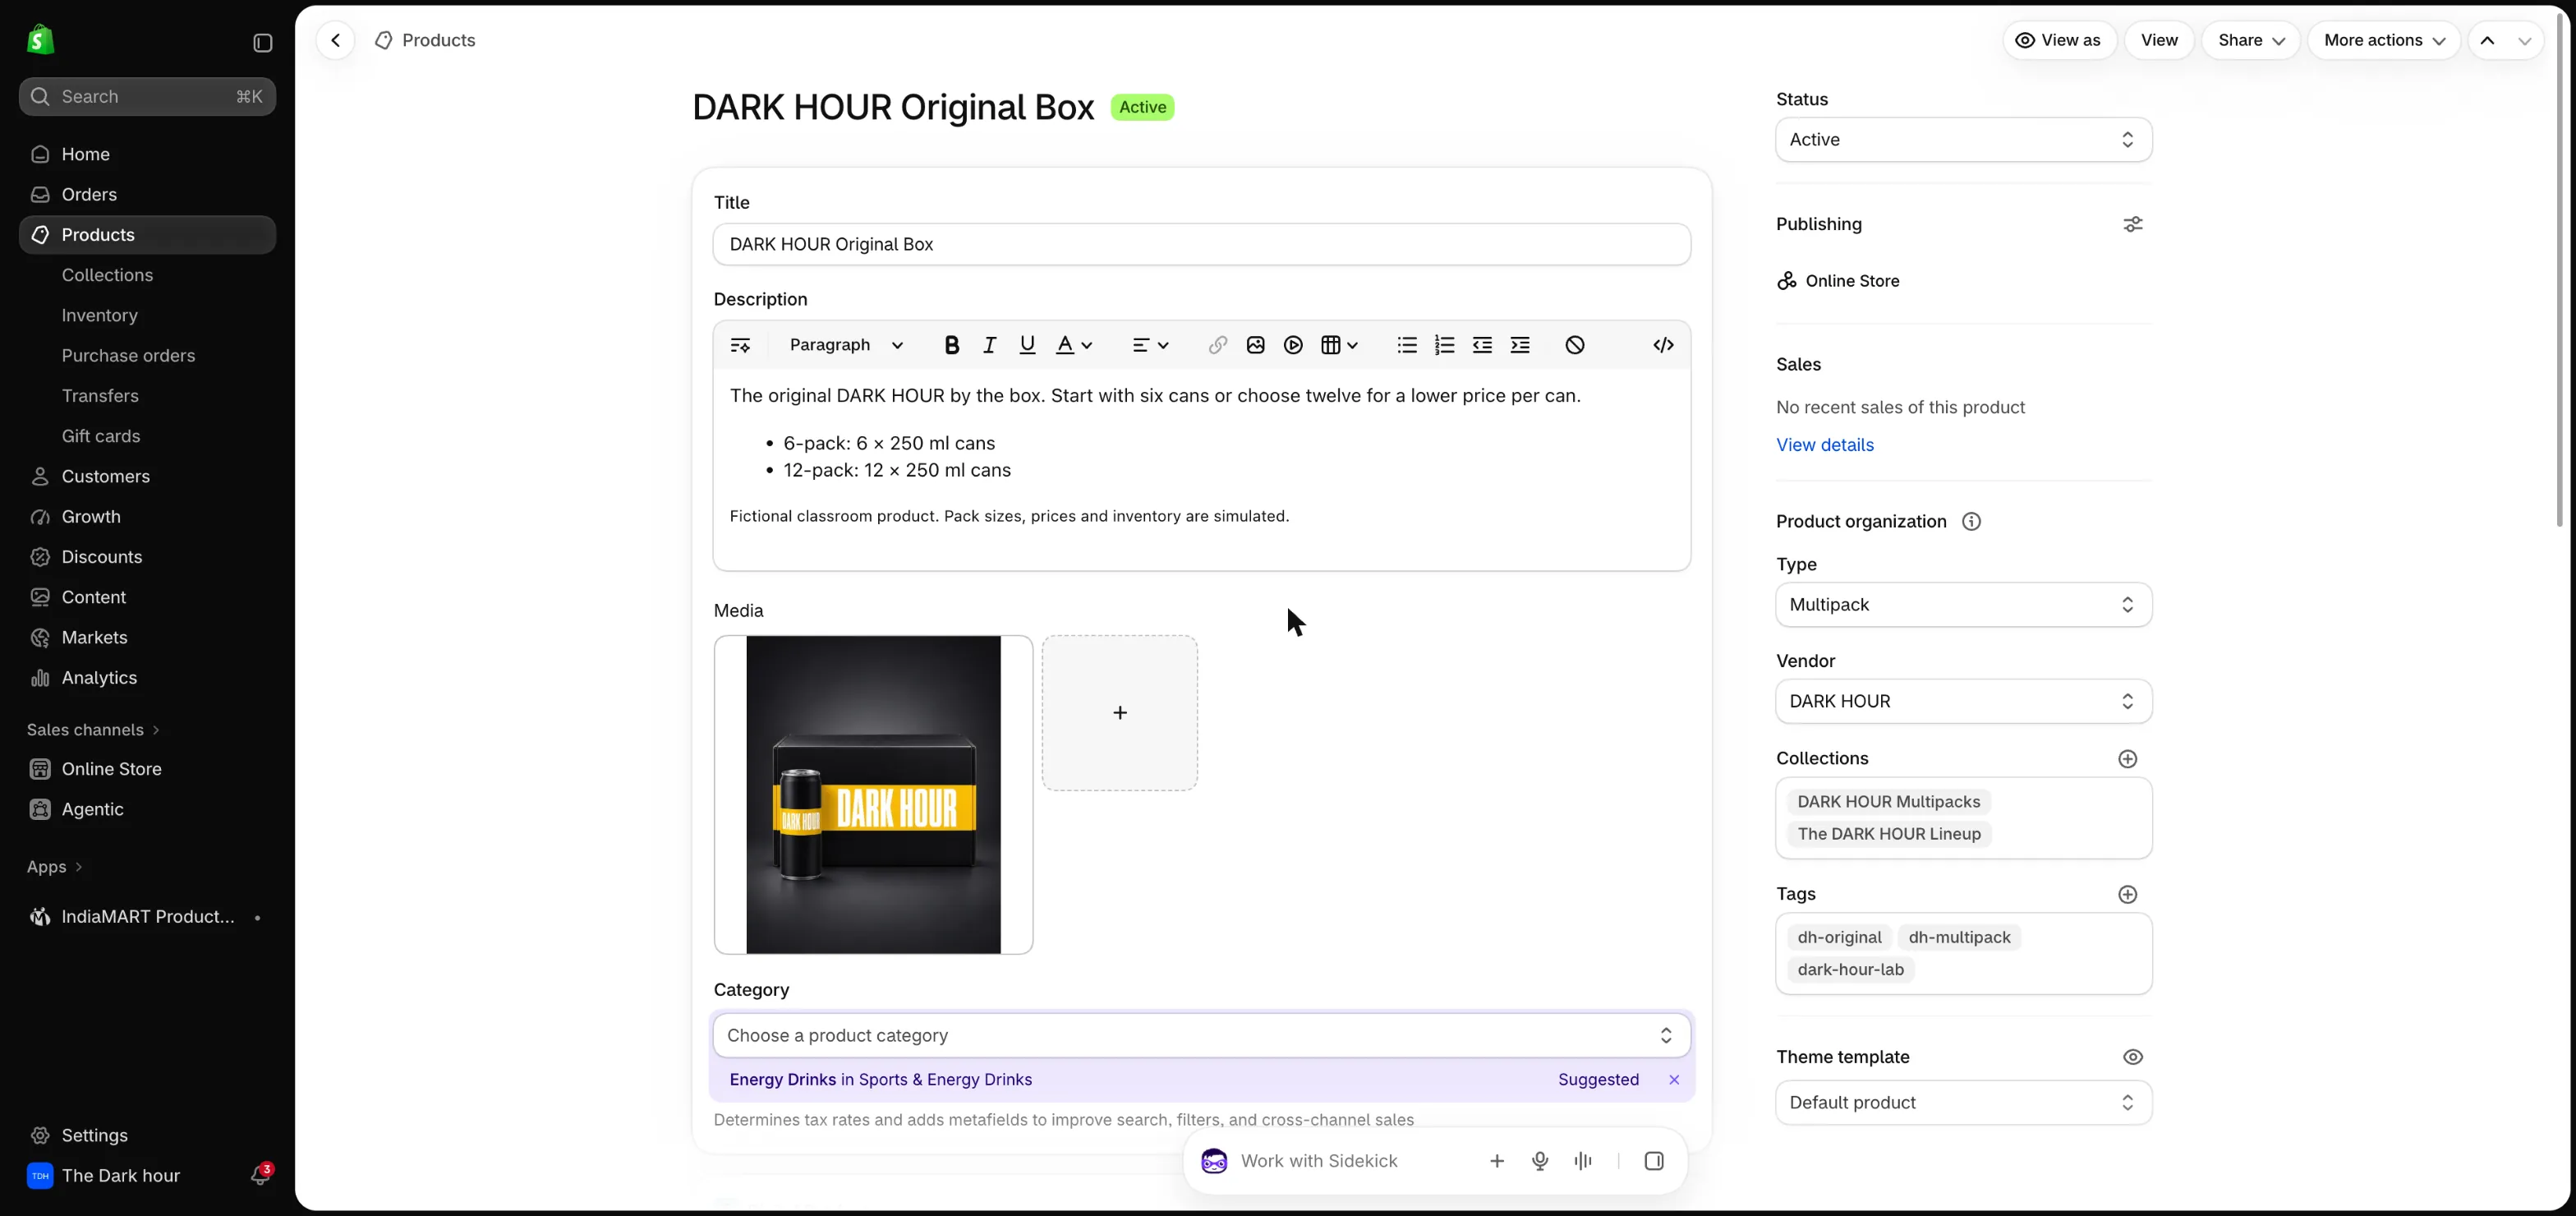
3Write a title a buyer would search forProduct name, key detail and pack size. "DARK HOUR Original Box" tells a buyer exactly what lands at the door.
4Write the description for one buyerWhat it is, why it is better, what is in the box and how fast it arrives. Short lines and bullets read best on a phone.
5Upload 4 to 6 photosThe first photo appears in collections and in catalogue ads, so make it the cleanest one.
6Choose a product categoryIt sets tax rules and helps search and filters. Accept Shopify's suggestion if it fits.
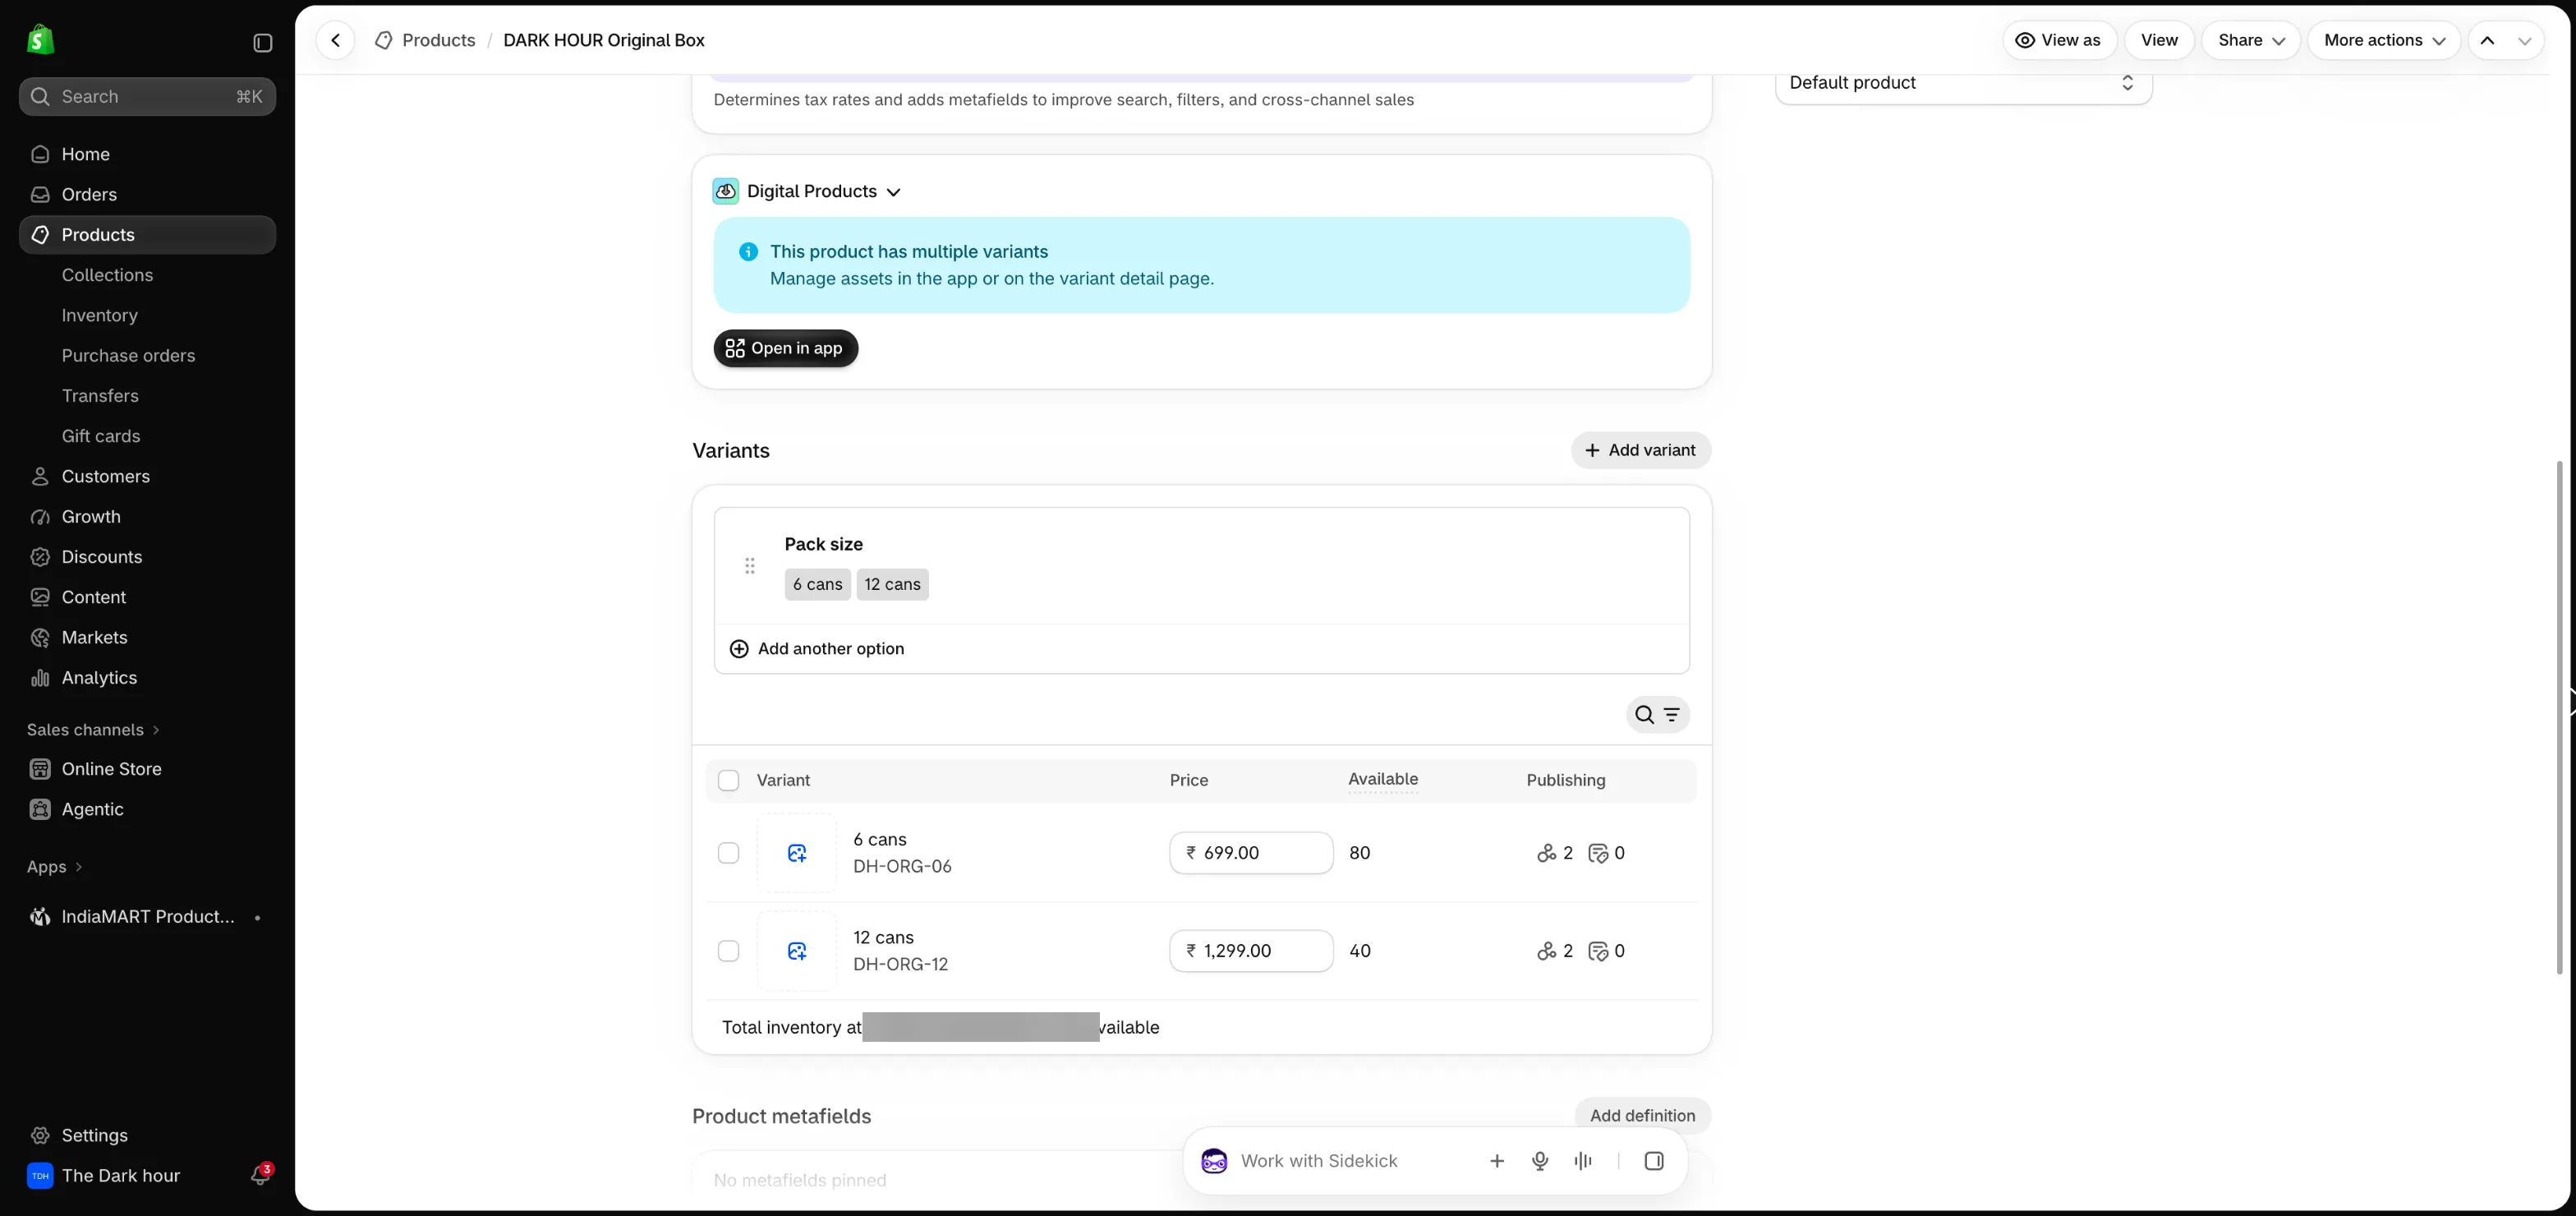
7Add an option such as Pack sizeEach value, 6 cans and 12 cans, becomes its own variant with its own price and stock.
8Set a price and stock for every variantDark Hour sells 6 cans at ₹699 and 12 cans at ₹1,299, so the bigger box is cheaper per can. Use Compare-at only when the MRP is real.
9Add the product to a collectionCollections feed the product grids on your homepage. Without one, the product hides.
10Status: keep it on Draft until the store is readyActive means buyers can see it. The demo product is Active. Switch yours only after policies and payments are done.
Why it mattersThe product page is where Ira lost 95 of every 100 visitors in Session 2. Photos, a clear price and a delivery promise decide whether a click becomes a cart.
ChatGPT laneFill the [brackets], paste into ChatGPT
Step 6OptionalProducts → Inventory → Import
Load stock in bulk with a CSV when you have many SKUs
1 / 7
Use ← → keys
1of 7
1Open Products, then InventoryStock counts for every variant live here.
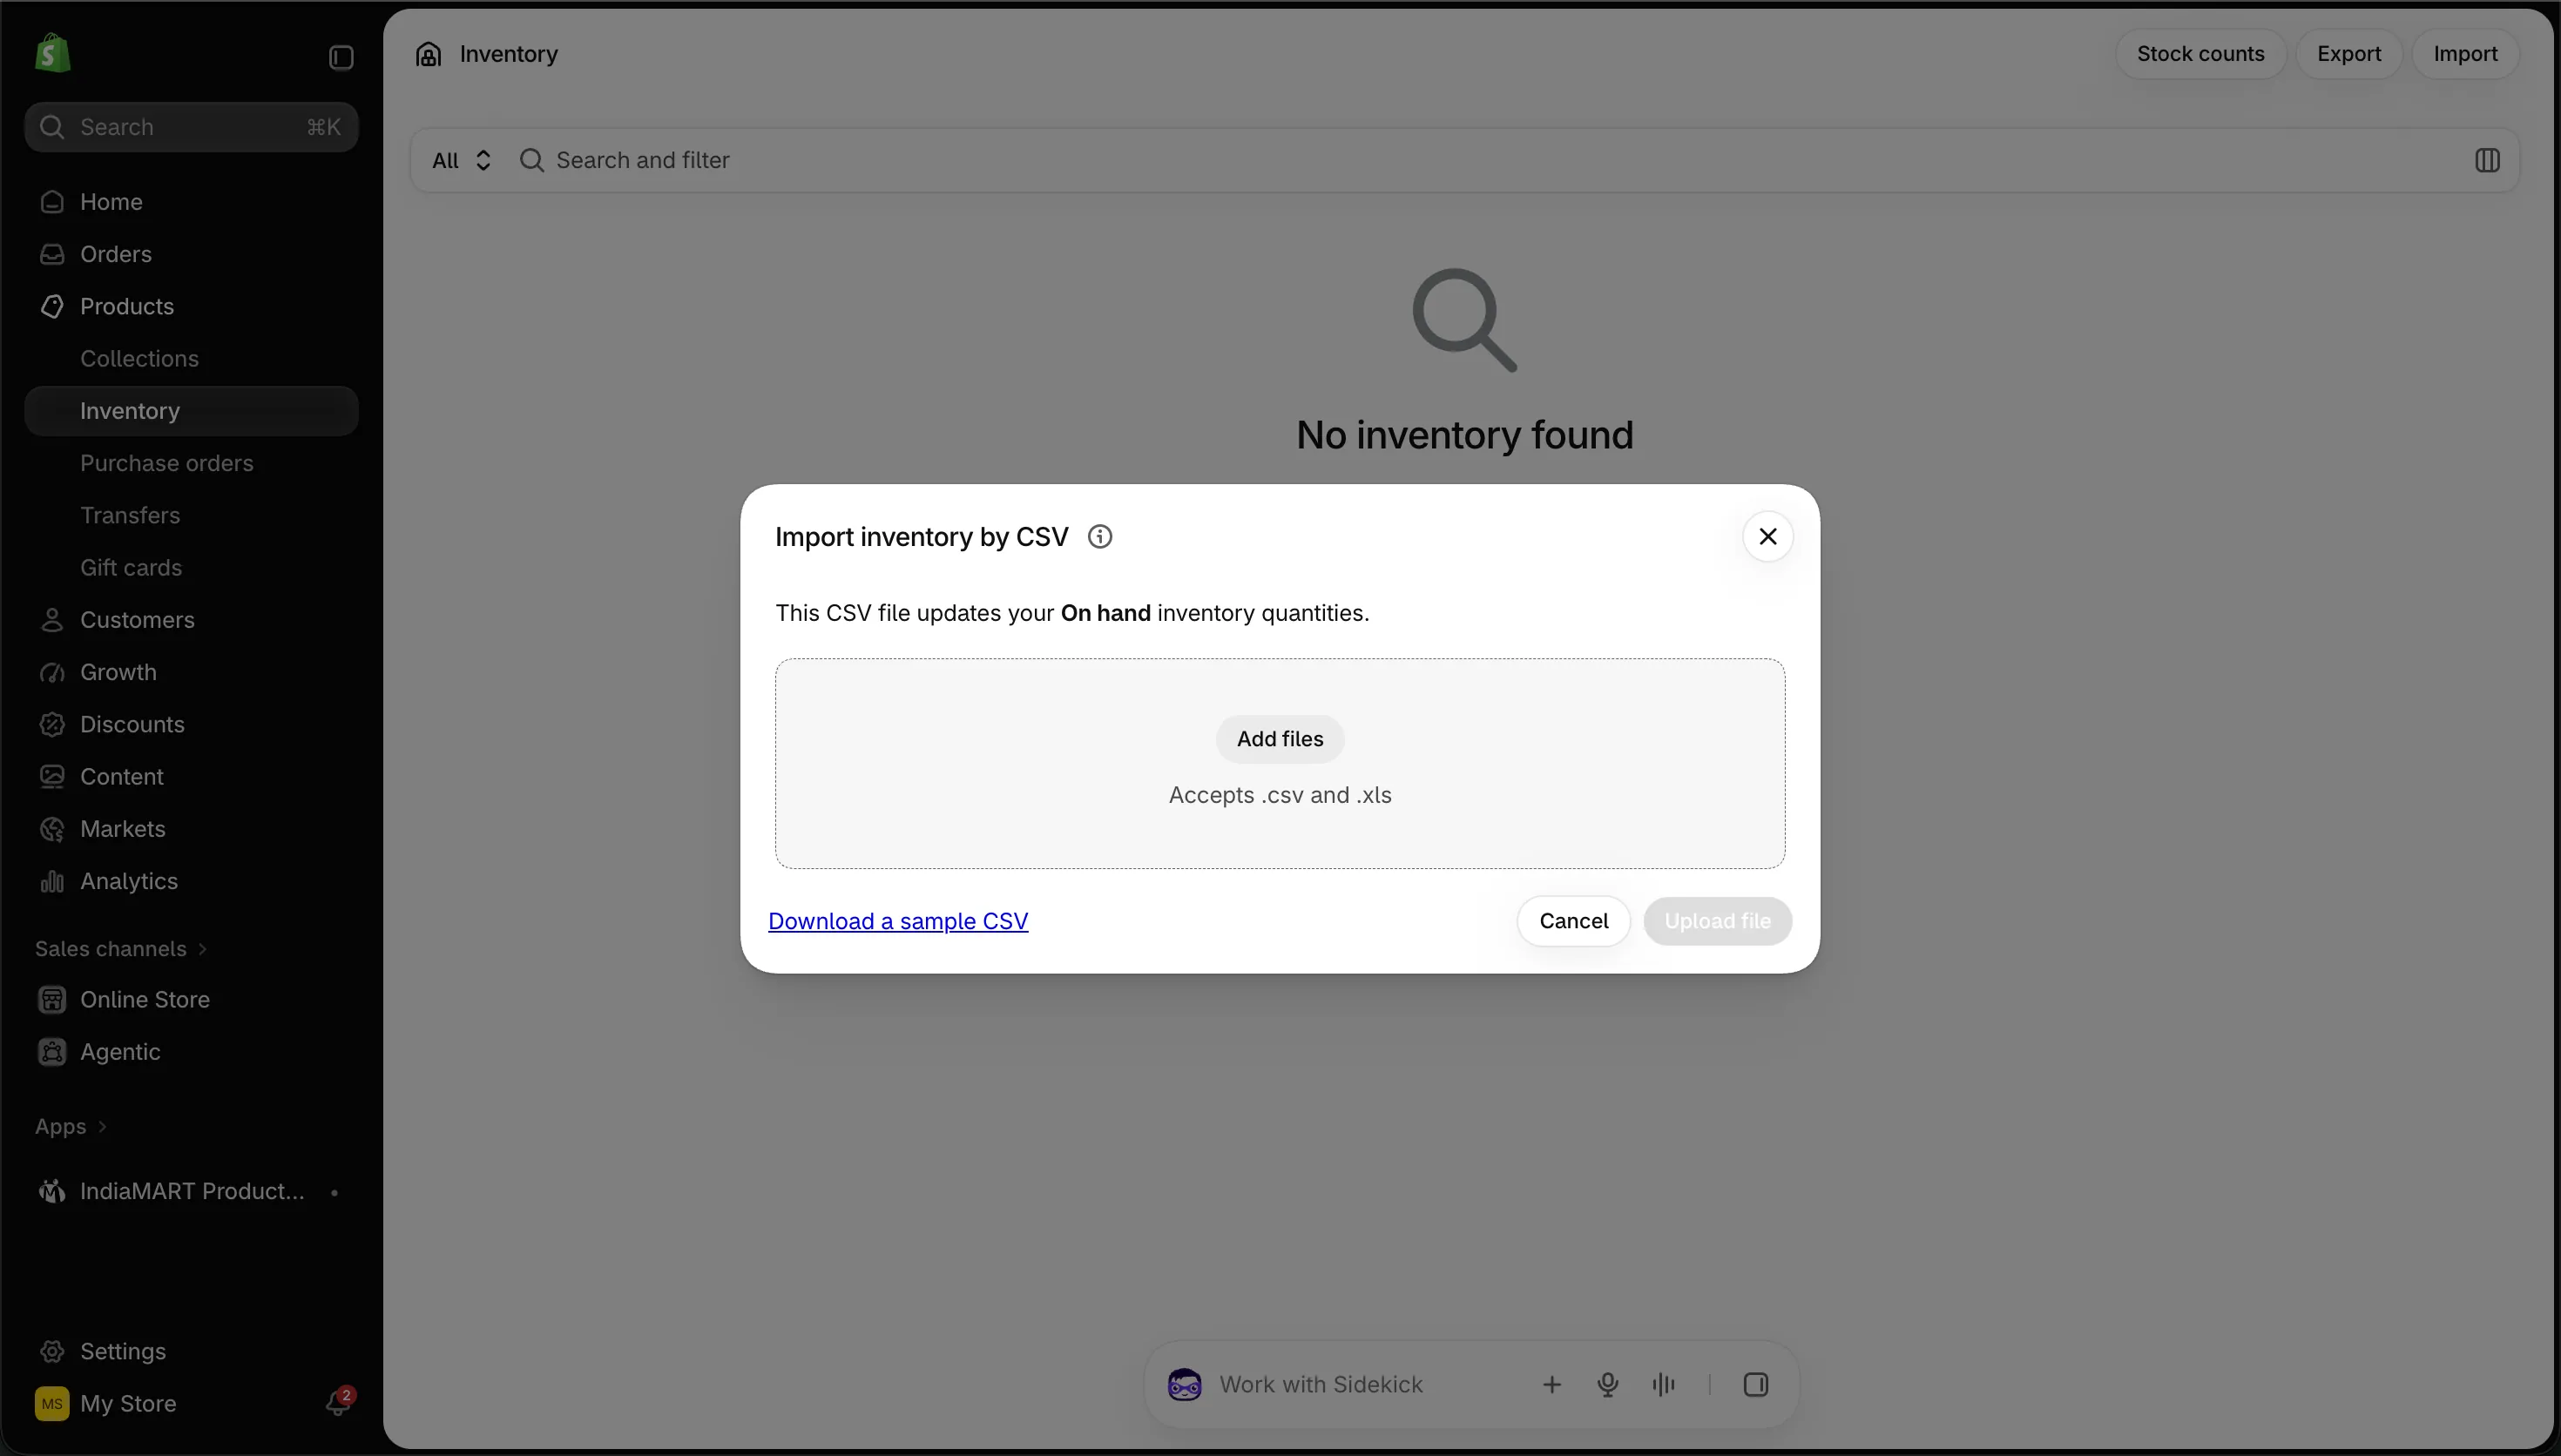
2Press ImportA window opens for your CSV file.
3Download a sample CSV firstYour columns then match Shopify's exactly, so the upload does not fail.
4Fill it in, then add the file hereShopify accepts .csv and .xls files.
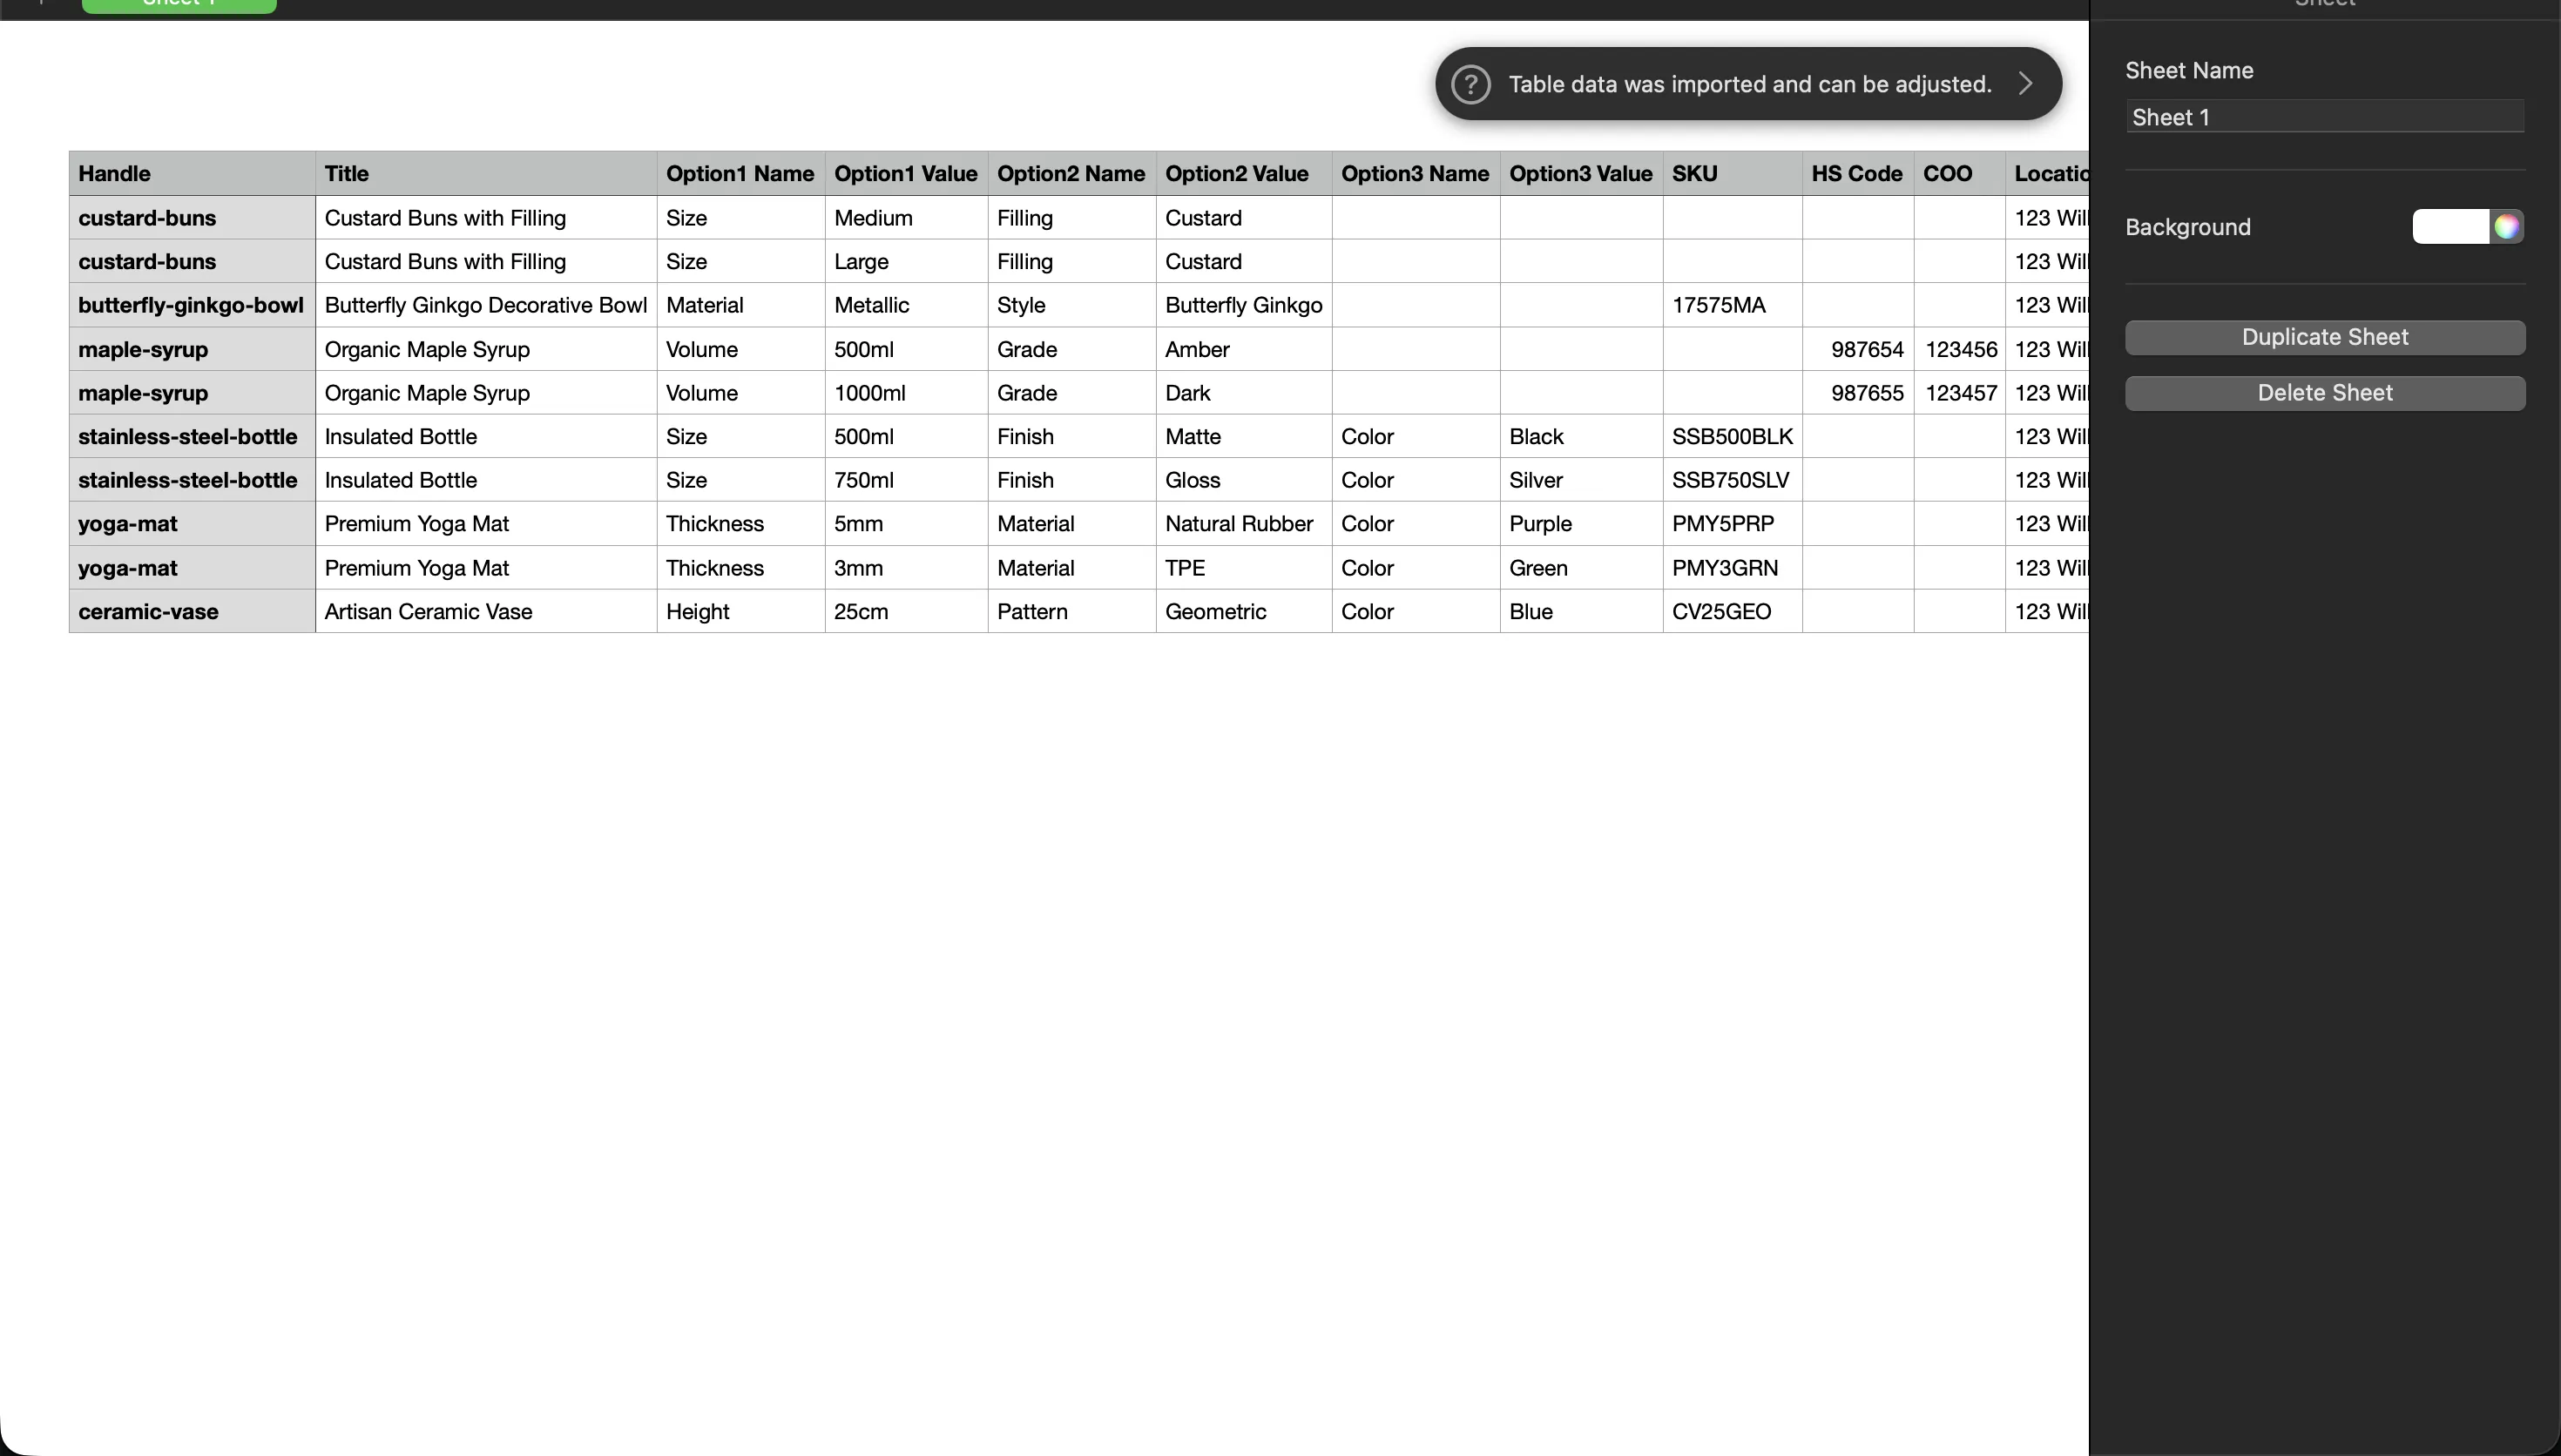
5Each column is one field Shopify readsHandle, title, option names and values, SKU and stock. Keep the header row exactly as downloaded.
6Each row is one variantRows with the same handle belong to one product: here a medium and a large custard bun.
7Give every variant a unique SKUThe SKU is how you, your courier and your supplier tell packs apart.
Why it mattersIf you ordered 100 to 200 units, your stock count must be right. Otherwise an ad can sell units you do not have.
ChatGPT laneFill the [brackets], paste into ChatGPT
Step 7OptionalShopify App Store → IndiaMART Product Sourcing
Still sourcing? Compare suppliers without leaving Shopify
1 / 12
Use ← → keys
1of 12
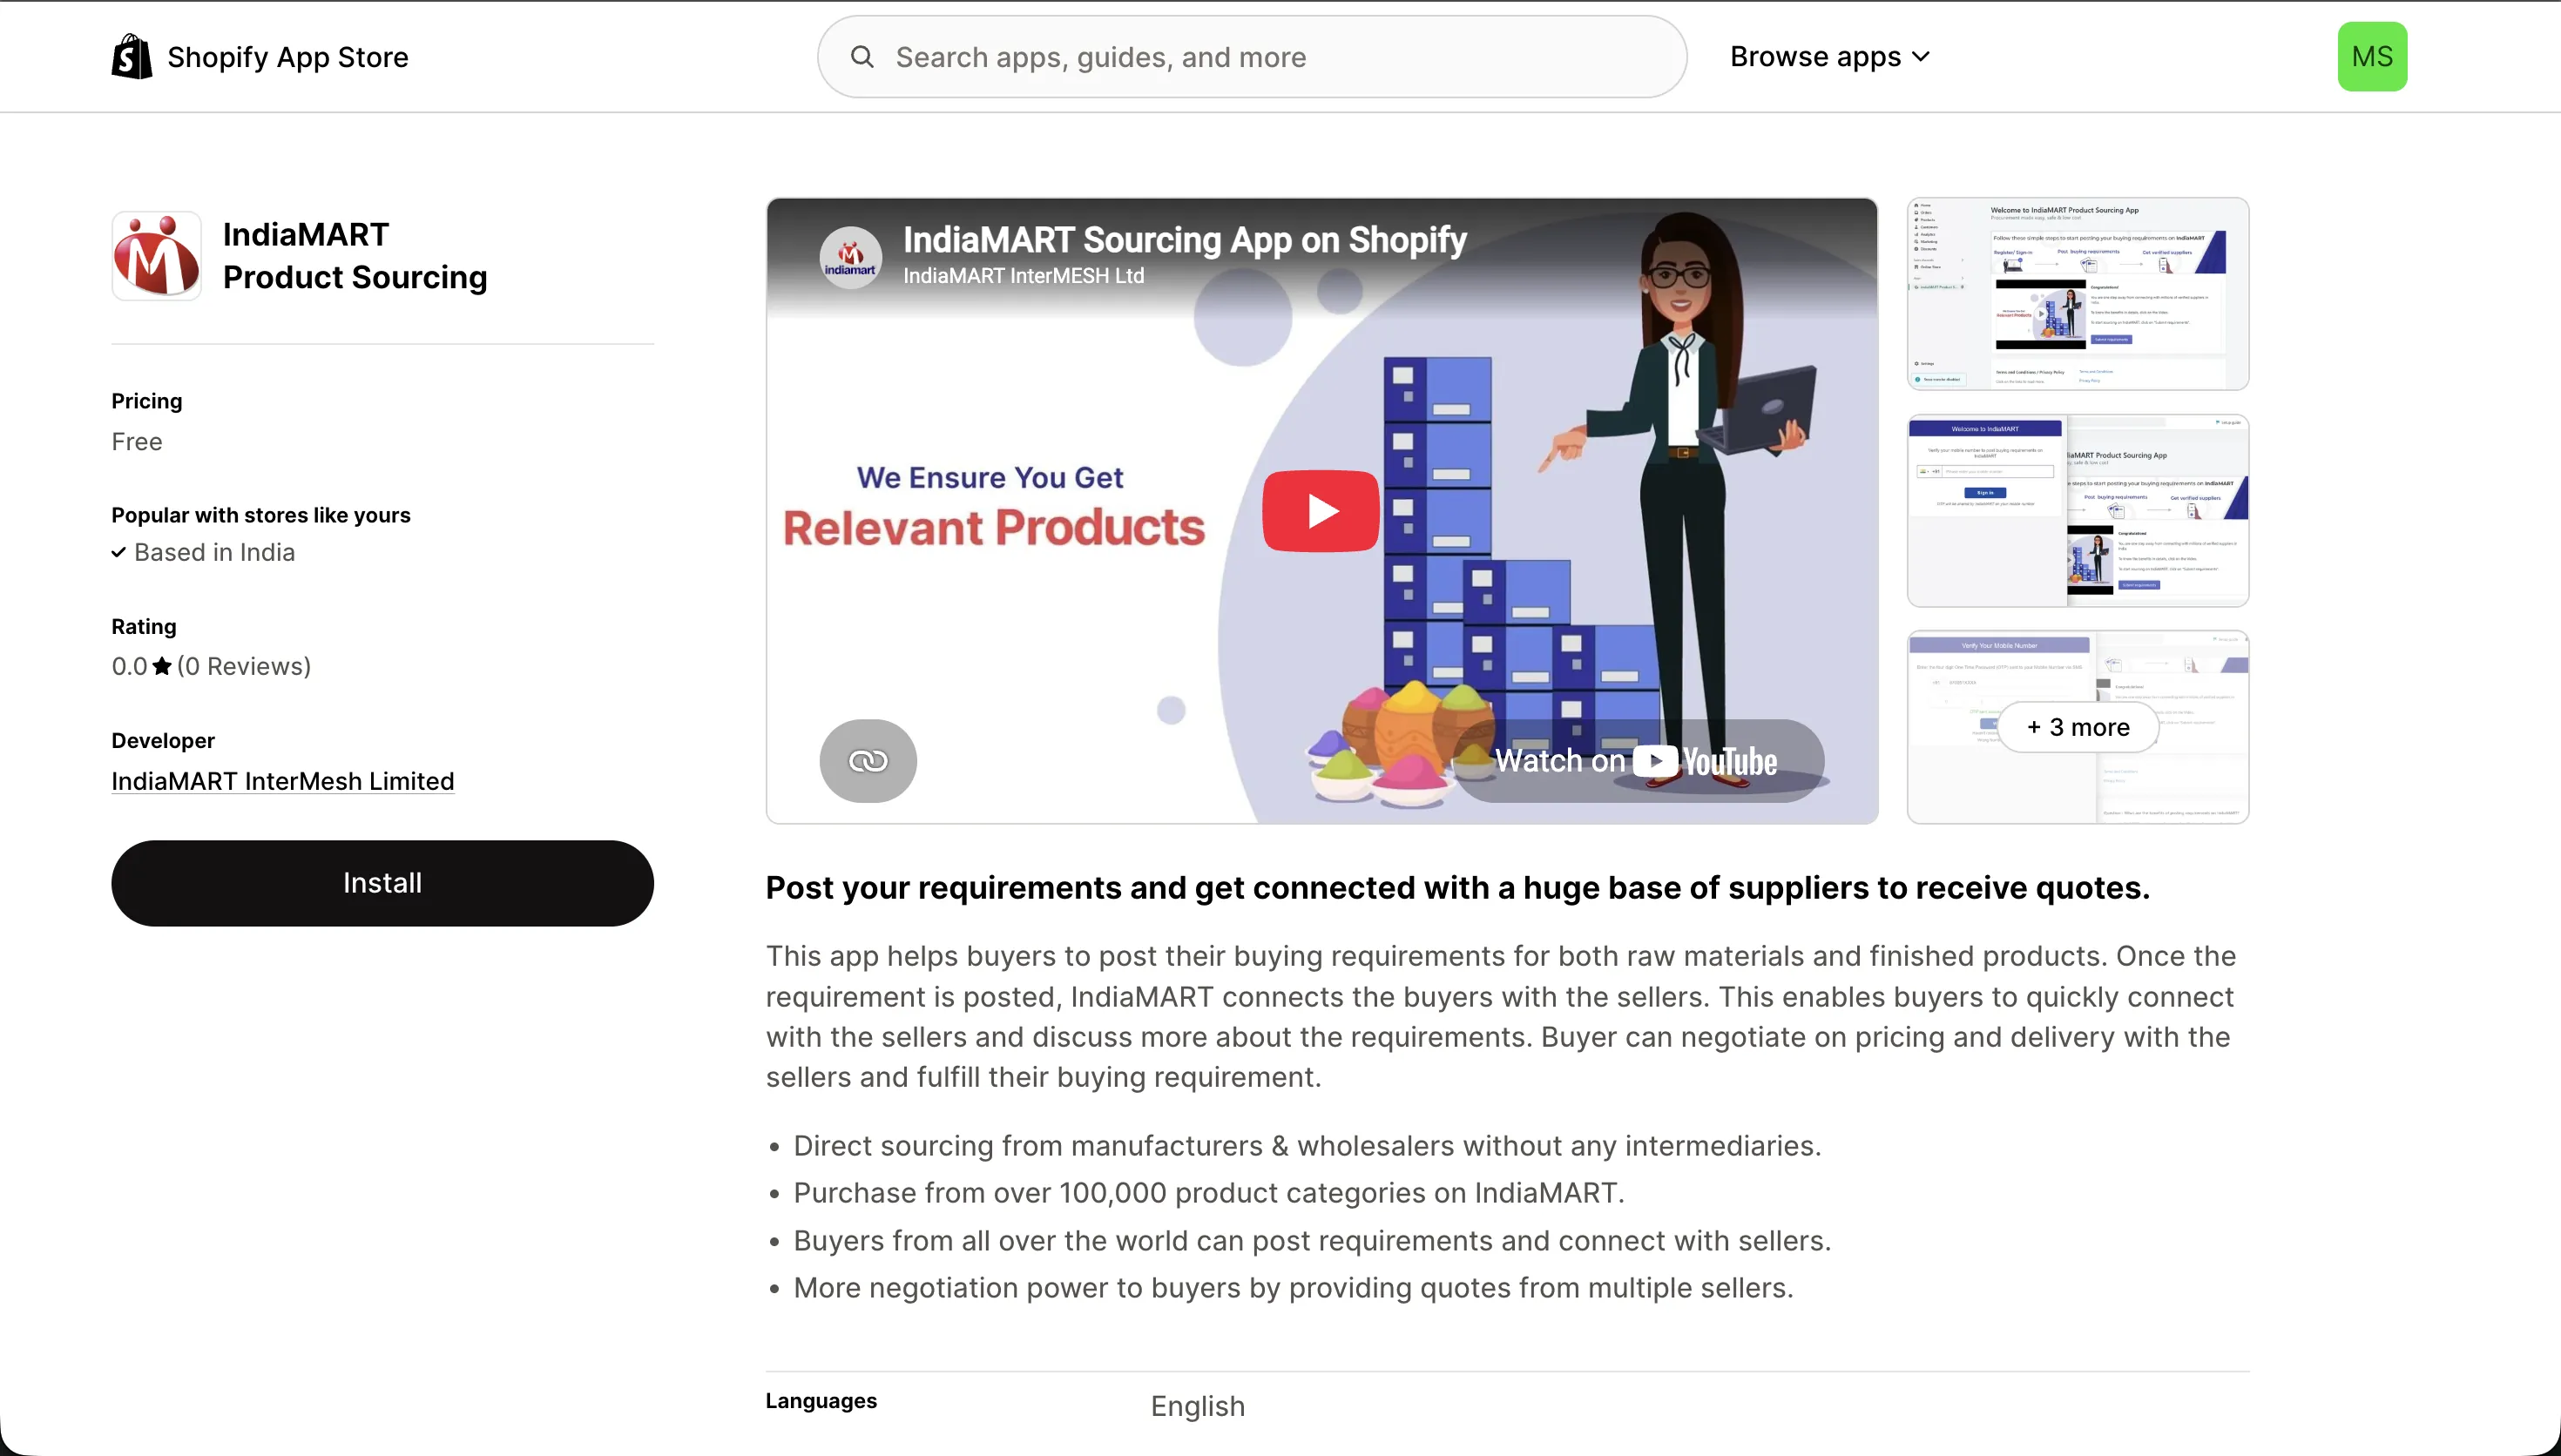
1Find IndiaMART Product Sourcing in the Shopify App StoreSearch the App Store from Apps in your admin.
2Read what it doesYou post a requirement and suppliers send you quotes, inside Shopify.
3Check the developerIndiaMART InterMesh Limited is the real company. Copycat apps exist for most big names.
4Press InstallApprove the access it asks for, then open it from Apps in your sidebar.
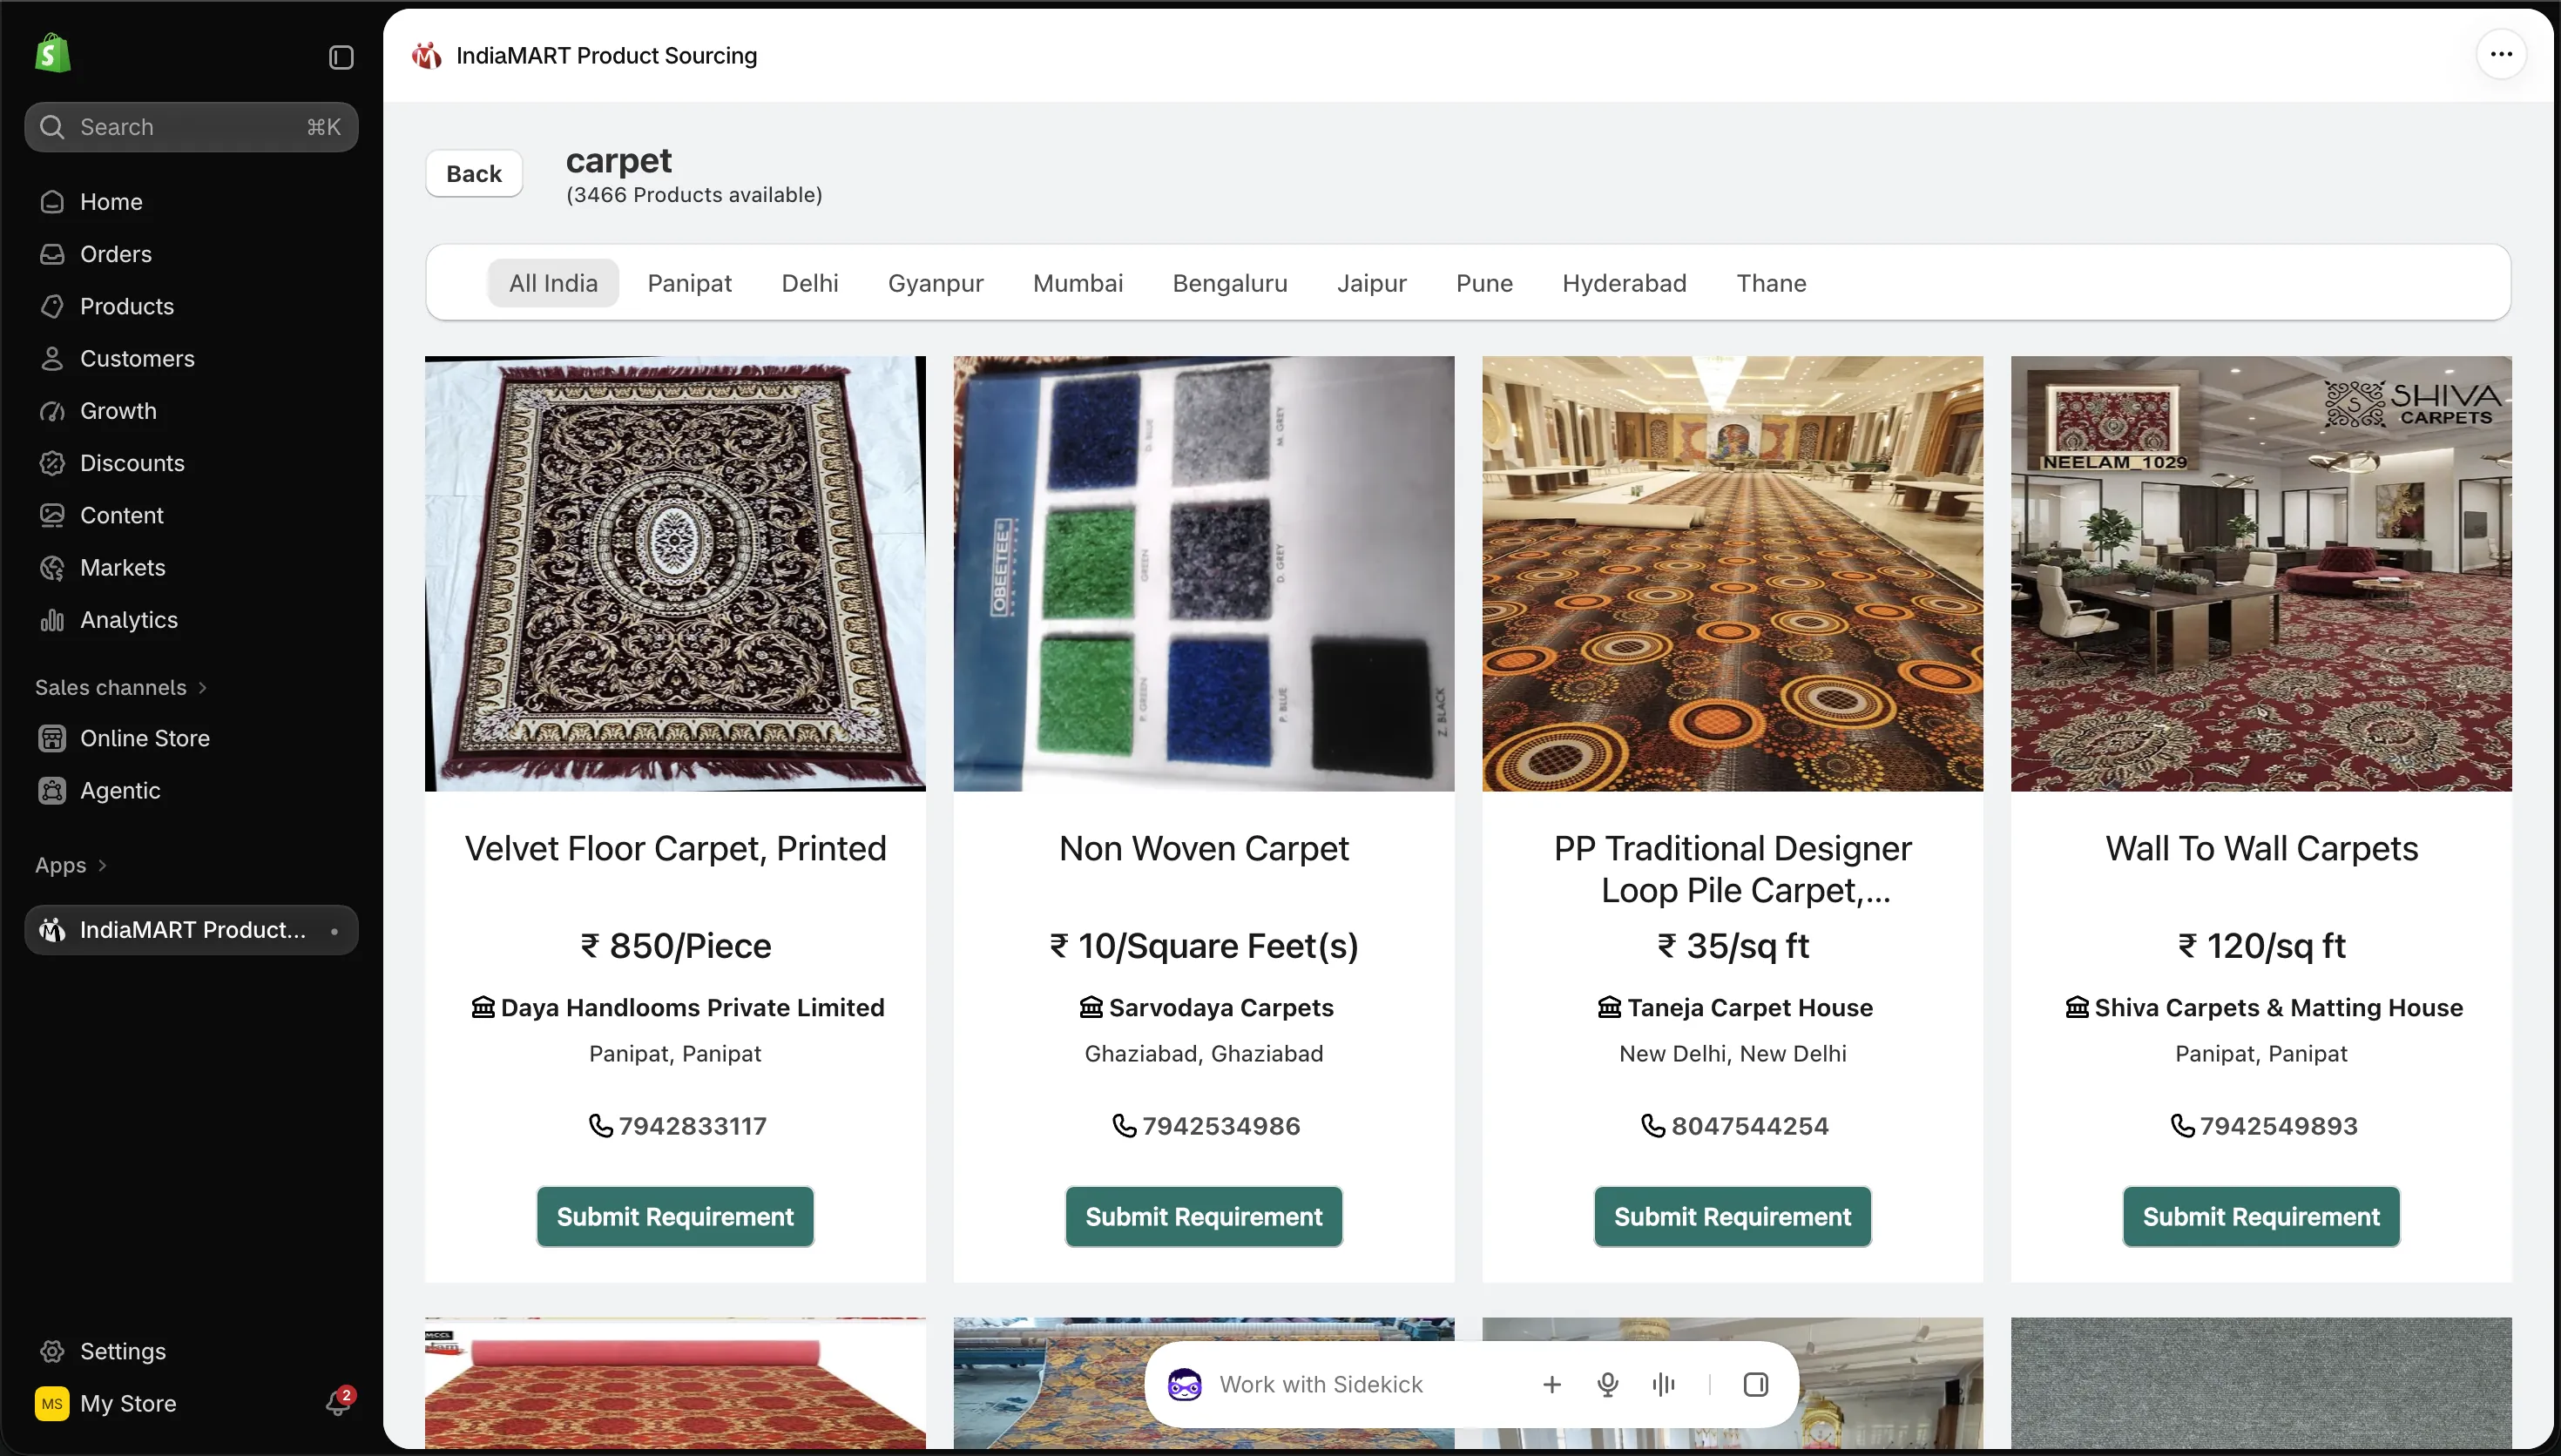
5Open the app from your sidebarInstalled apps appear under Apps, just above Settings.
6Search the product you want to sourceA common word gives the most suppliers. Here, "carpet" returns 3,466 listings.
7Filter by cityA supplier close to you means cheaper inbound courier and faster restocks.
8Compare price, unit and city on every cardWatch the unit: ₹850 a piece and ₹35 a square foot are not comparable until you convert them.
9Press Submit RequirementYou ask for a quote instead of buying at the listed price.
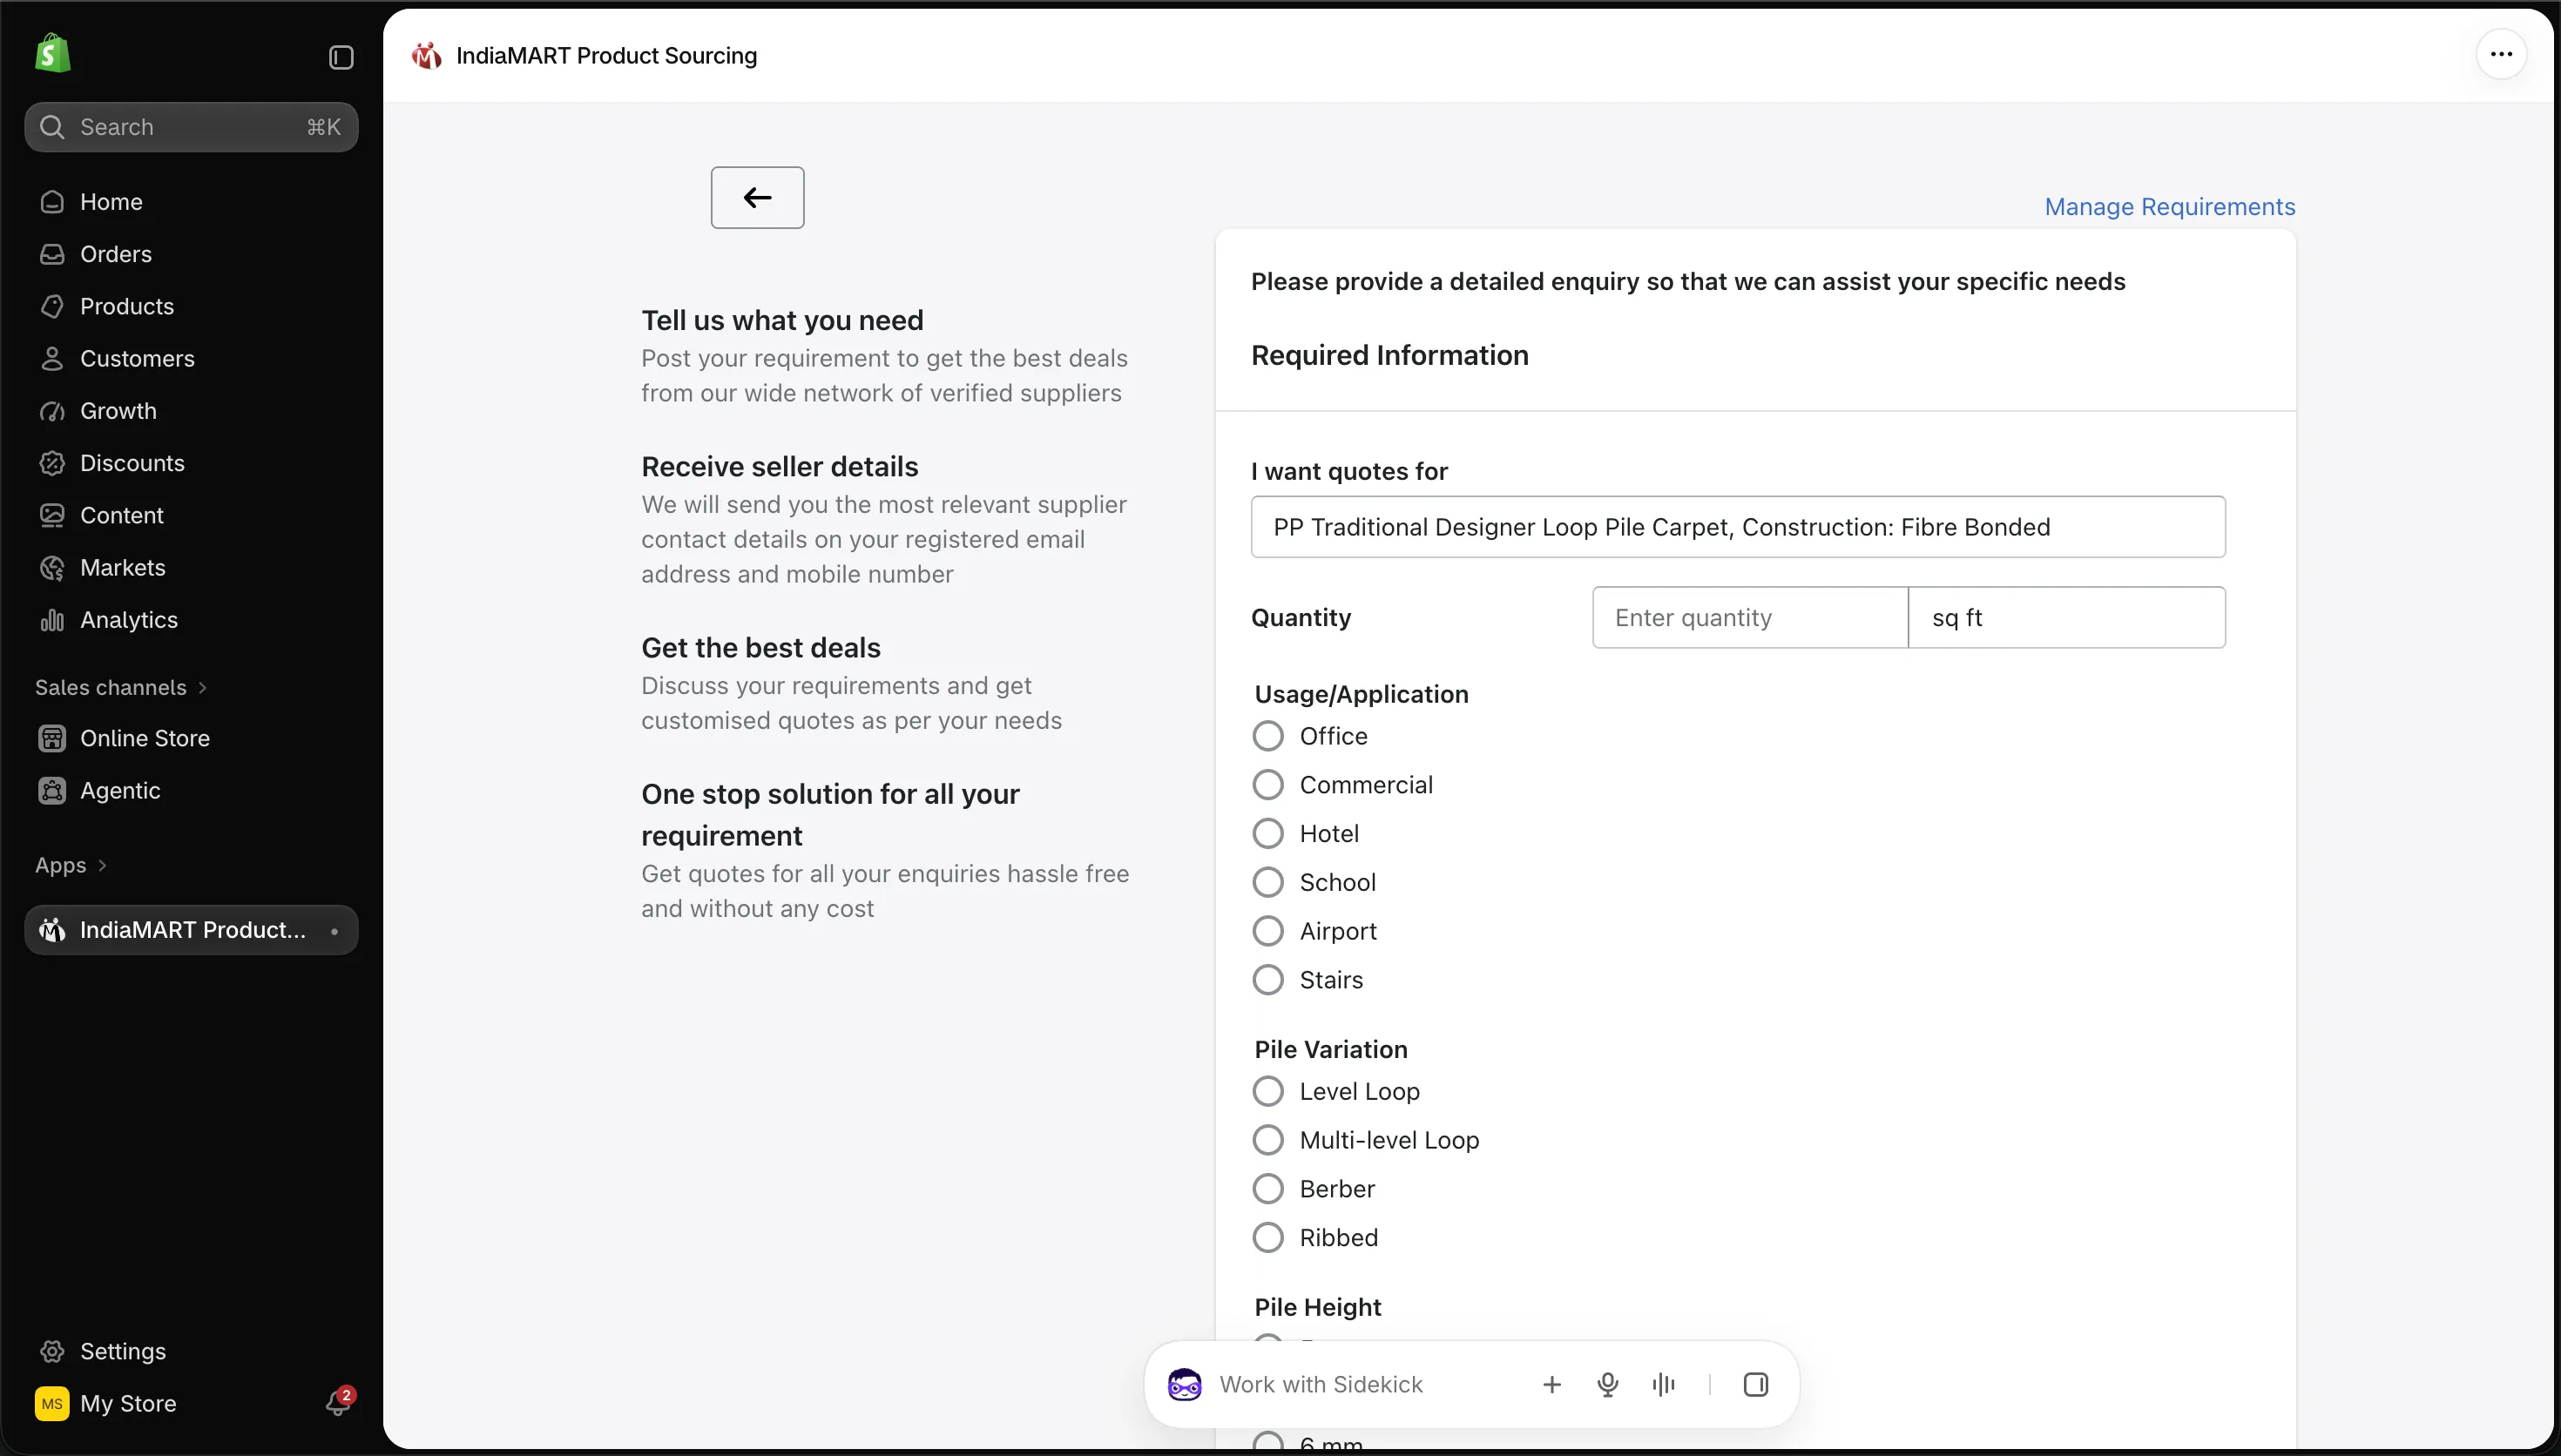
10Say exactly what you want quotedMaterial, size and finish. A vague request gets a vague price.
11Enter the quantity you will really buyYour first stock of 100 to 200 units. Suppliers price by quantity.
12Answer the product questionsThese change by category. Then submit, and compare the quotes that come back.
Why it mattersYour landed cost per unit sets your break-even cost per order from Session 3. Twenty rupees per unit changes how much you can afford to pay Meta for each sale.
ChatGPT laneFill the [brackets], paste into ChatGPT
Step 8ChatGPT → Plugins → Shopify
The ChatGPT lane: connect your store to ChatGPT in seven clicks
1 / 11
Use ← → keys
1of 11
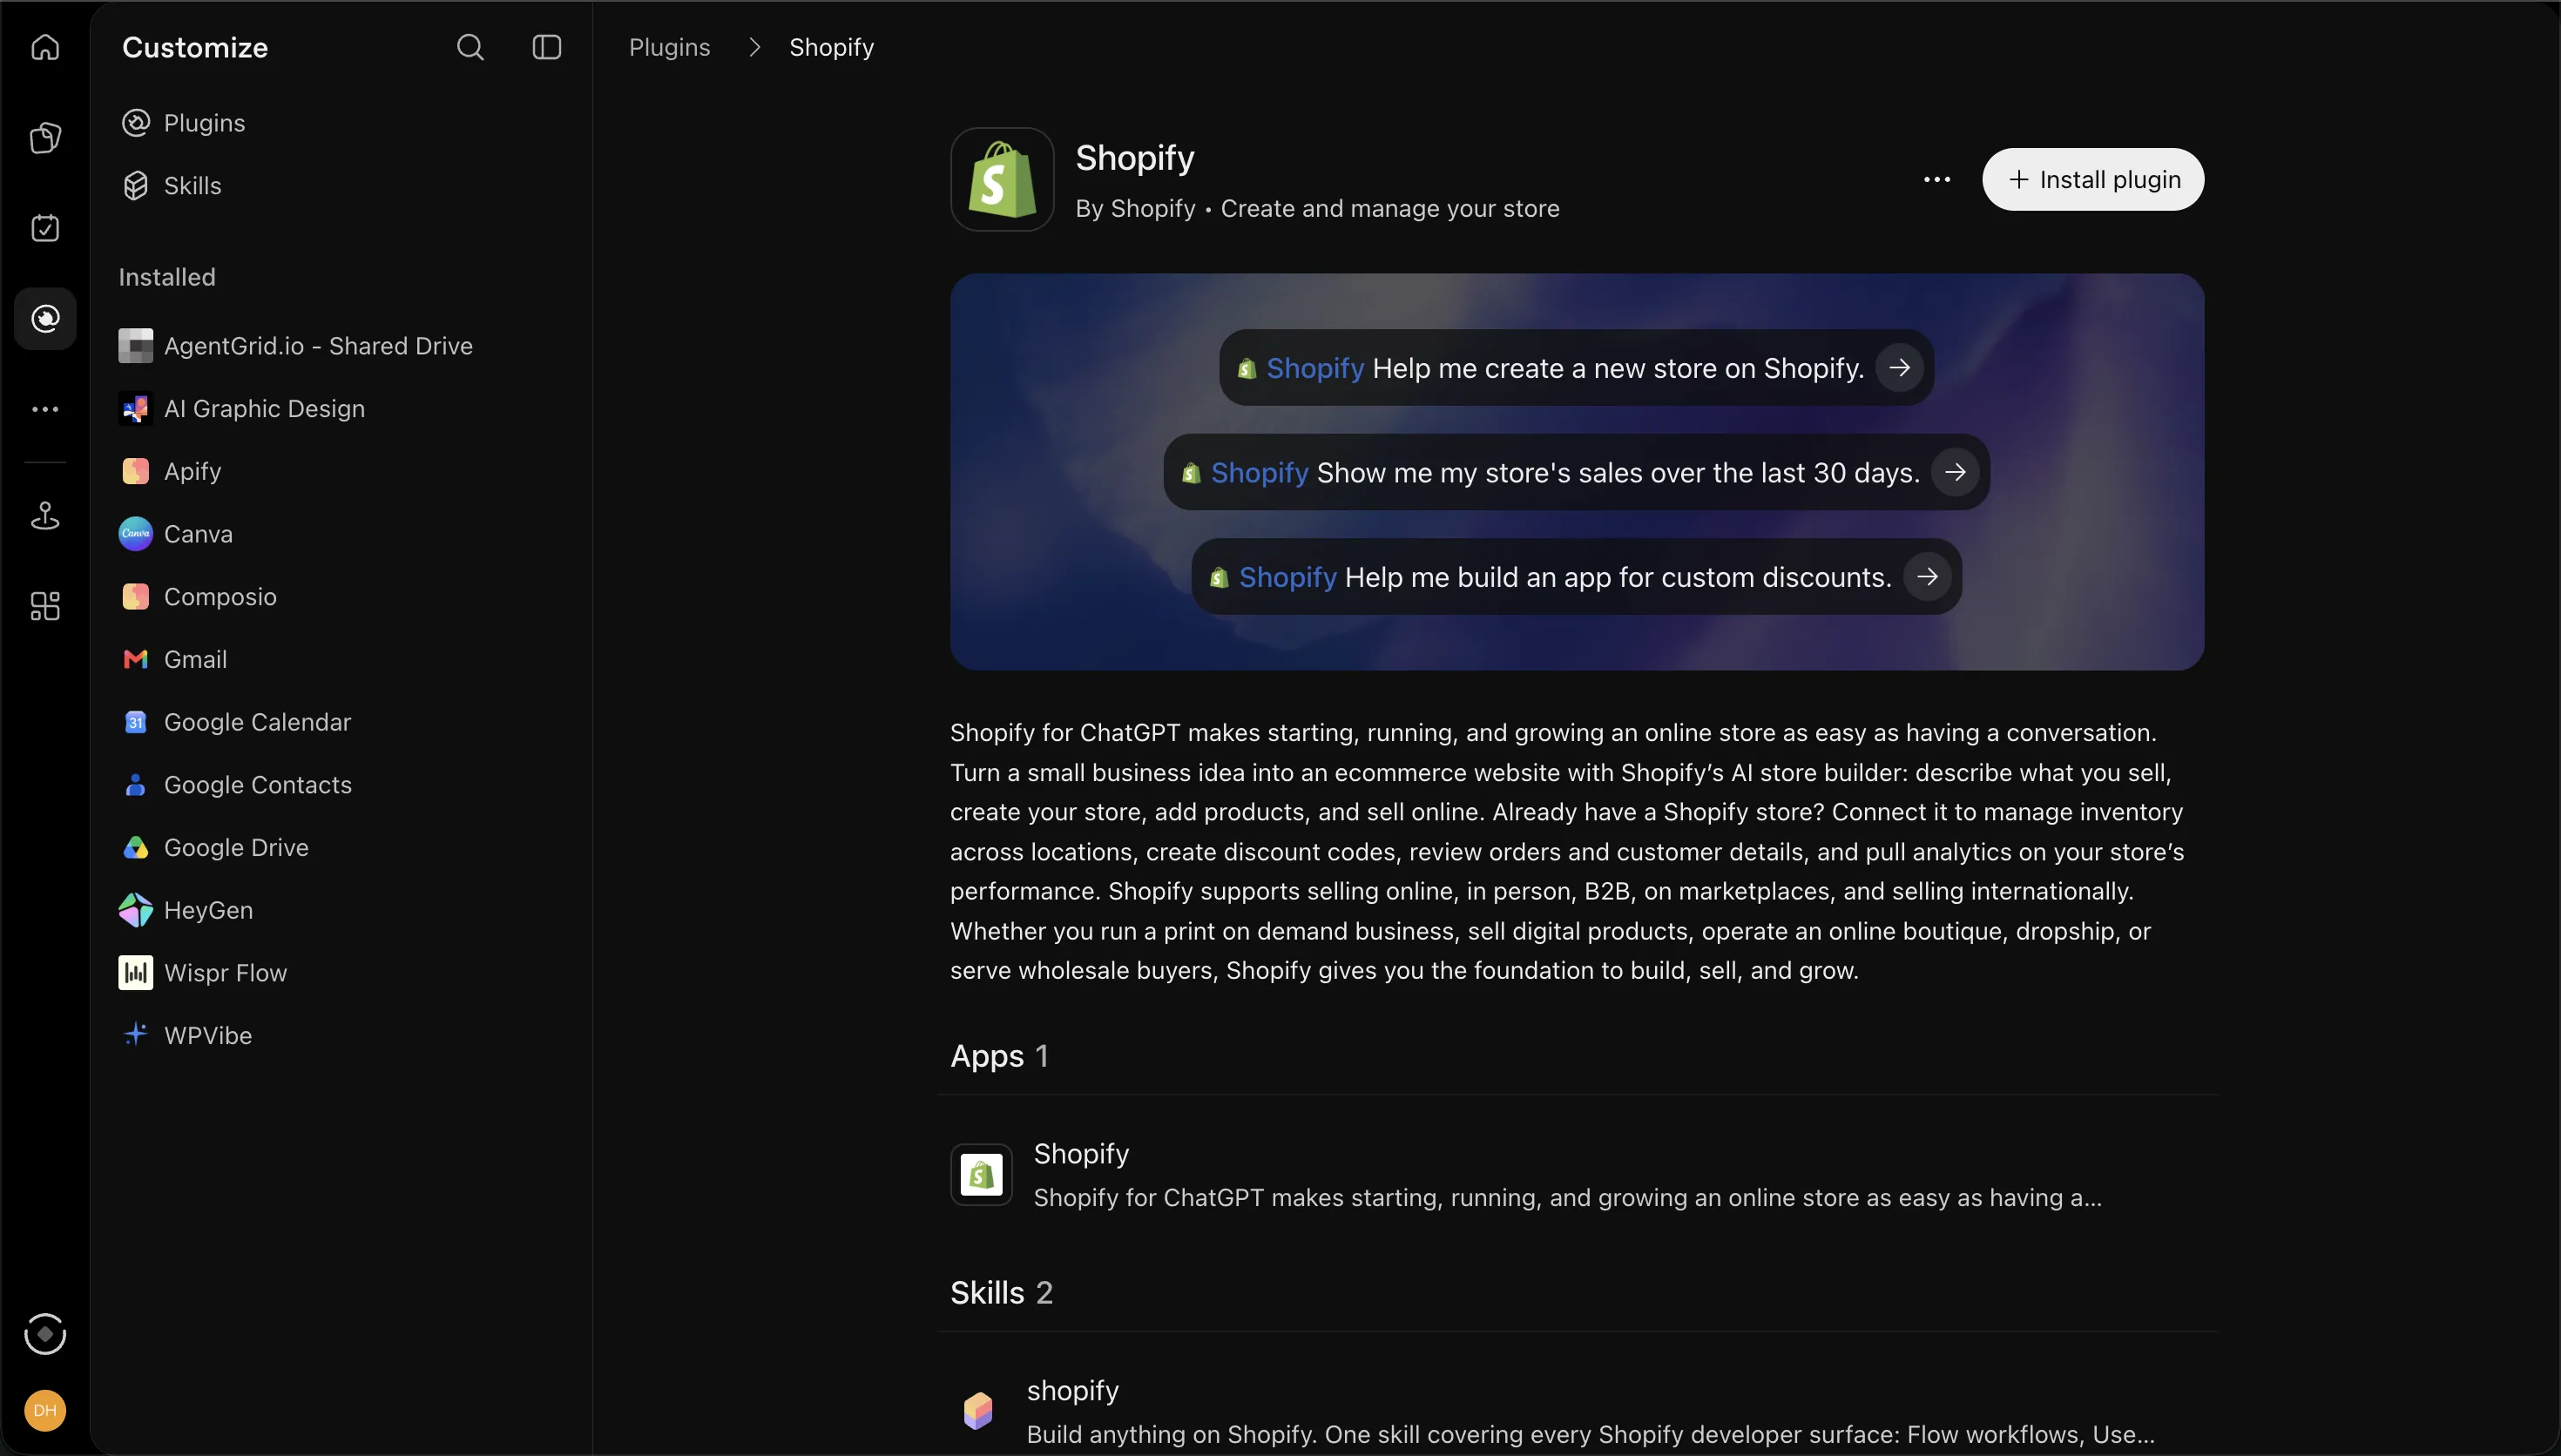
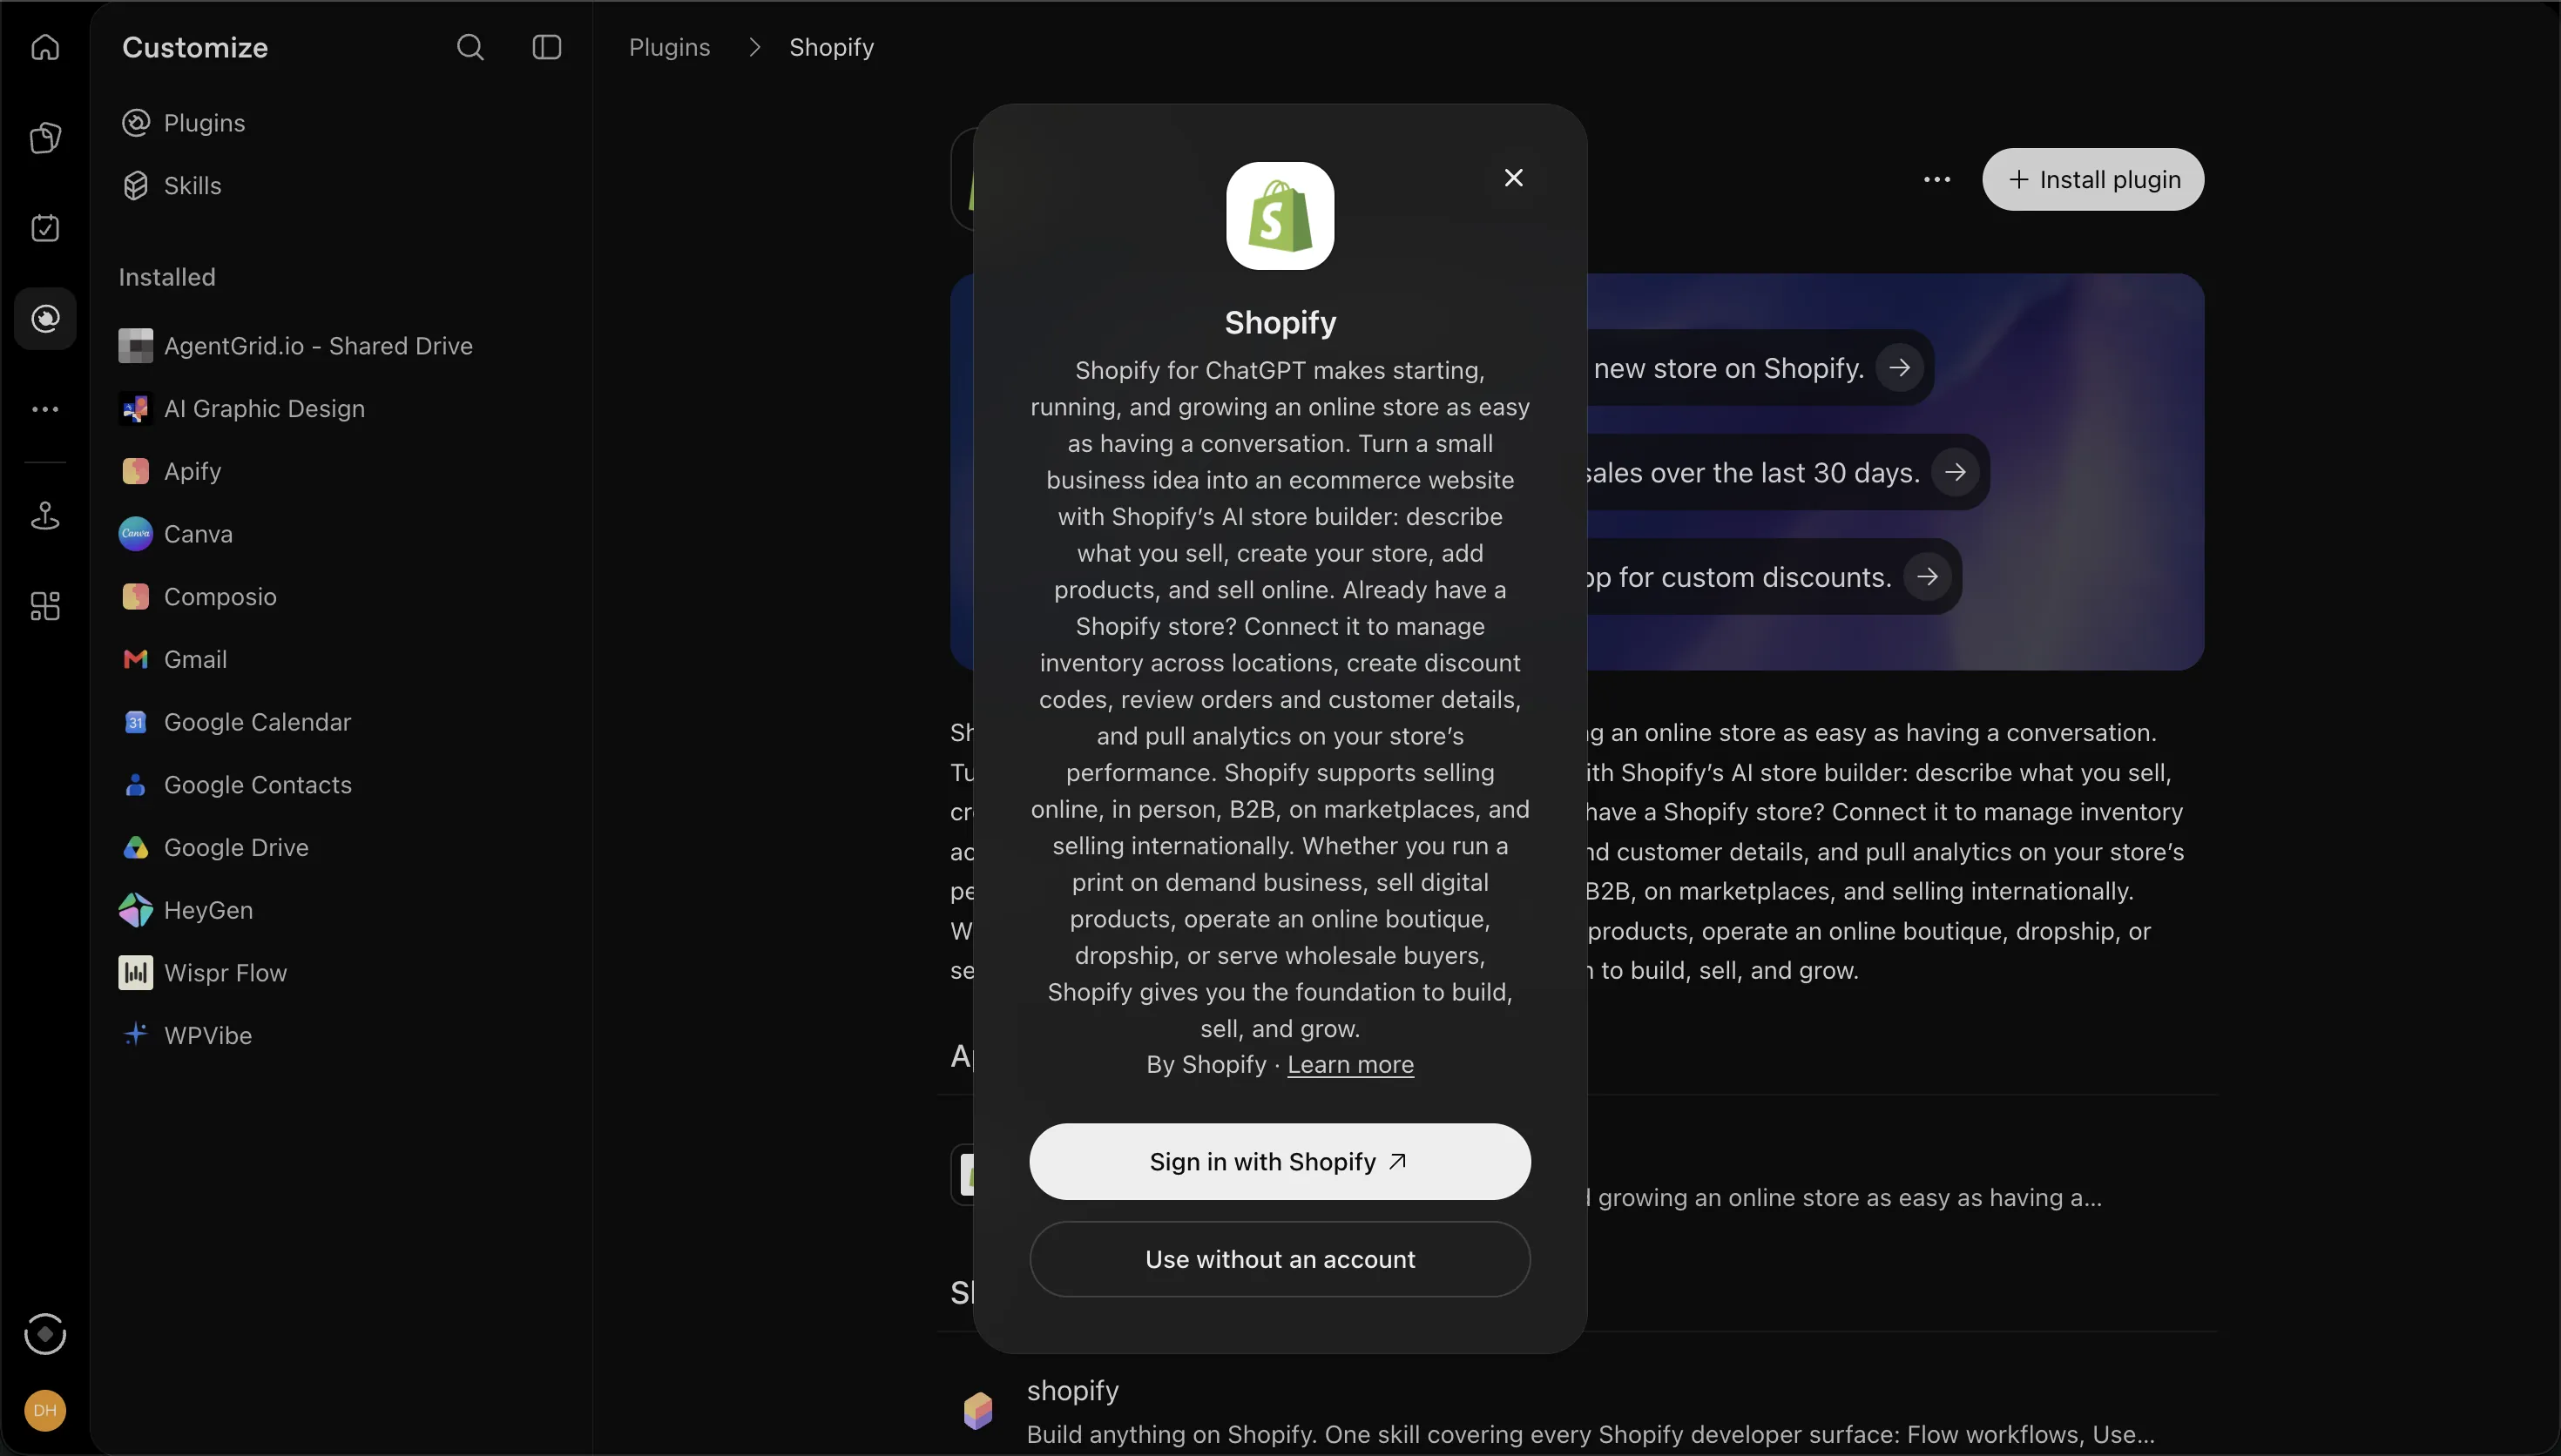
1In ChatGPT, open PluginsOn the web app this sits under Apps in Settings. The steps after it are the same.
2Find Shopify, made by ShopifyCheck the maker before you connect anything to your store.
3These are examples of what you can askOnce connected, you type @Shopify and ask in plain English.
4Press Install pluginA sign-in window opens next.
5Choose Sign in with ShopifyUse the same login as your store, so ChatGPT finds it.
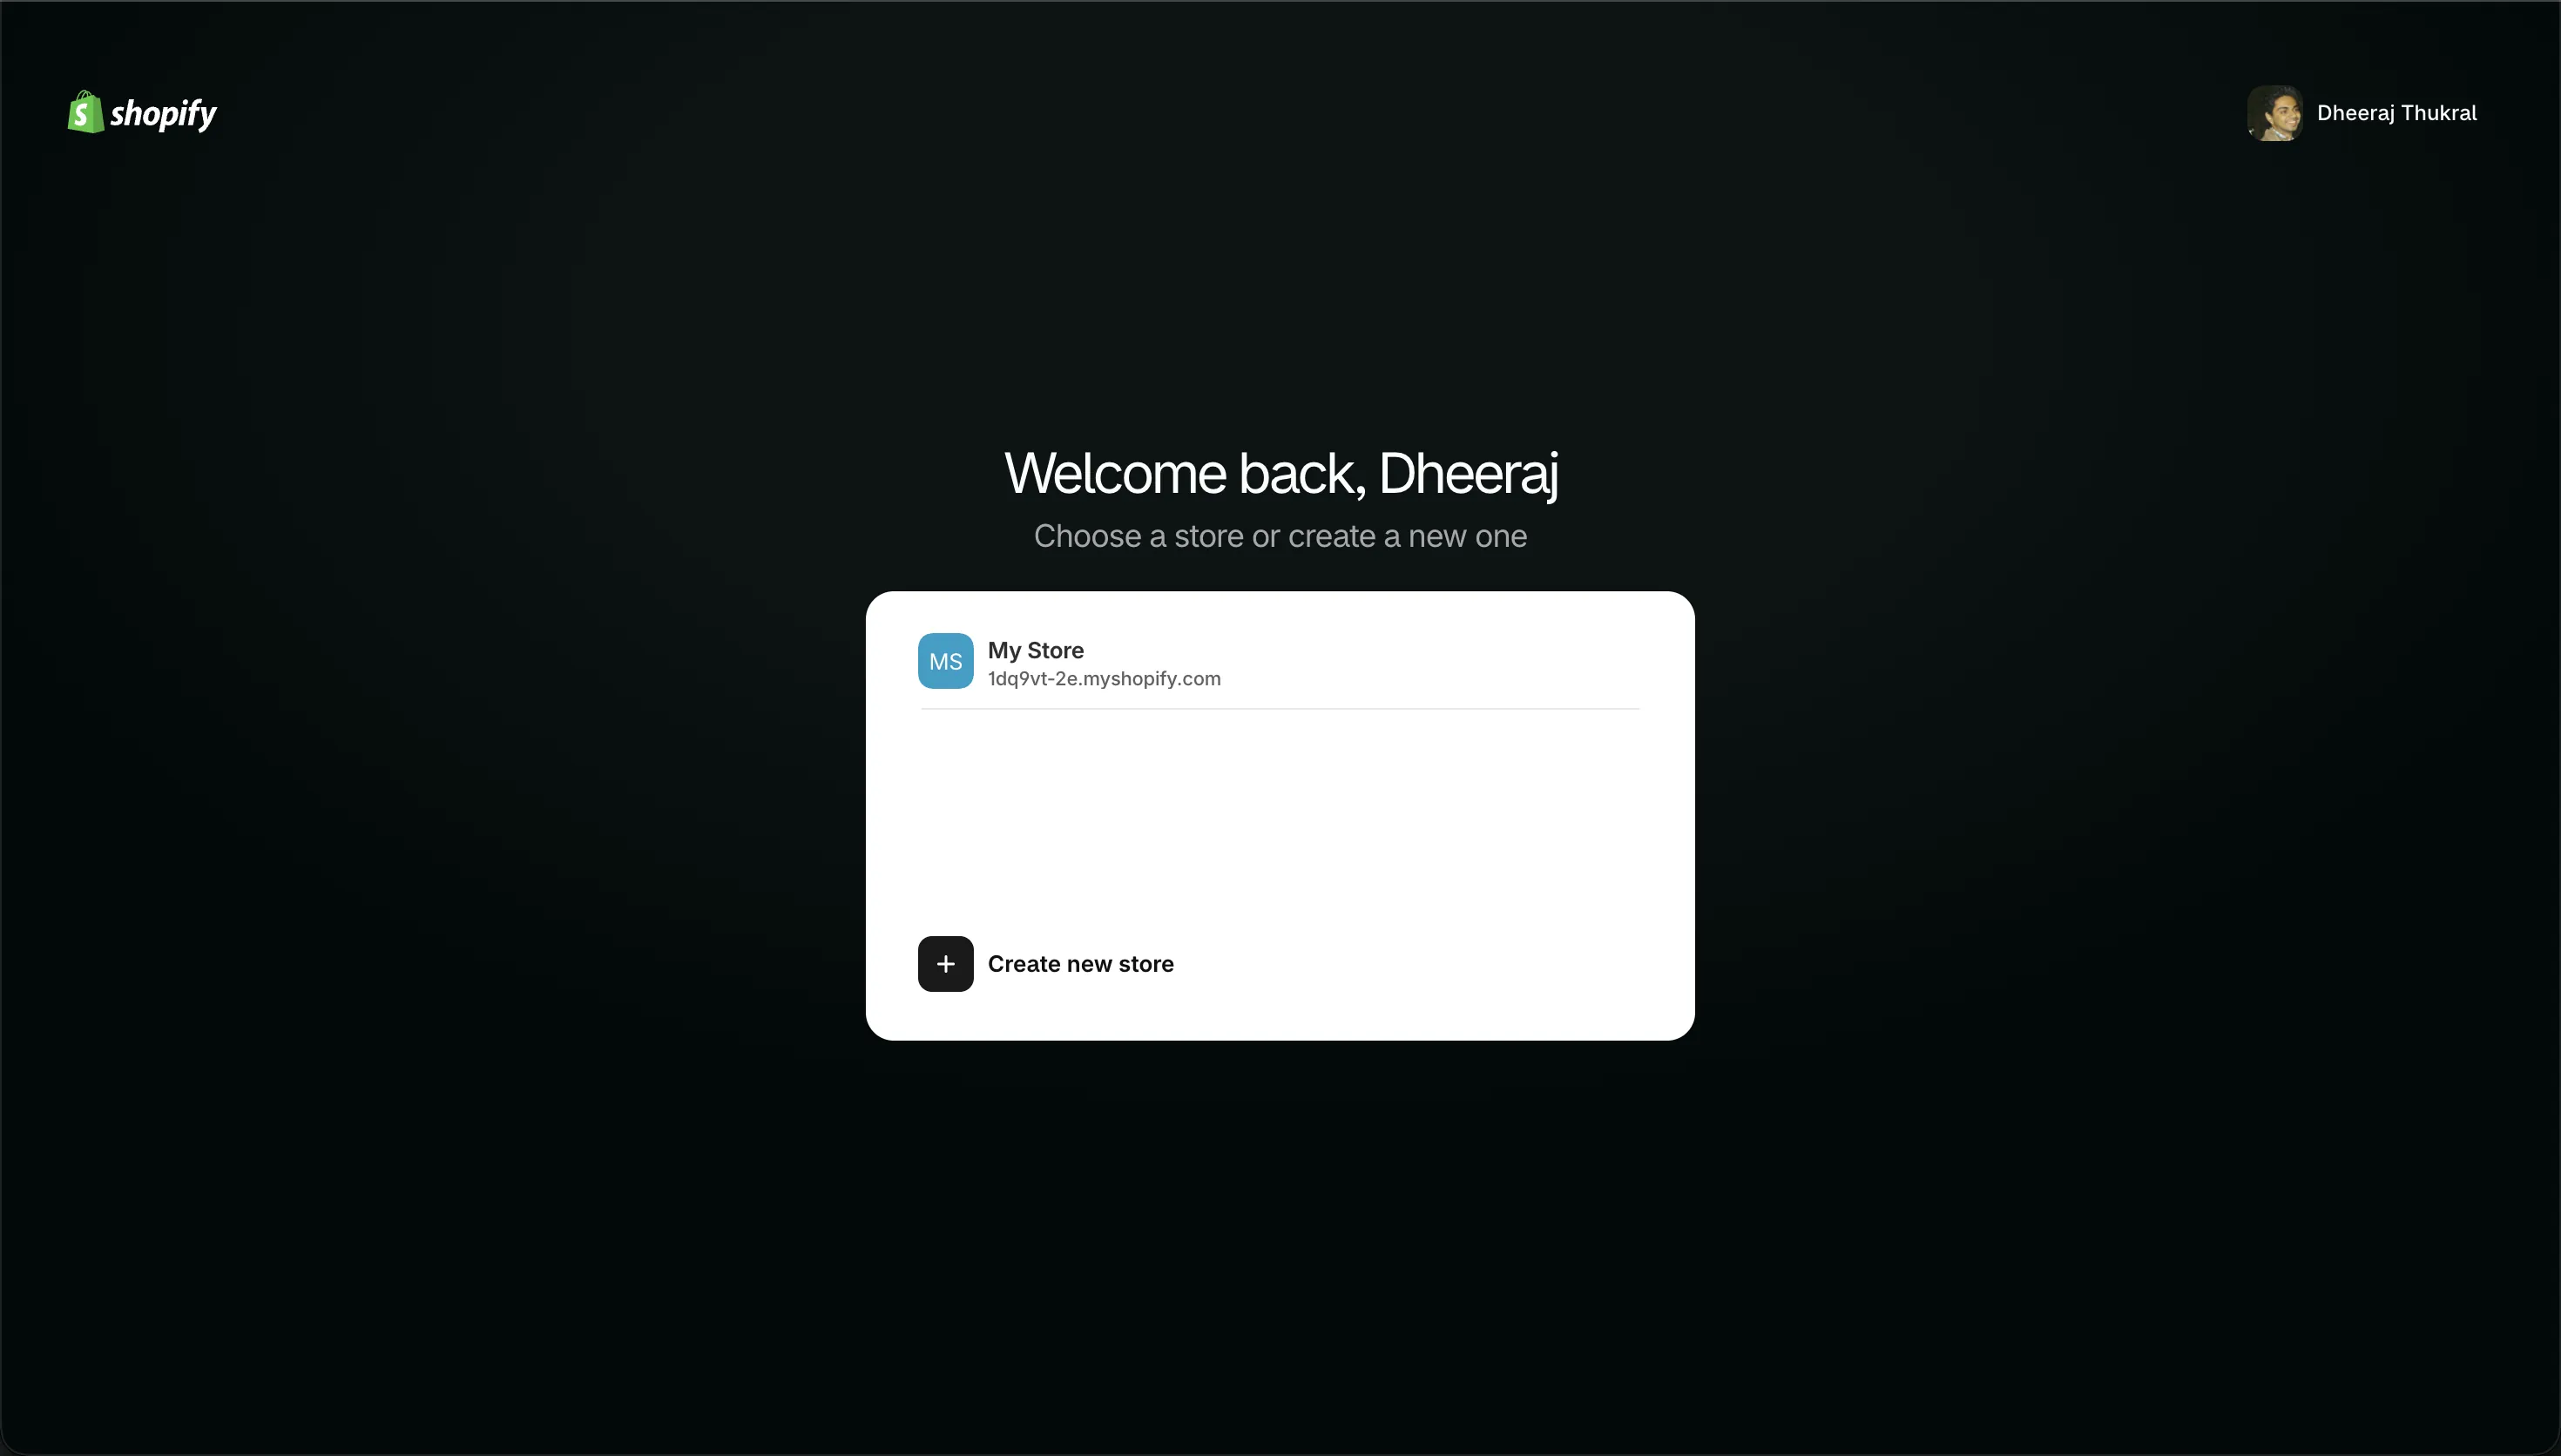
6Pick your storeIf you run more than one, check the myshopify address under the name.
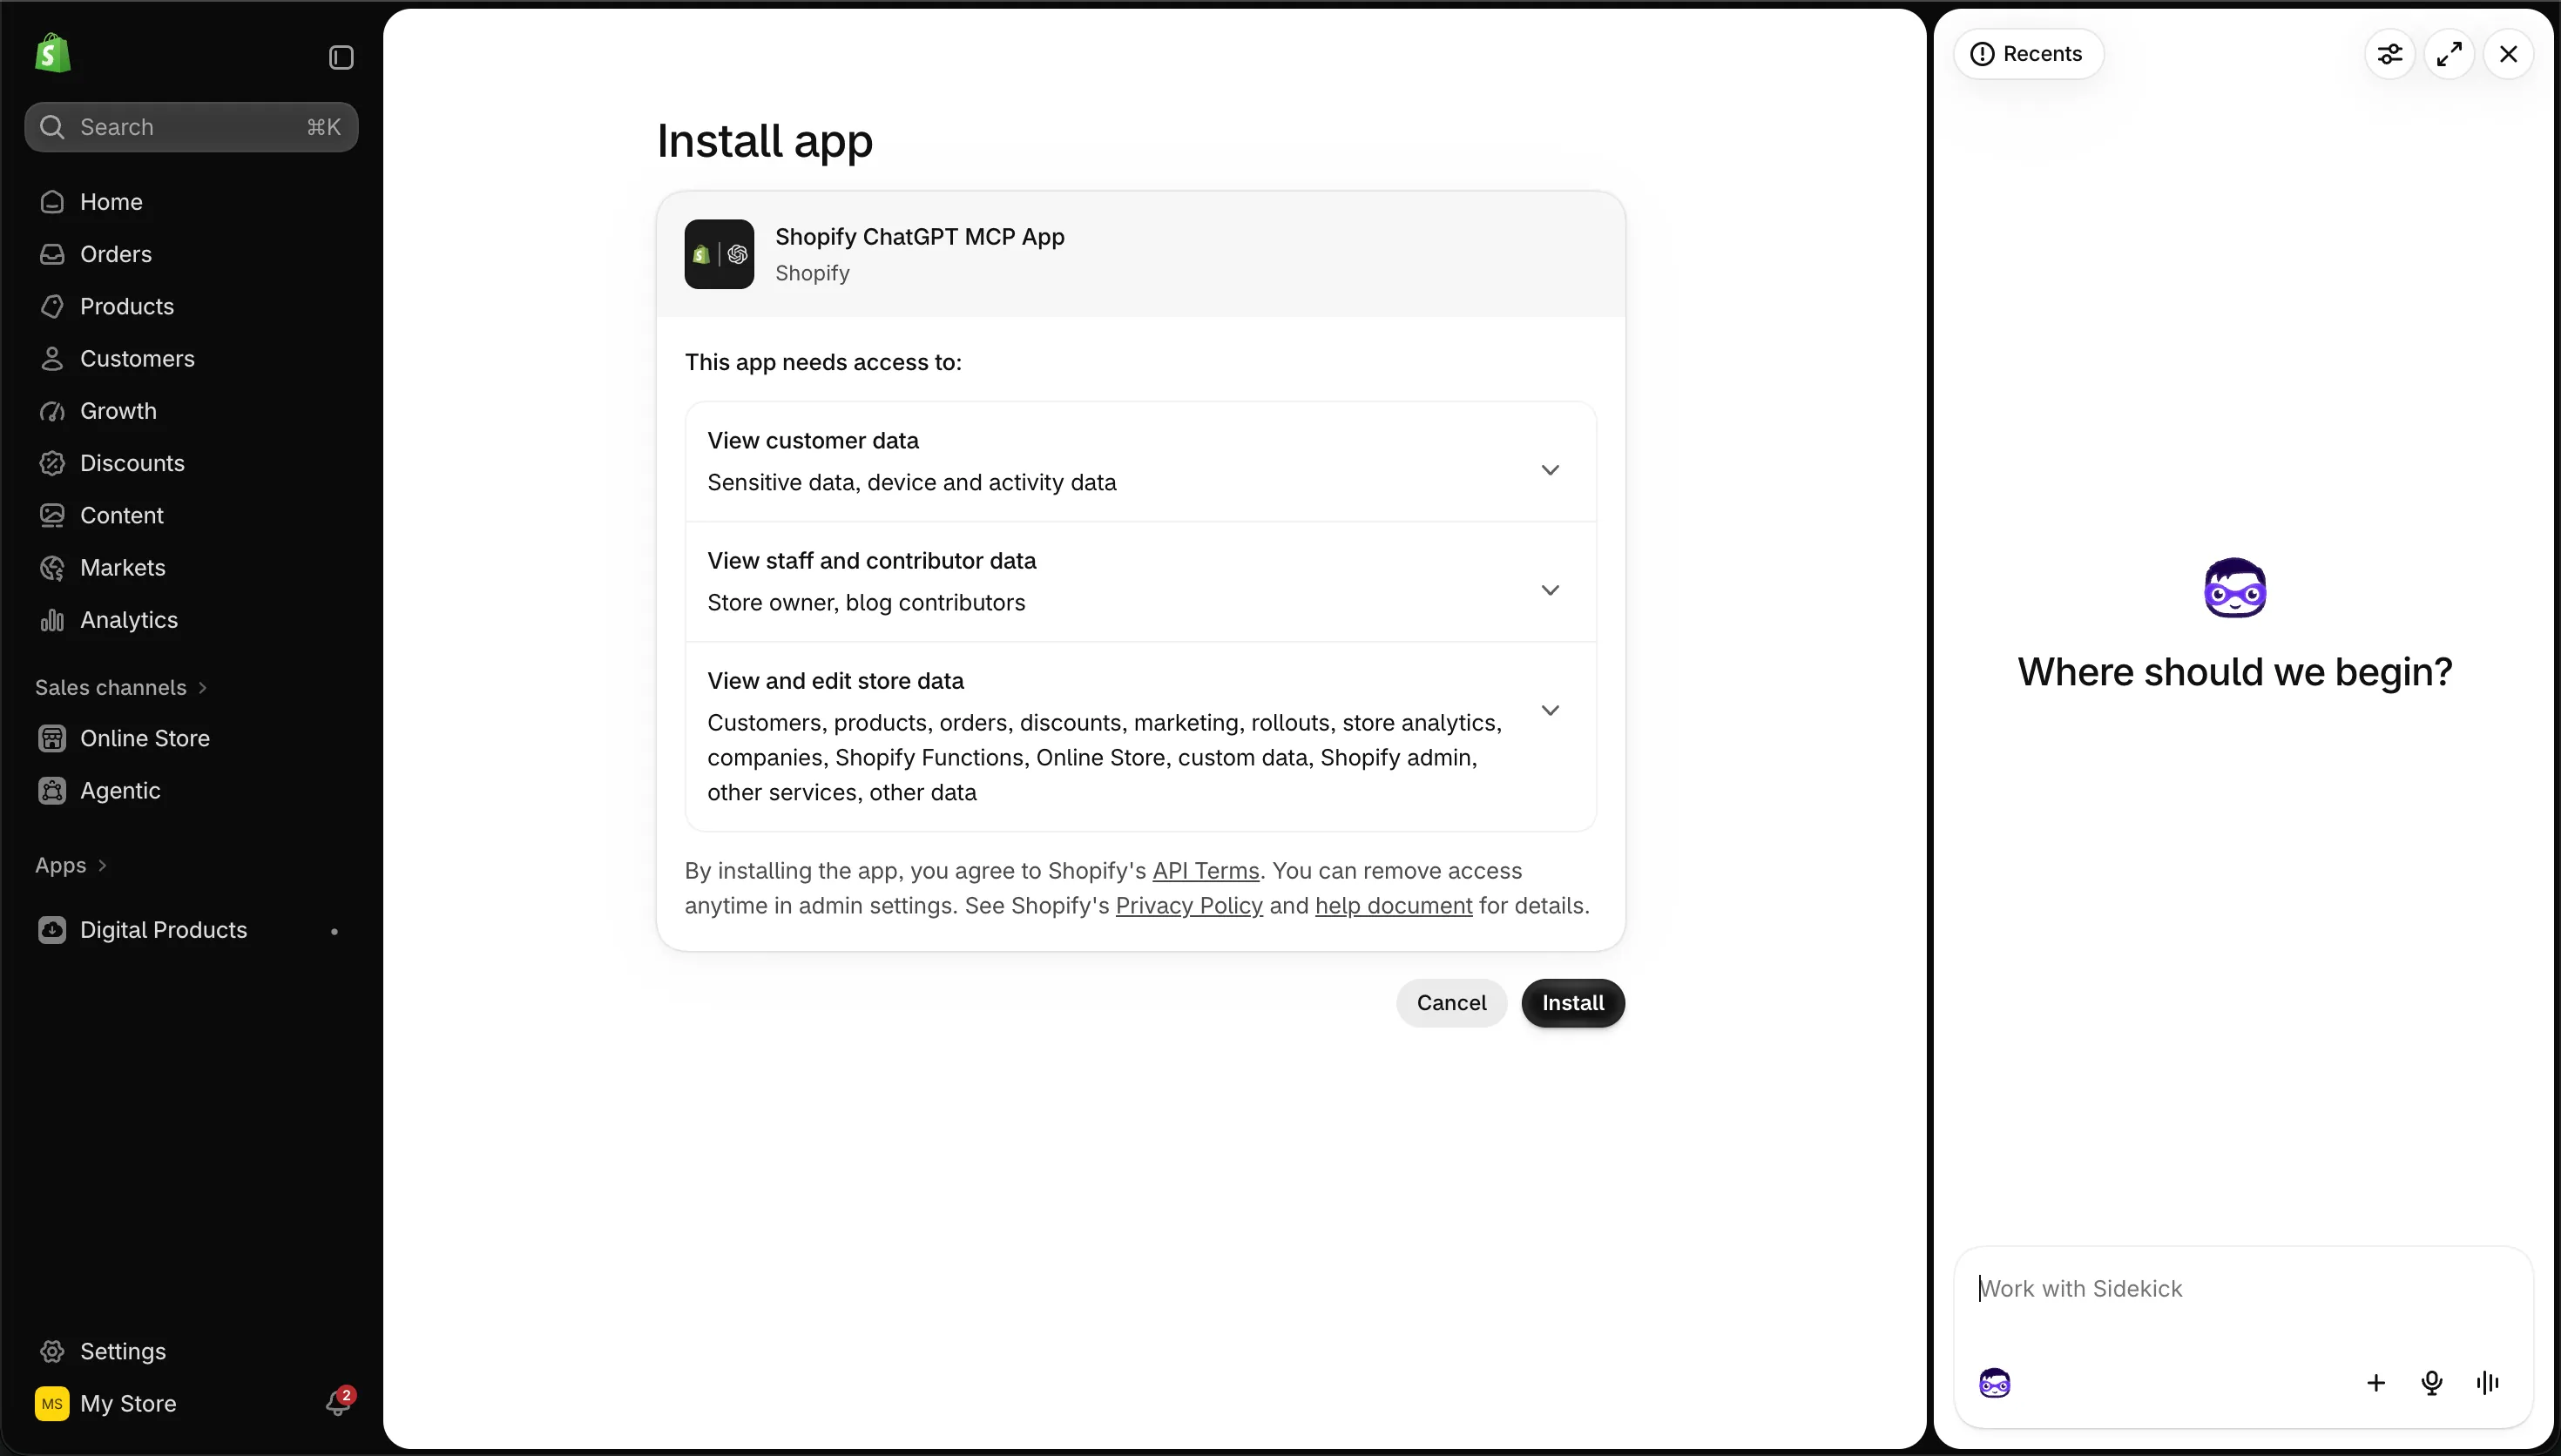
7Shopify opens: Install the Shopify ChatGPT MCP AppThis small app is the bridge between ChatGPT and your store.
8Read what ChatGPT will be able to accessCustomers, products, orders and your theme. You can remove the app any time in your admin.
9Press InstallYou land back in ChatGPT.
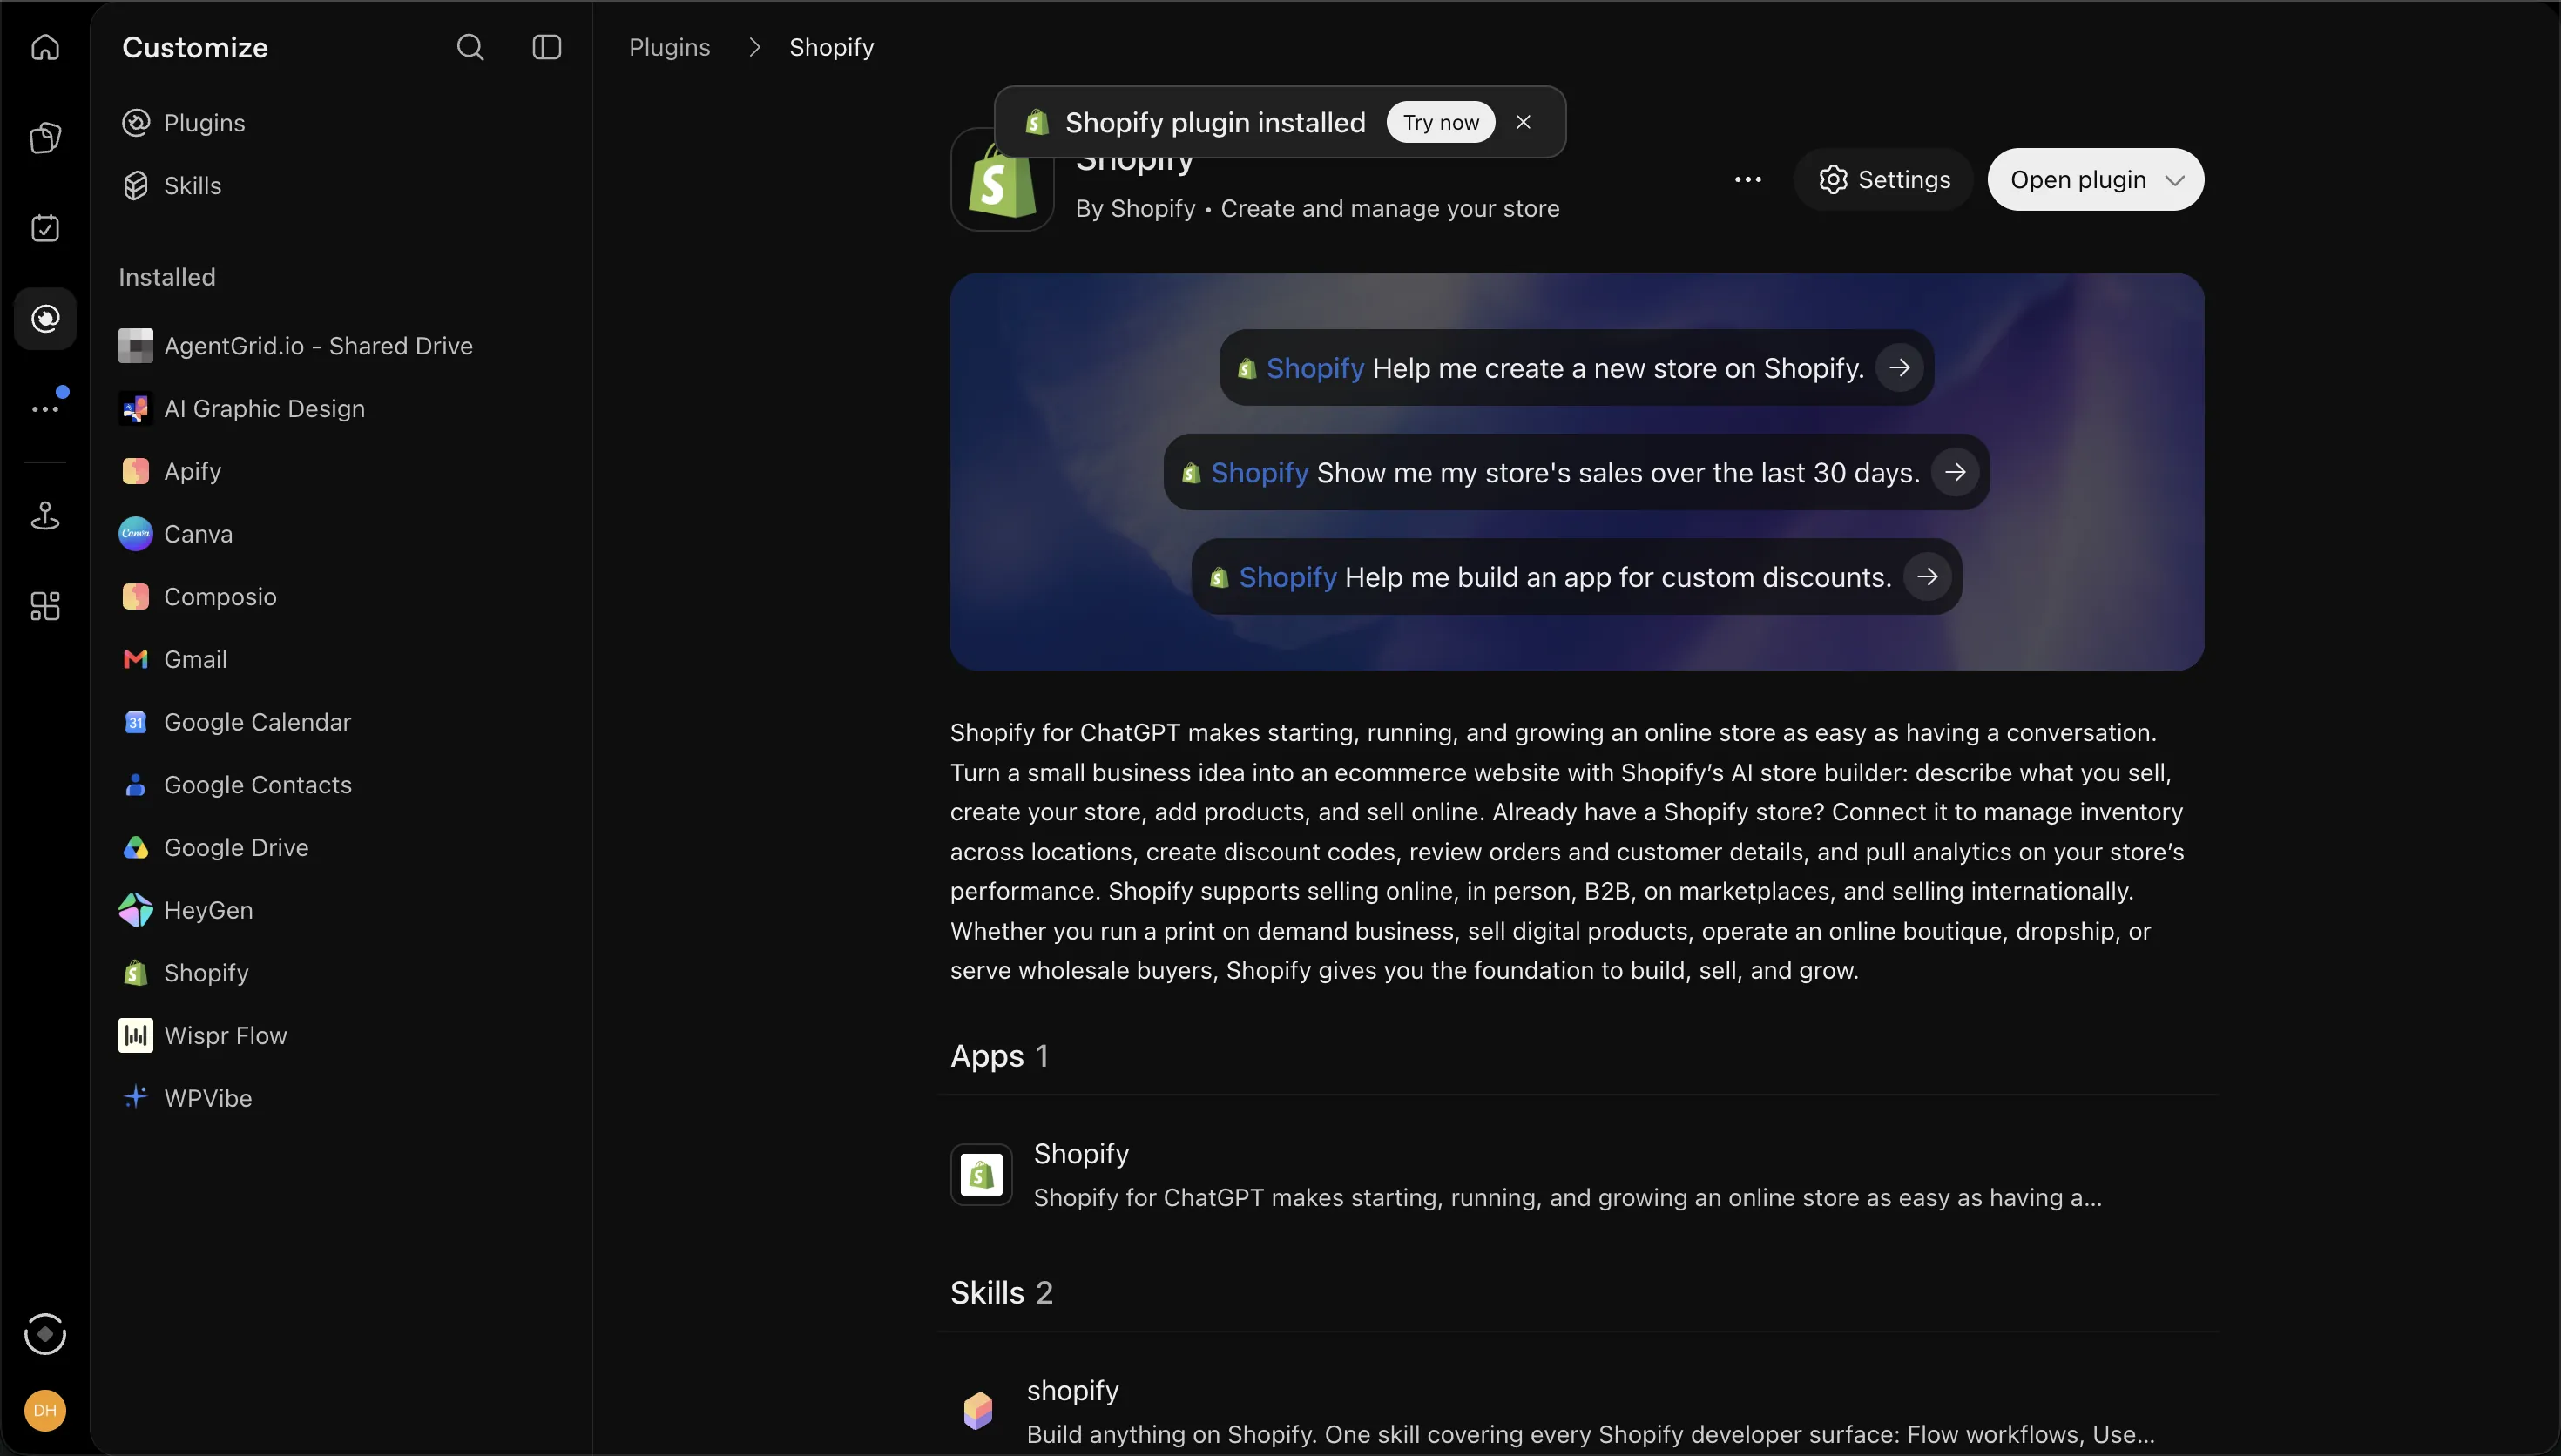
10Done: Shopify plugin installedShopify now also appears in your installed list.
11Press Open plugin, or type @Shopify in any chatStart with a read-only question, such as asking what is missing from your store.
Why it mattersShopify says the plugin is free to use, for a new store or an existing one. It speeds up repetitive work. You still need to know where every setting lives, because some changes are manual only.
ChatGPT laneFill the [brackets], paste into ChatGPT
Step 9ChatGPT · Dark Hour Shopify Store, Execution, 20 Nov 2026
Know what ChatGPT did, and what stayed manual, when Dark Hour was built
1 / 3
Use ← → keys
1of 3
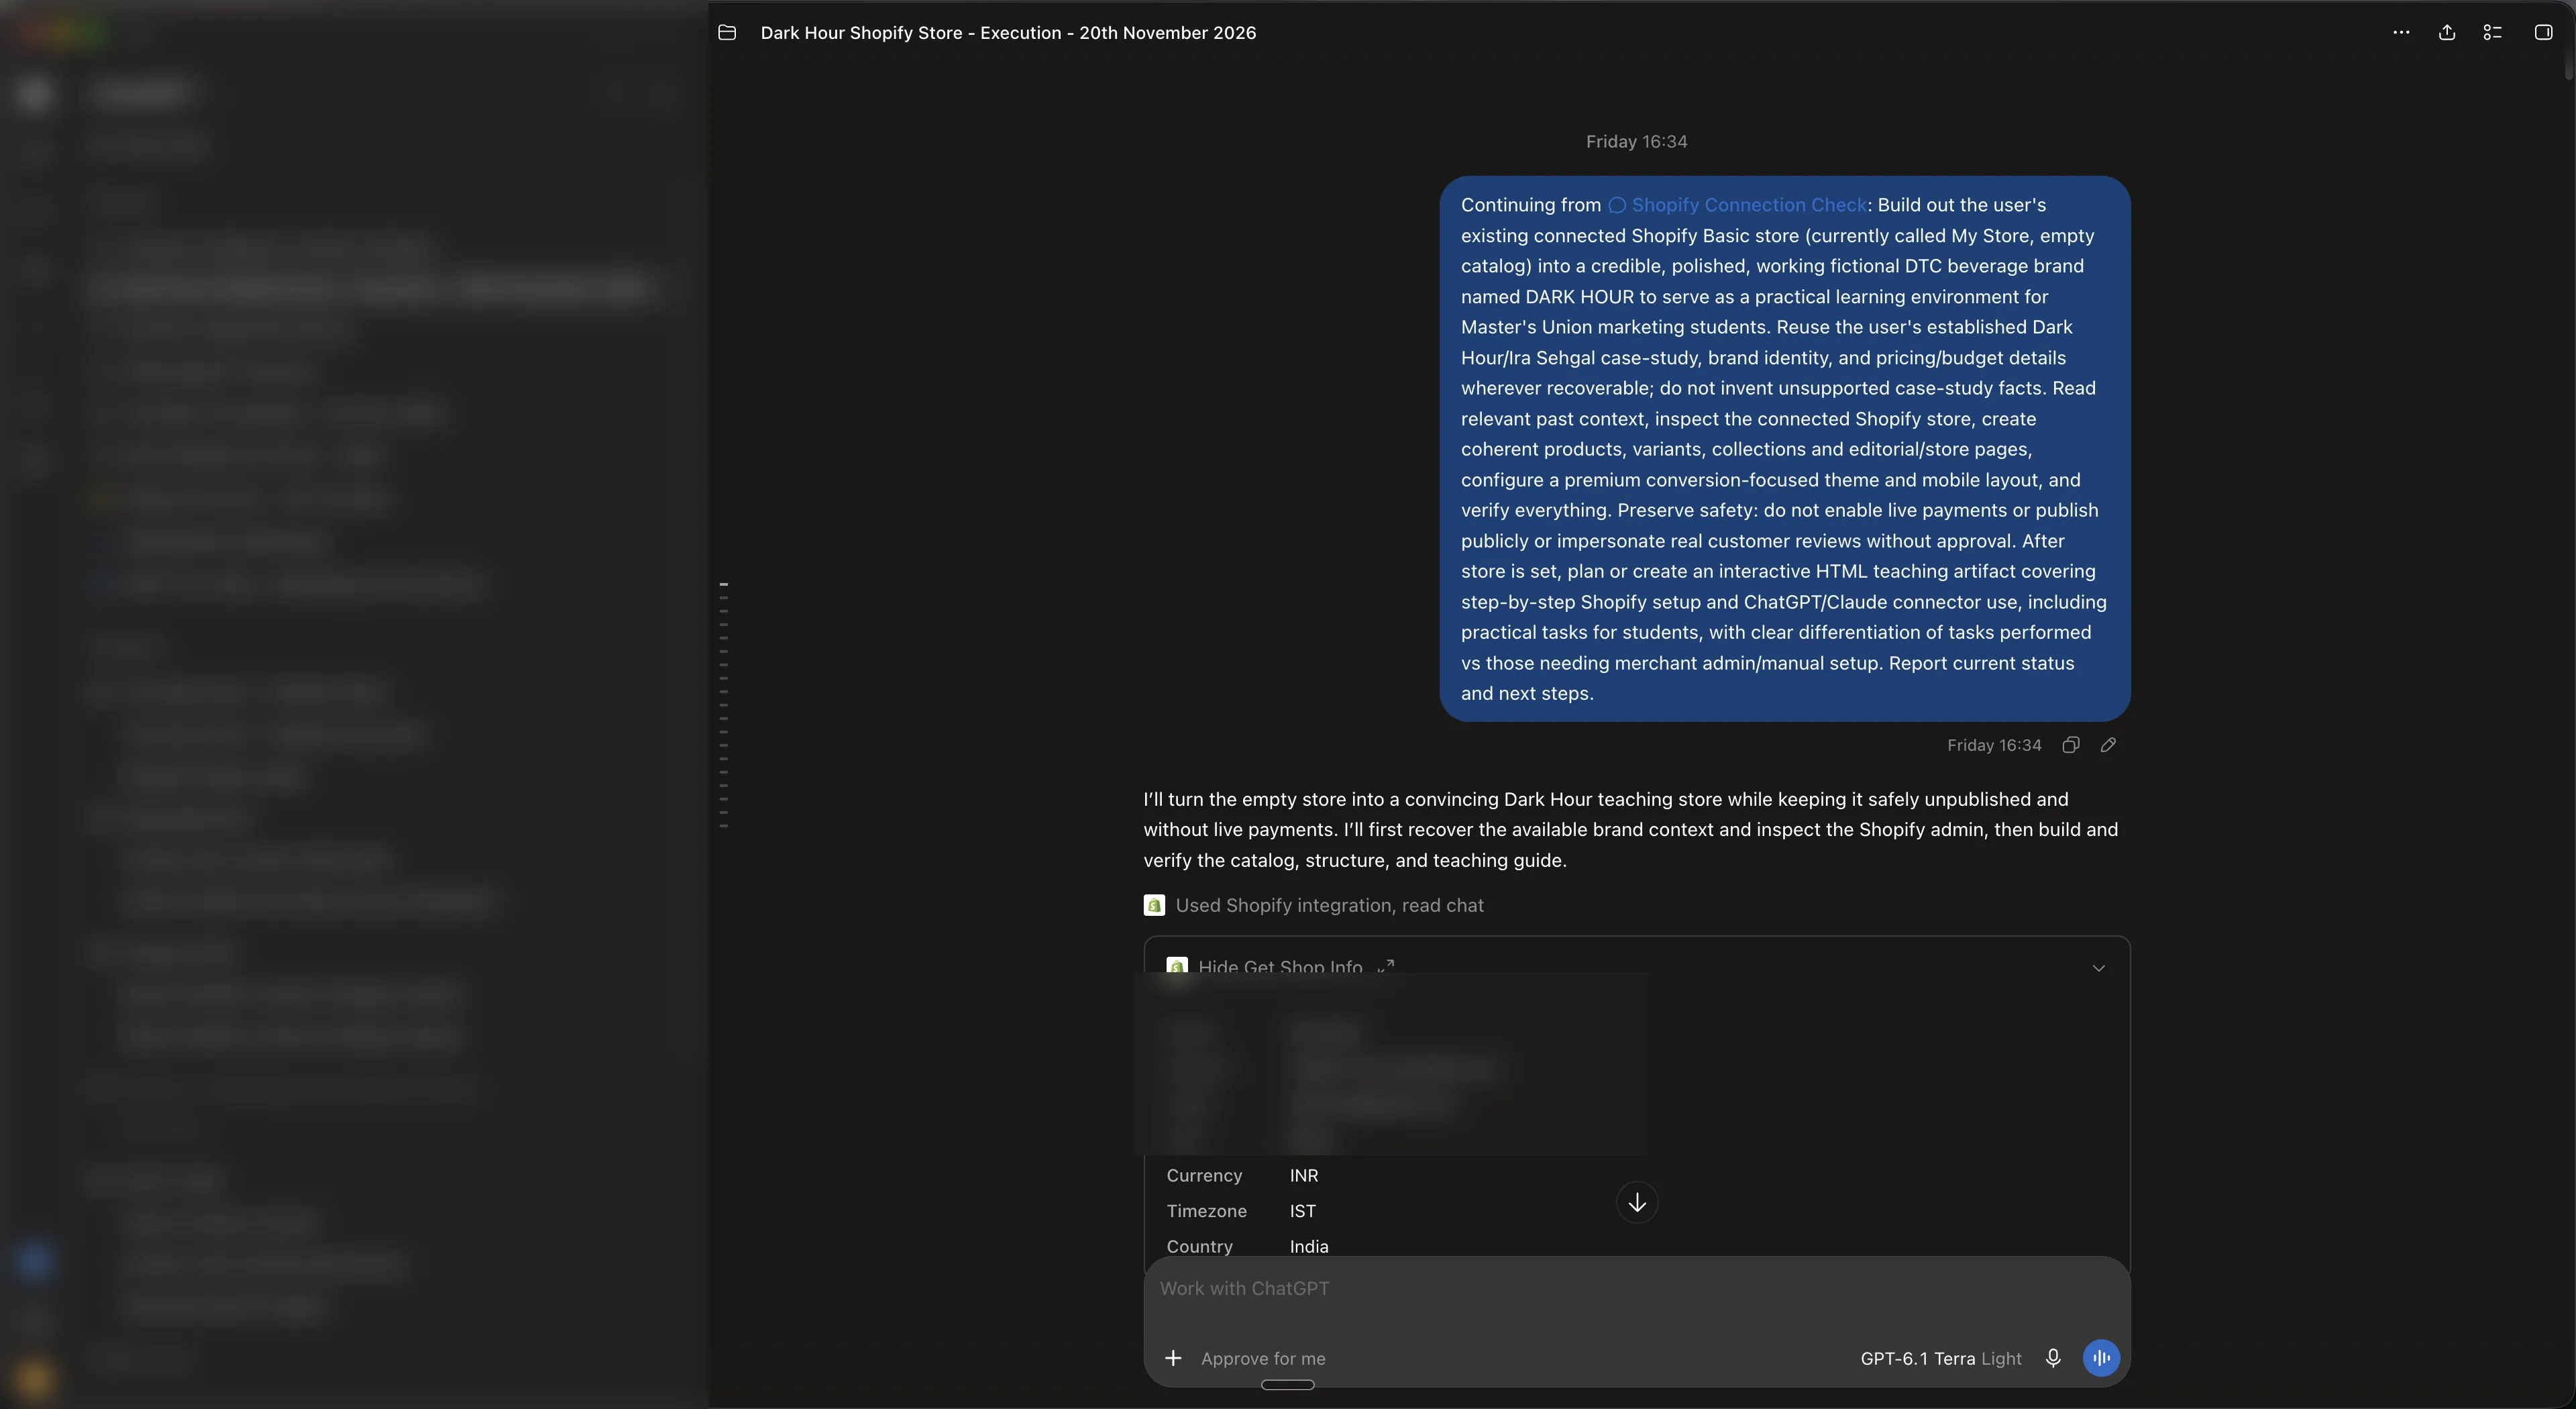
1The brief Dheeraj sentBuild a credible D2C brand called DARK HOUR on the empty store, keep it unpublished, enable no live payments and impersonate no real brand.
2ChatGPT replies with its plan firstIt promises to keep the store unpublished and payments off, then to inspect before building.
3It reads the store before changing anythingName, domain, currency, time zone and country. Personal details are blurred here.
ChatGPT did this through the plugin
Created two products and three variants with practice stock: single can ₹129, 6-pack ₹699, 12-pack ₹1,299
Made two collections (The Lineup, Multipacks) and three pages (The Story, The Bengaluru Drop, Demo FAQ)
Redesigned the Horizon theme in draft and checked it at desktop and phone widths
Recommended apps: Facebook & Instagram by Meta, Judge.me, Microsoft Clarity, Tolstoy and Shopify Bundles
You must do this by hand
Switch checkout to test mode: Settings → Payments
Rename the store: Settings → General
Remove the storefront password: Online Store → Private → Public → Launch
Approve every publish with a clear sentence, such as "I approve publishing this update"
Why it mattersAI does the typing. You stay responsible for anything that touches money, legal pages or going live.
ChatGPT laneFill the [brackets], paste into ChatGPT
Checkpoint: before you move on
Part 2 · Session 4
Make the store look and feel like a brand people trust
A store that works is not yet a store that sells. In this part you set the header, the cover, the homepage order and the product page, publish the policies buyers look for, and learn to push ChatGPT past an average first draft.
Step 1Online Store → Themes → Edit theme
Open the theme editor: three zones and one Save button
1 / 9
Use ← → keys
1of 9
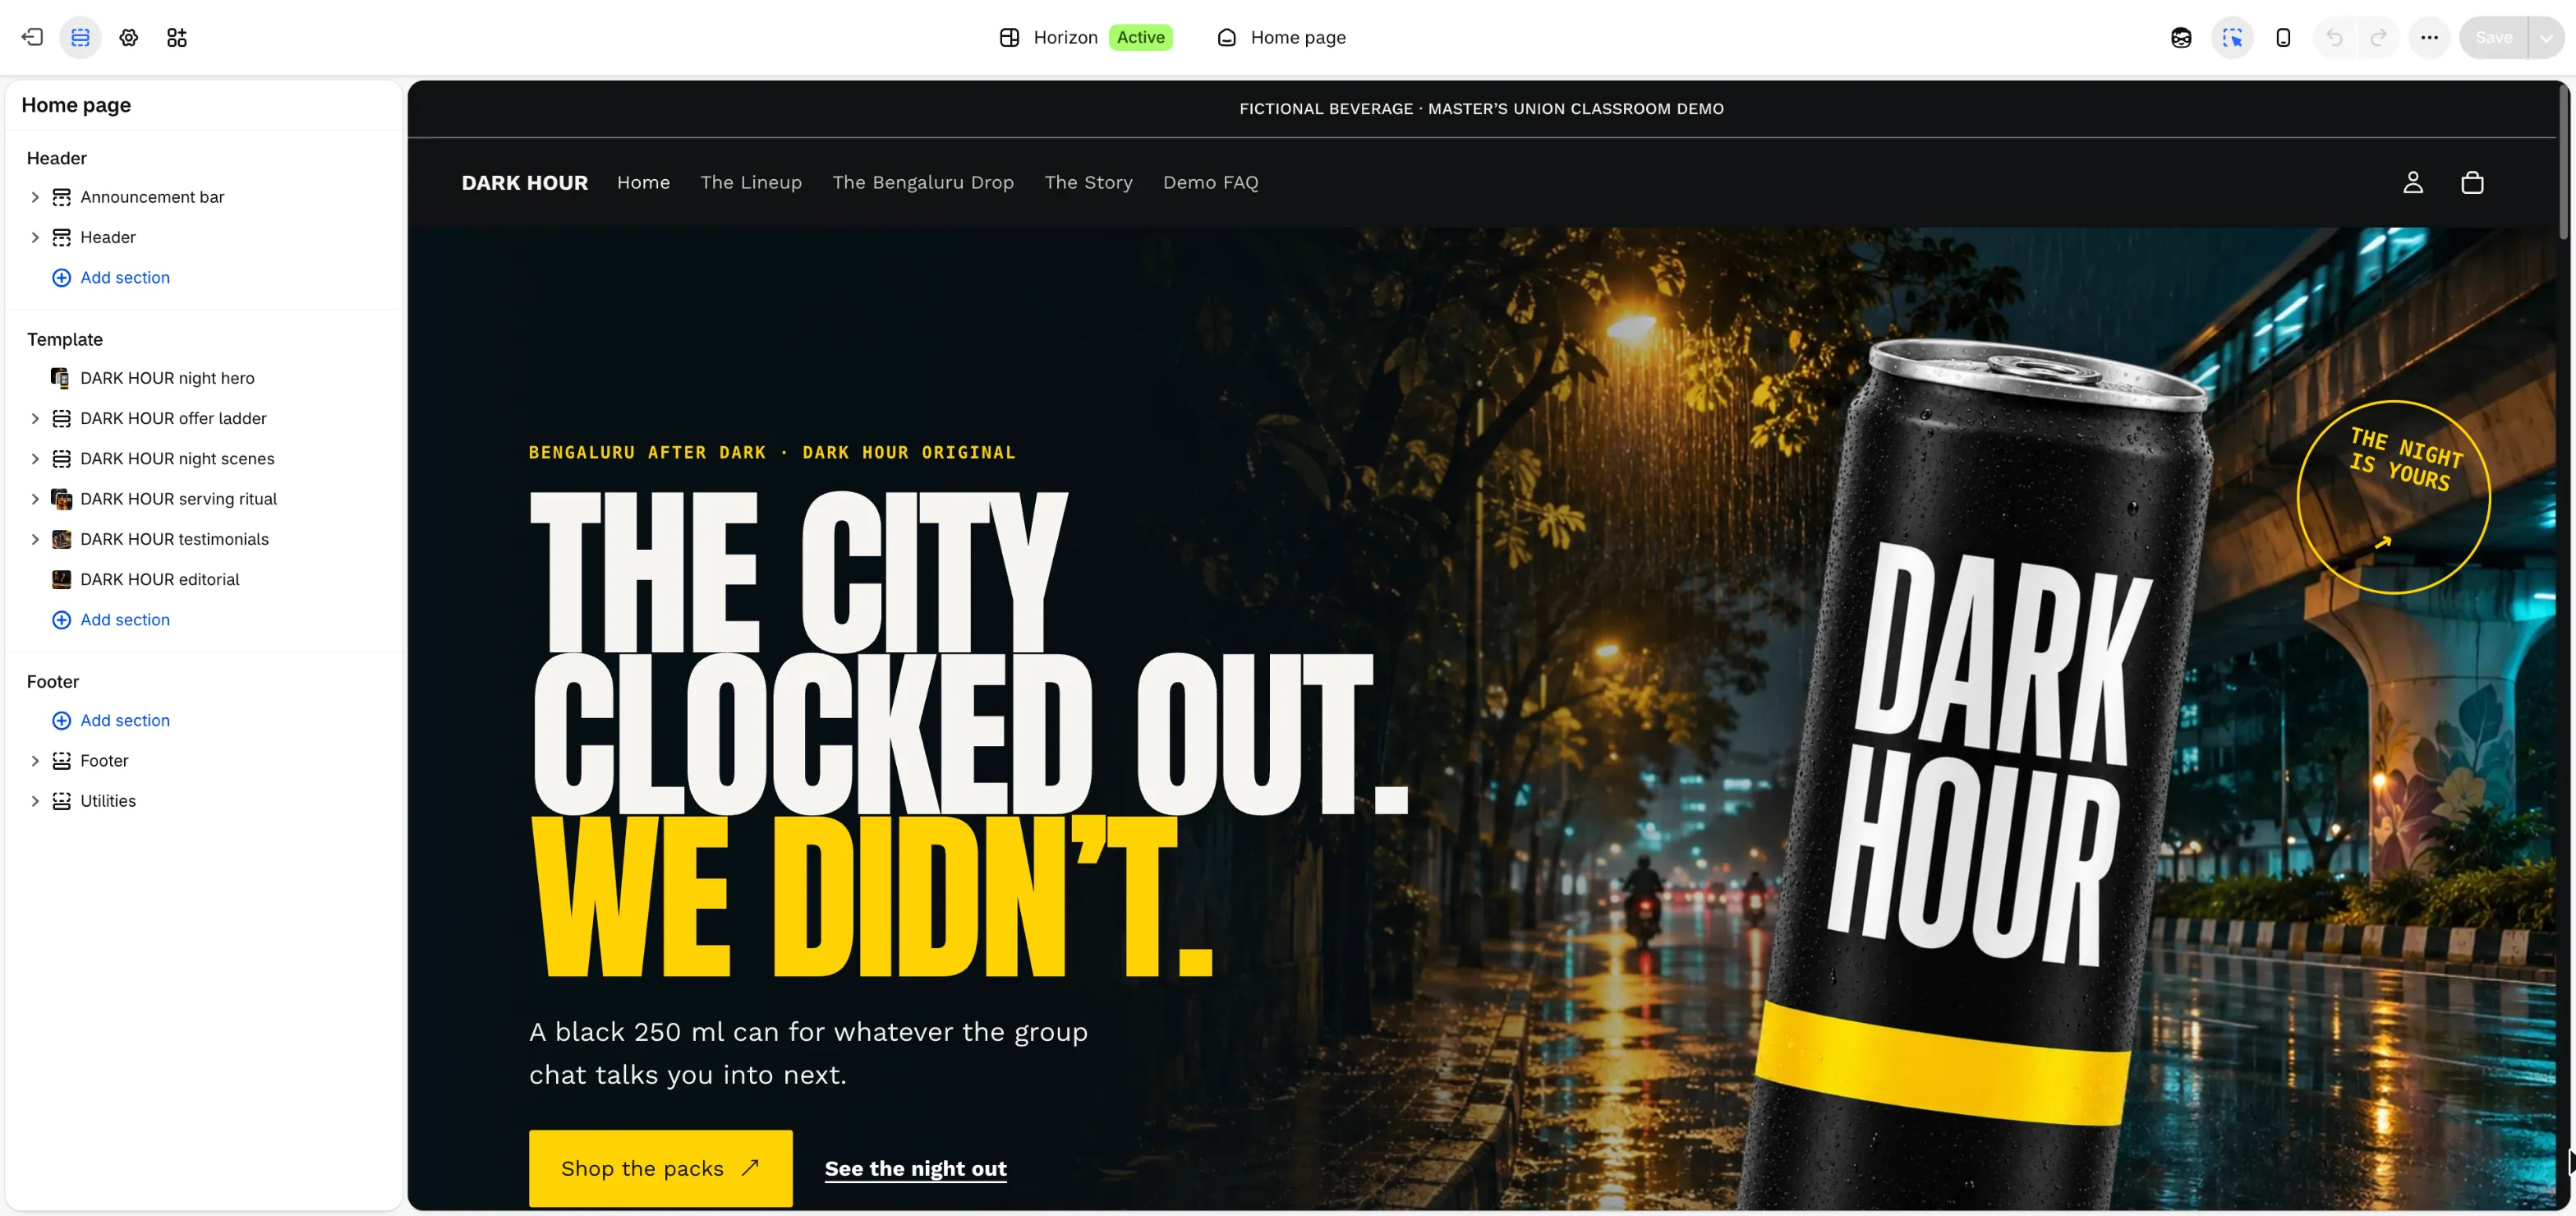
1Open Online Store in the sidebarYour theme, pages and the look of the store all live here.
2Check whether the store is Public or PrivateKeep it private, with a password, while you build. Make it public before your ads go live.
3Press Edit themeThis opens the theme editor, where every section of every page is changed.
4Header: the announcement bar and the menuThese sections show on every page of the store.
5Template: this page's sections, top to bottomClick a section to edit it. Drag the handle to change the order.
6Footer: links, policies and social iconsAlso shown on every page. Your policy links belong here.
7Switch the page you are editingHome, product, collection and cart each have their own template.
8Preview on mobileMost buyers arrive from an Instagram ad on a phone. Check every change here.
9Press SaveNothing goes live until you save.
Why it mattersEvery design change in this part happens inside these three zones.
Step 2Theme editor → Header · Content → Menus
Set the header and menu so a buyer reaches the product in one tap
1 / 9
Use ← → keys
1of 9
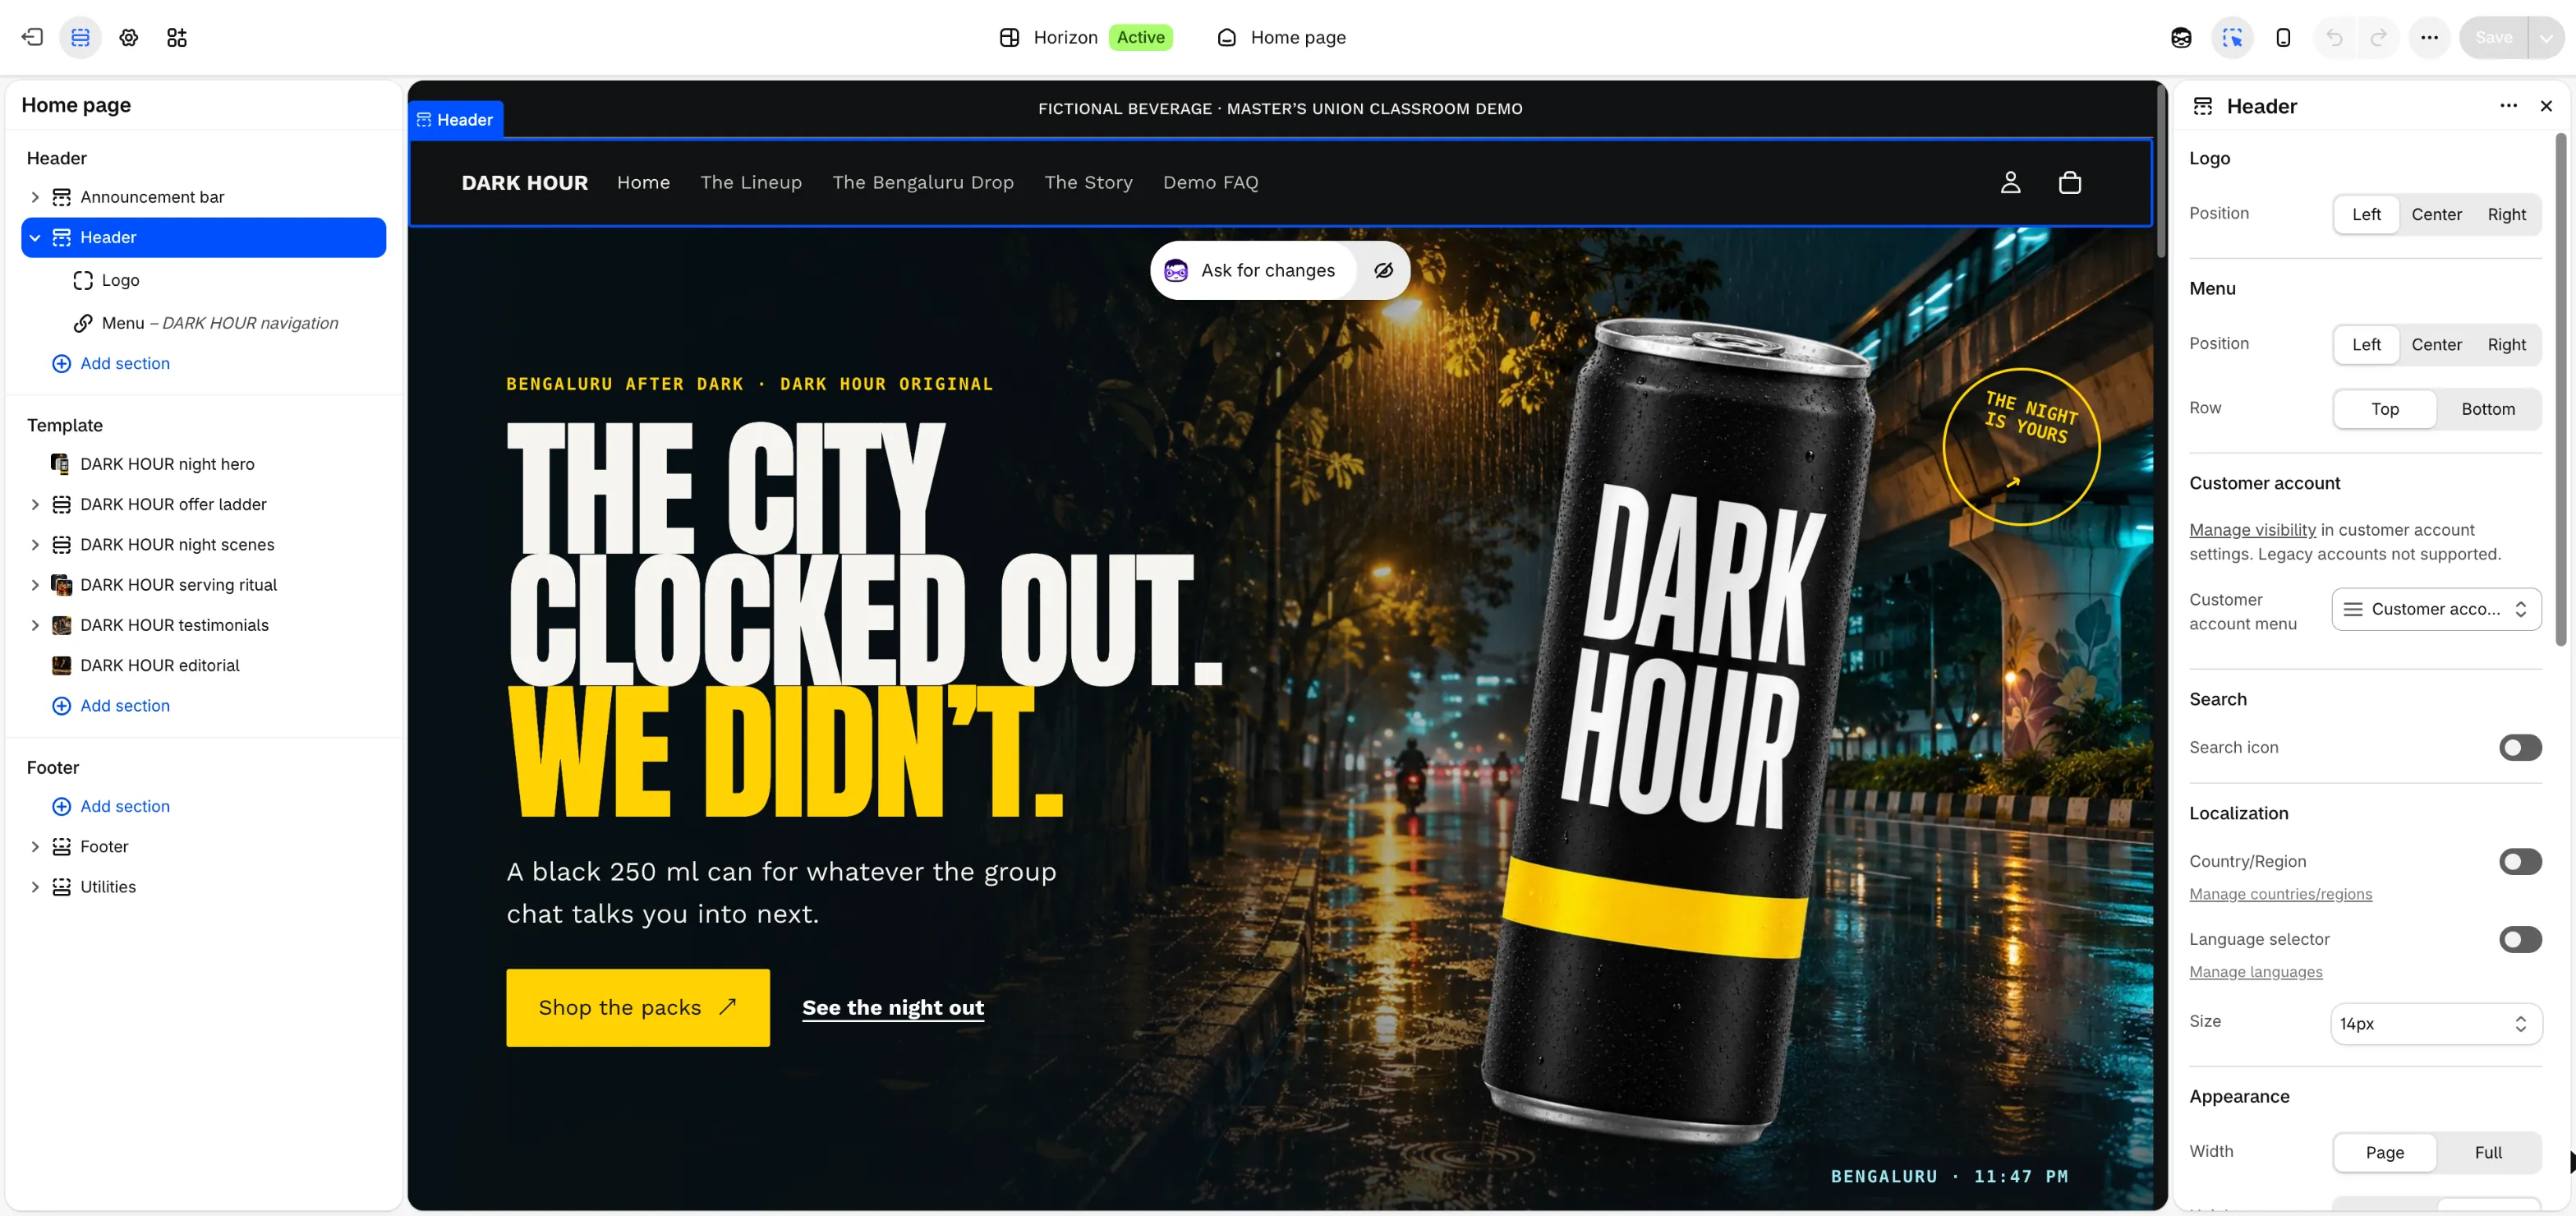
1Click Header in the sidebarIts settings open on the right. The logo and the menu live inside it.
2Set the logo position to LeftLeft is the safe default on phones, where most of your buyers are.
3Set the menu position and rowLeft and Top keep the menu next to the logo, one tap from any product.
4Leave the search icon off for nowWith one or two products, search is clutter. Turn it on when the catalogue grows.
5Note which menu the header usesThe links themselves are edited in Content, then Menus. That screen comes next.
6The links live in Content, then MenusEach menu is a list of links. The header and the footer each pick one menu.
7Keep the main menu to about five itemsDark Hour uses Home, The Lineup, The Bengaluru Drop, The Story and Demo FAQ.
8Use a separate footer menu for policiesShipping, returns, privacy and contact. Buyers look for them at the bottom of the page.
9Press Create menu when you need a new oneThen choose it in the theme editor, under Header or Footer.
Why it mattersKeep the main menu to five items or fewer. Every extra link is another way to leave before buying.
ChatGPT laneFill the [brackets], paste into ChatGPT
Step 3Theme editor → Hero section
Choose a cover image with one promise, one product and one button
1 / 9
Use ← → keys
1of 9
1Click the hero section in the sidebarThe hero is the first screen a buyer sees. Its text and images open on the right.
2Eyebrow: one small line that sets the scenePlace, time or occasion. Dark Hour uses "Bengaluru after dark".
3Headline: one promise in as few words as possibleDark Hour splits it into a white line and a yellow accent line.
4Subtitle: what it is and who it is forOne sentence. The size and the moment it is made for.
5Button: say exactly what happens next"Shop the packs" tells the buyer where the tap goes. "Learn more" does not.
6Images: the product cut-out over a campaign photoThe cut-out keeps the can sharp on any background.
7Check the preview: it reads top to bottom in two secondsEyebrow, headline, accent. A buyer scrolling past an ad gives you no longer than that.
8The product is the biggest object on the screenNobody should wonder what is being sold.
9One main button, visible without scrollingA second, quieter link is fine. Two loud buttons split the tap.
How to decide your cover
Show the product where it is used, not on a white table.
If you can afford one great photo, spend it here.
Check it at phone size. If the headline is hard to read over the photo, darken the photo.
Match the cover to your best ad, so the click feels like a continuation.
Why it mattersThe cover is the first thing every ad click lands on. It has a few seconds to confirm the person is in the right place.
ChatGPT laneFill the [brackets], paste into ChatGPT
Step 4Theme editor → Add section
Build the homepage section by section, in the order a buyer decides
1 / 9
Use ← → keys
1of 9
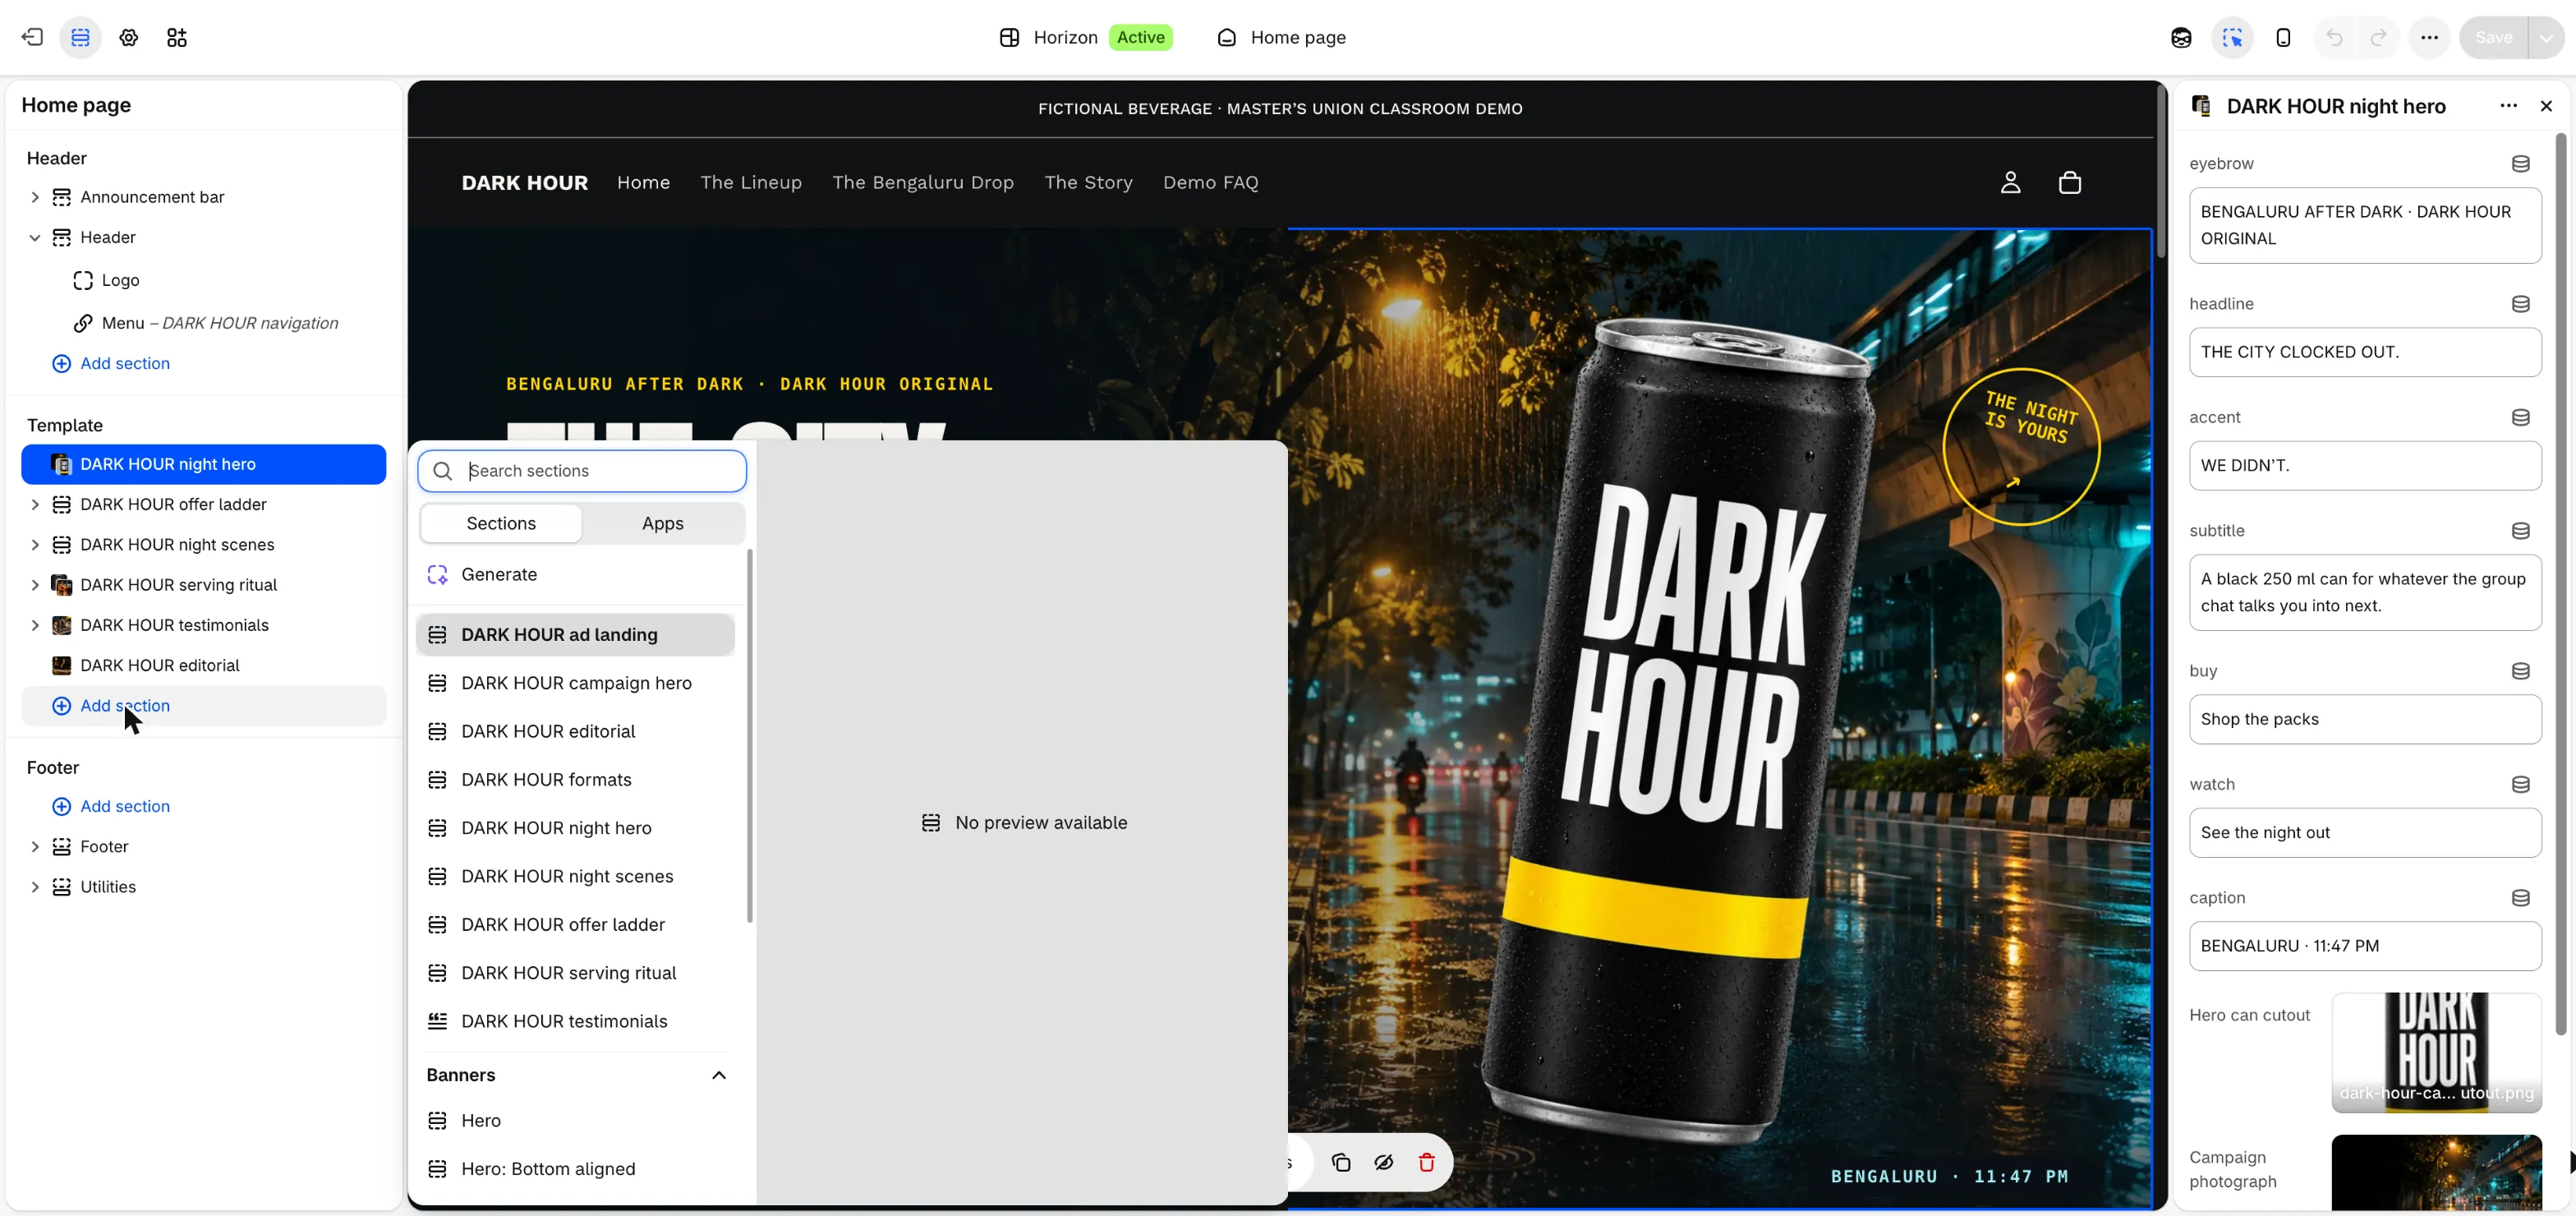
1Press Add section under TemplateNew sections land at the bottom of the page. Drag them into place afterwards.
2Search sections or browse by typeType what you need, such as "testimonials" or "FAQ".
3Your theme's own sections sit at the topDark Hour's sections were built through ChatGPT. Shopify's standard ones follow below.
4Banners hold hero imagesStart here if your theme has no hero yet.
5Live store: one question as the section heading"What are we bringing?" turns a price list into a choice the buyer makes.
6Offer three choices and highlight the middle oneThe six-pack is the one Dark Hour wants most people to pick, so it gets the yellow card.
7Label each pack by who it is forFirst taste, starter box, lowest price per can. The buyer finds their own card fast.
8Show the price per can₹108.25 a can against ₹129 for a single makes the bigger pack feel like the better deal.
9Each button adds that exact pack to the cartOne tap, no extra page. Fewer steps means fewer people drop off.
A homepage order that matches how people decide
Announcement bar: the offer or the free shipping line
Hero: am I in the right place?
Products or packs: what can I buy?
Three reasons: why this one?
Proof: reviews, ratings, customer reels
What is inside and how to use it
FAQ: delivery, returns, payment
Footer with policies and contact
Why it mattersA buyer from an ad asks the same questions in the same order. Each section answers one of them.
ChatGPT laneFill the [brackets], paste into ChatGPT
Step 5Theme editor → Products → Default product
Make the product page answer every doubt next to Add to cart
1 / 8
Use ← → keys
1of 8
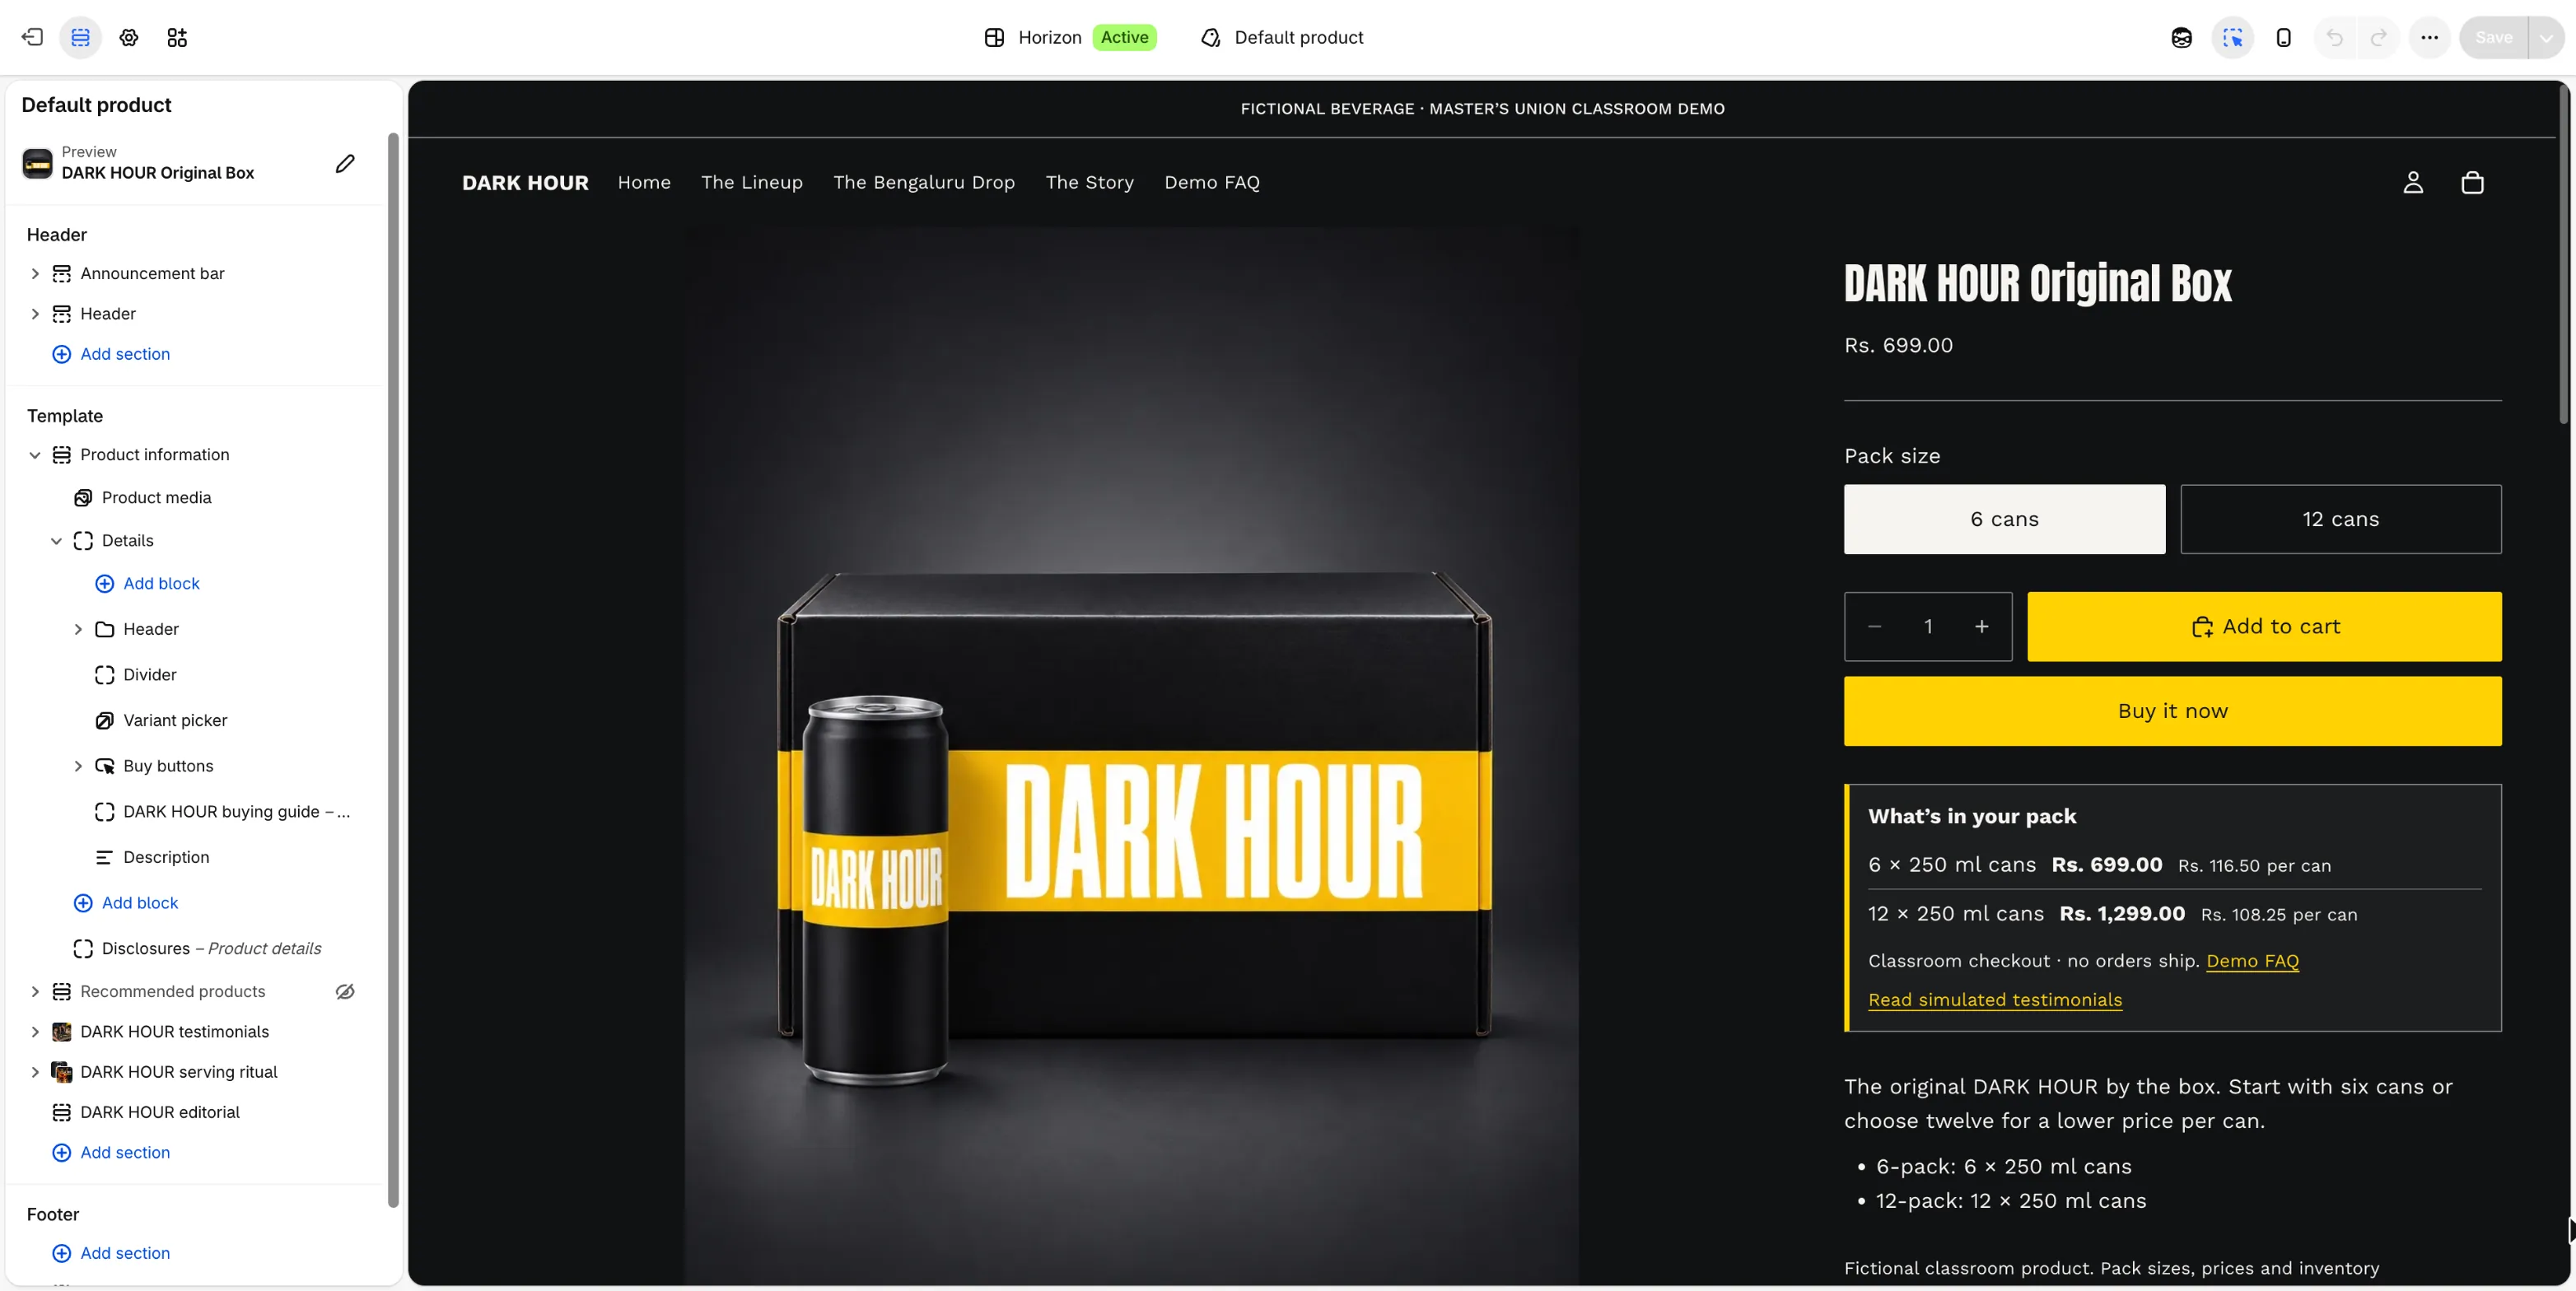
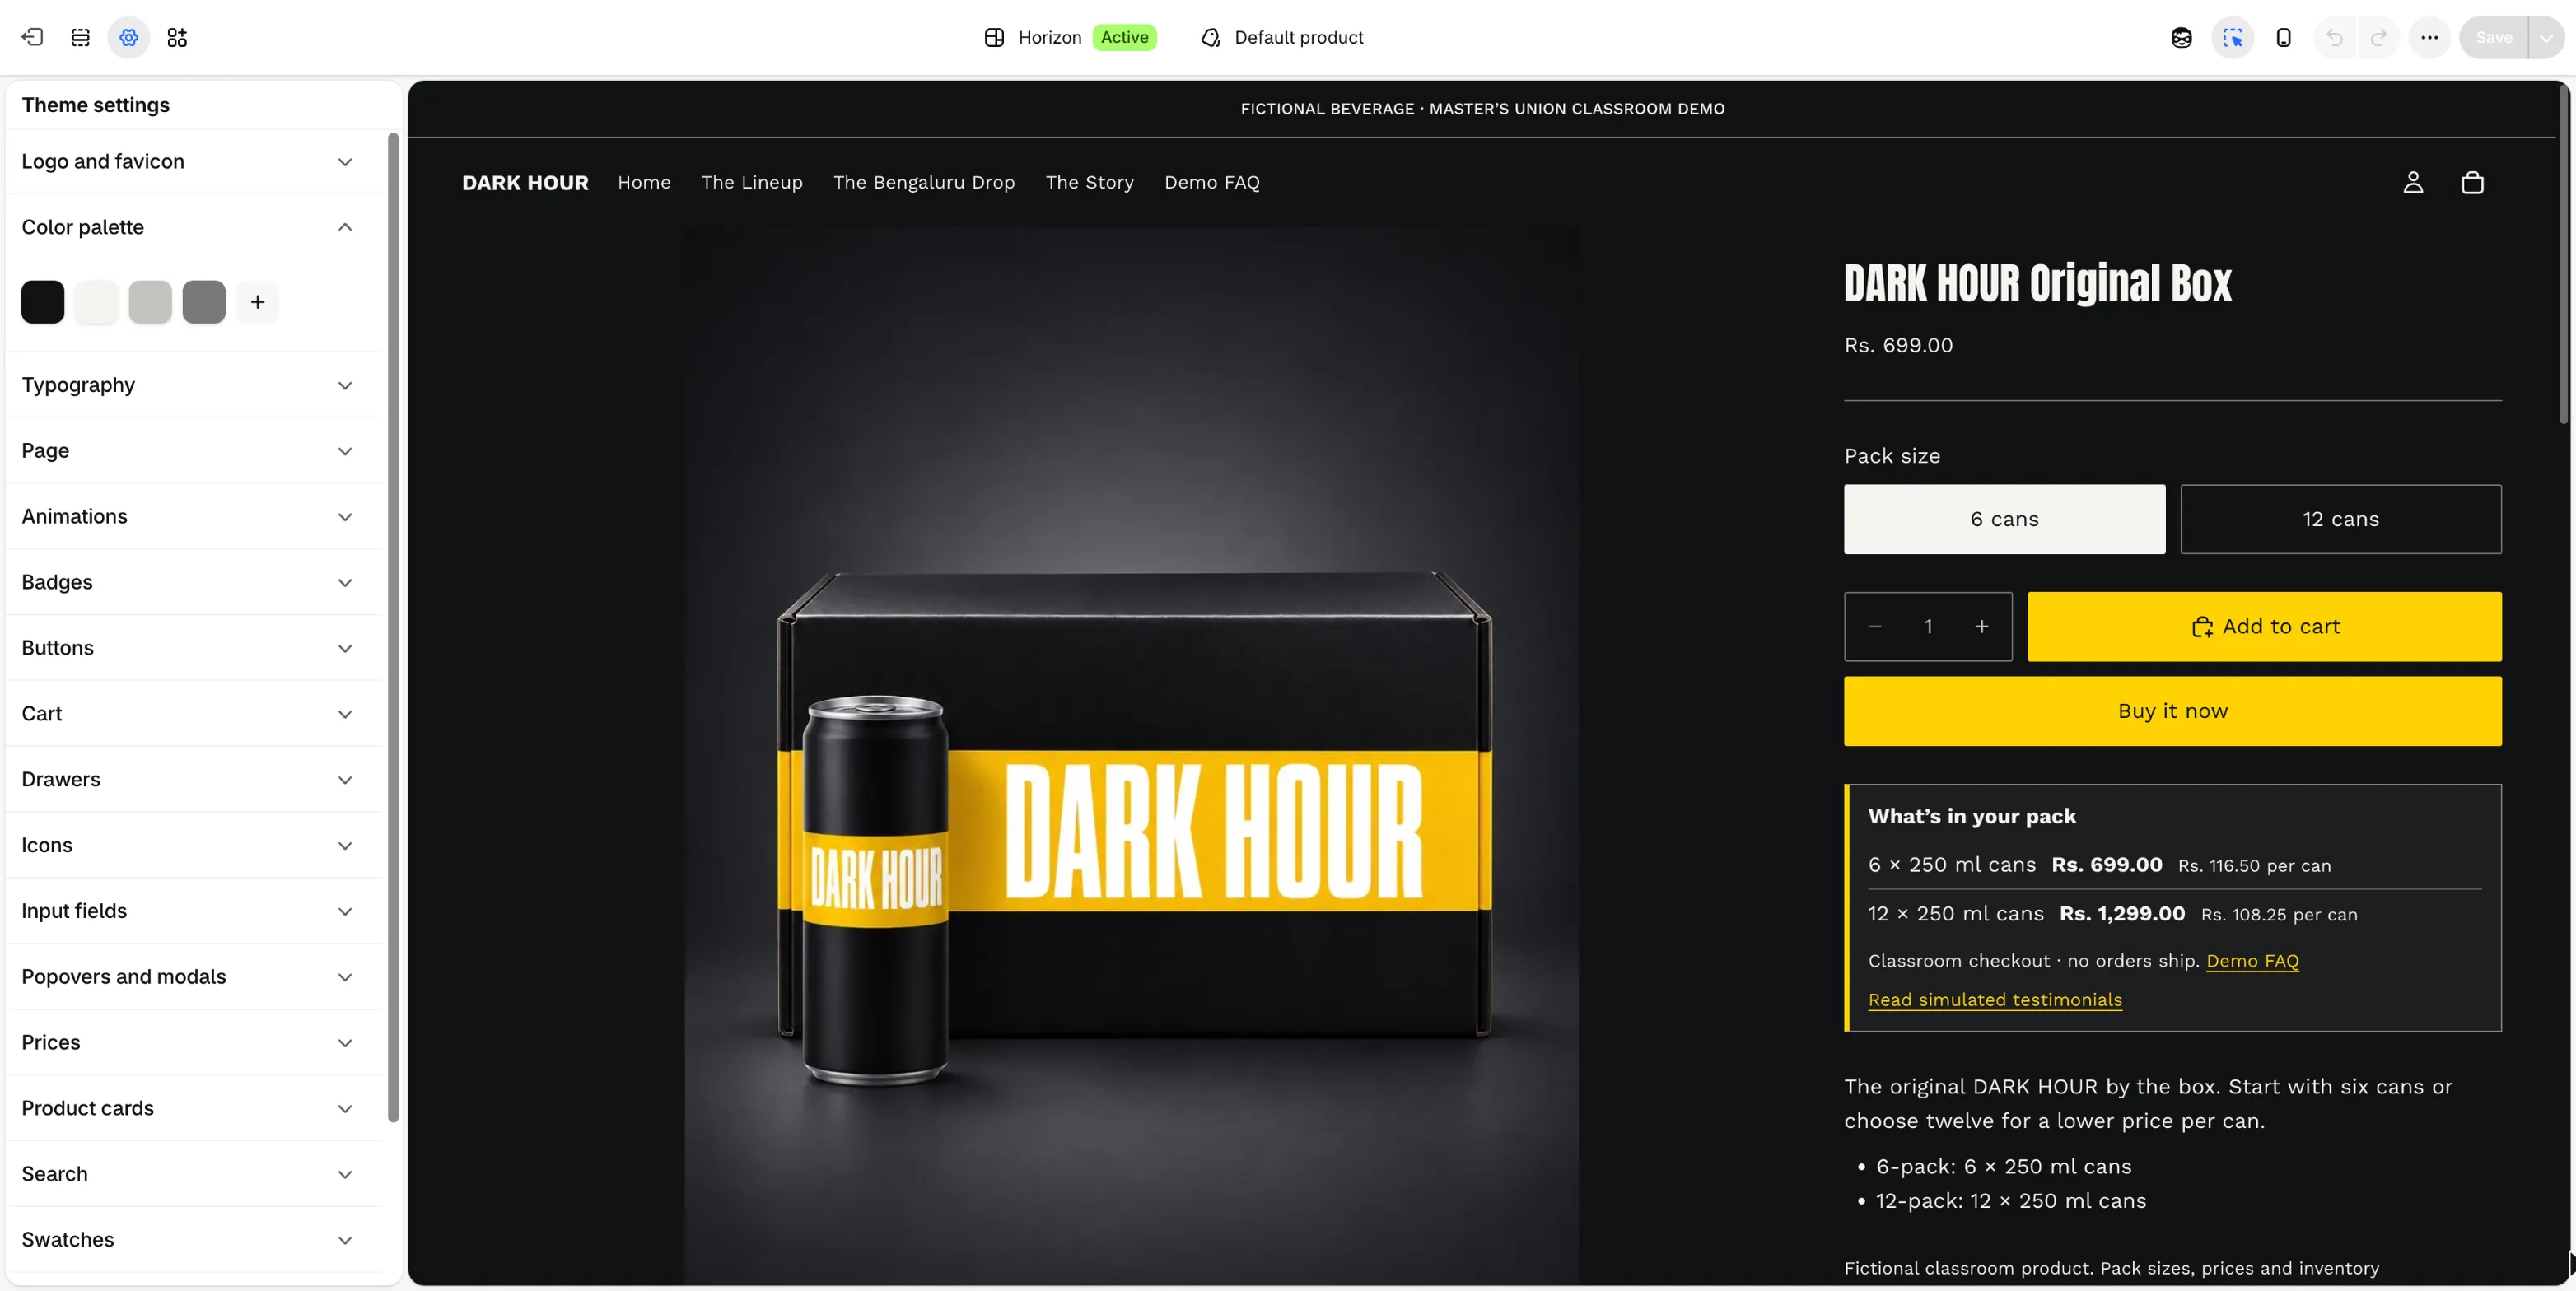
1Switch the editor to Products, then Default productEvery product page in your store uses this one template, so you fix it once.
2These blocks build the right-hand columnVariant picker, buy buttons, a buying guide and the description. Drag them to change the order.
3Show packs or sizes as buttons, not a dropdownButtons show every choice at once, so nobody misses the 12-can box.
4Add to cart and Buy it now sit right under the choiceTurn on the sticky add-to-cart bar in the Product information settings, so the button follows the scroll on phones.
5Answer the next doubt right under the buttonsDark Hour shows what is in each pack and the price per can, where the buyer is deciding.
6Then the descriptionShort lines and bullets. Most buyers never scroll past this.
7Check the same page in mobile viewPress the phone icon at the top of the editor. Most buyers arrive from an Instagram ad on a phone.
8Price, options and the button show without much scrollingIf a buyer has to hunt for Add to cart on a phone, the ad money is wasted.
Why it mattersIn Ira's test week, 95 of every 100 product page visitors left without adding to cart. This page is the leak to fix first.
ChatGPT laneFill the [brackets], paste into ChatGPT
Step 6Theme editor → Theme settings
Set brand colours, fonts and logo once for the whole store
1 / 5
Use ← → keys
1of 5
1Open Theme settings, the gear iconThese settings apply to every page at once, so you set them one time.
2Upload the logo and a small square faviconThe favicon is the tiny icon in the browser tab and in bookmarks.
3Keep the colour palette shortDark Hour's palette is near-black and off-white, so the yellow on its buttons stands out.
4Pick one display font and one body fontDark Hour pairs a tall condensed heading font with a plain, easy-to-read body font.
5Set one button style for the whole storeUse your strongest colour, so every Add to cart looks the same on every page.
Why it mattersConsistency is what makes a three-day-old store look like a brand.
ChatGPT laneFill the [brackets], paste into ChatGPT
Step 7Settings → Policies · Settings → Shipping and delivery
Publish the policies and shipping rules buyers look for before paying
1 / 9
Use ← → keys
1of 9
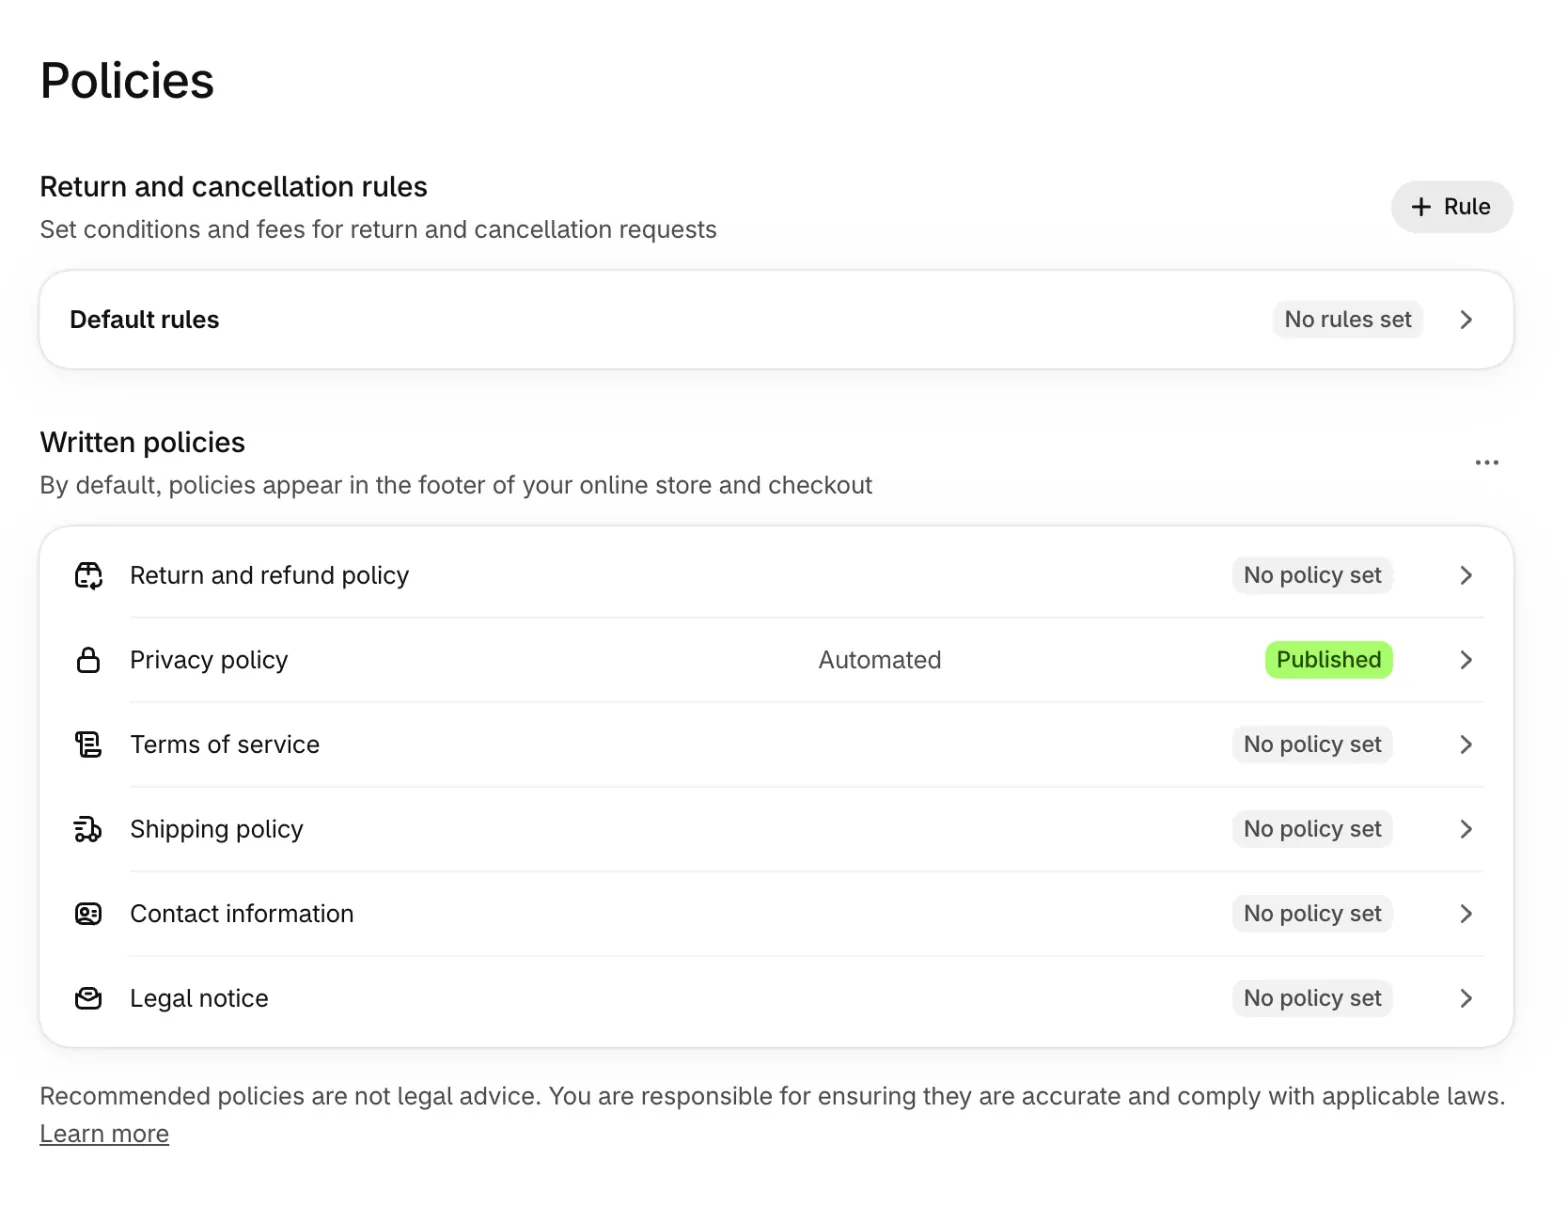
1Settings, then Policies: open Return and refund policySay how many days a buyer has, what condition the item must be in, and how fast the refund arrives.
2Write a shipping policy with your real delivery timesName the courier and the days, such as 3 to 6 days across India. Never promise faster than you ship.
3Add contact informationAn email and phone you answer. Buyers, Razorpay and Meta all look for it.
4Let Shopify automate the privacy policyCheck it says Published. The demo store still shows No policy set on the others. Yours must not.
5Templates are not legal adviceShopify can suggest wording, but you are responsible for every promise in it. Read each line.
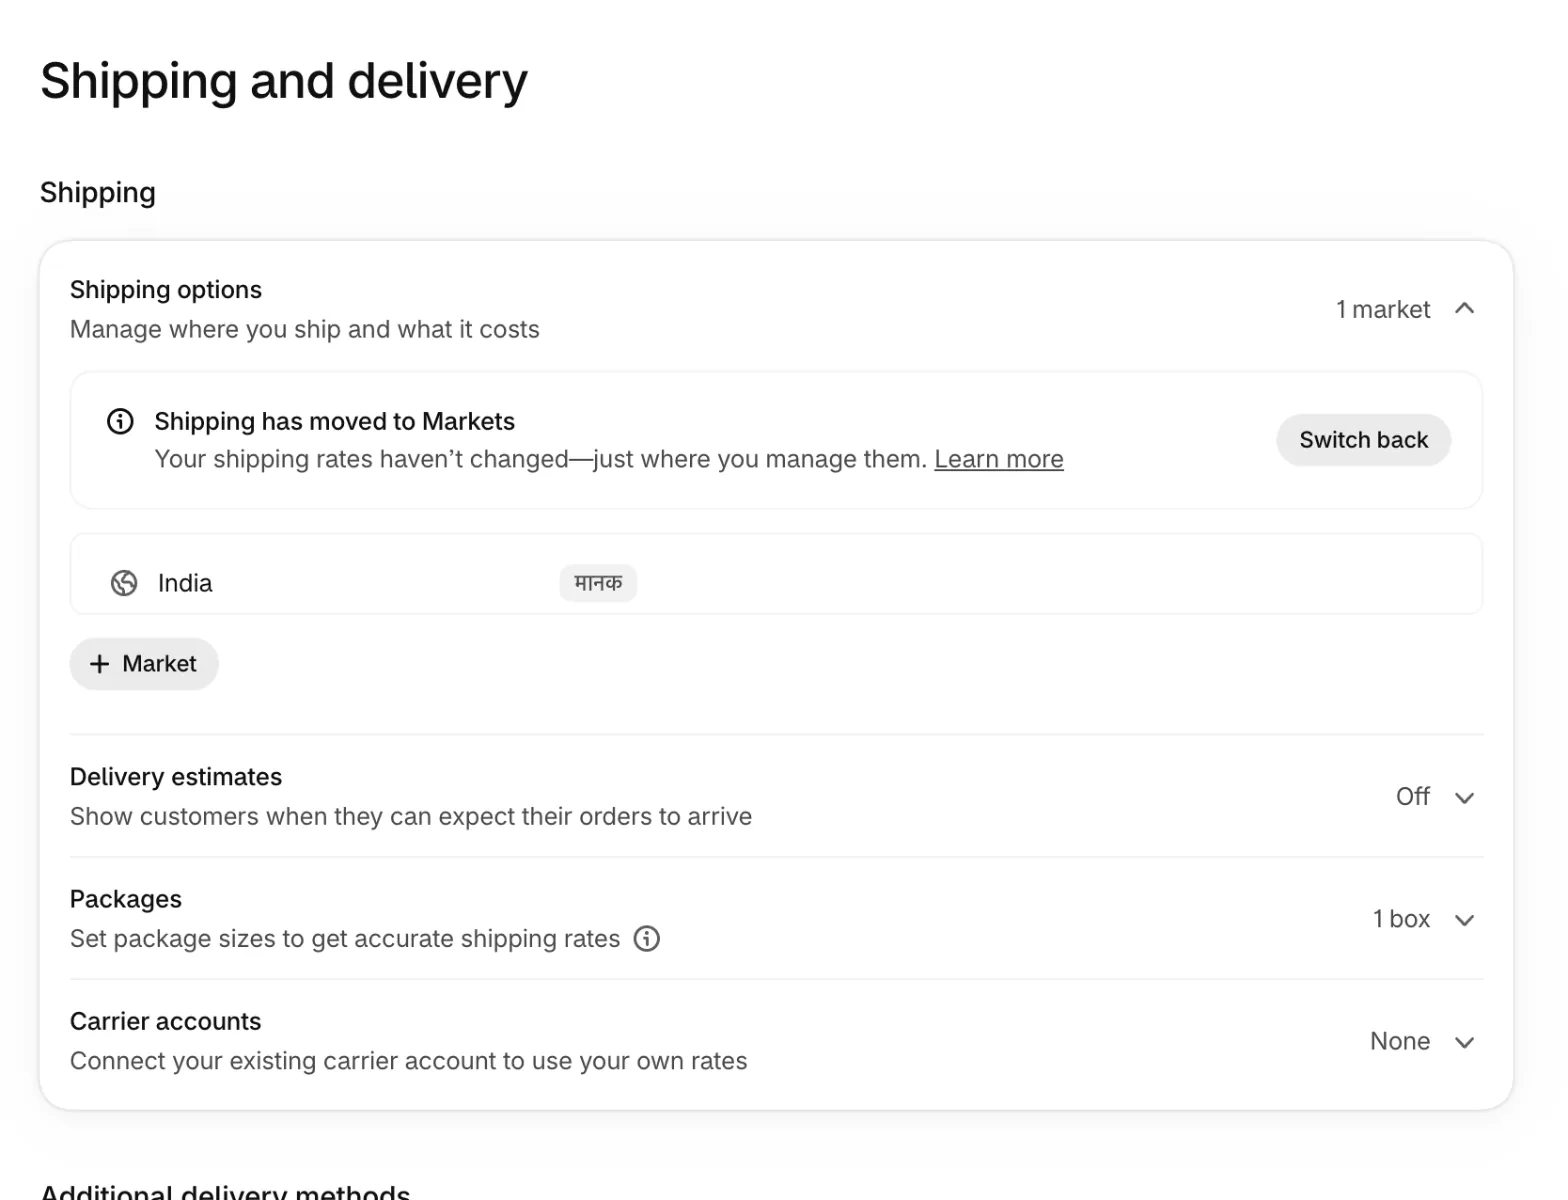
6Settings, then Shipping and deliveryShipping now lives inside Markets. Your rates sit in each market, and most of you need only one: India.
7Open the India market and set your ratesA flat rate, or free shipping above an order value. Price it into your break-even.
8Turn on delivery estimates if your courier is predictableBuyers see when the order arrives before they pay. It is still Off on the demo store.
9Set your real box sizeAccurate package sizes give accurate shipping rates at checkout.
Why it mattersPolicies appear in your footer and at checkout. Buyers look for returns and delivery times before they pay, and missing contact details make a new store look unsafe.
ChatGPT laneFill the [brackets], paste into ChatGPT
Step 8ChatGPT + Shopify plugin
Drive ChatGPT like a creative director, the way Dark Hour was built
1 / 11
Use ← → keys
1of 11
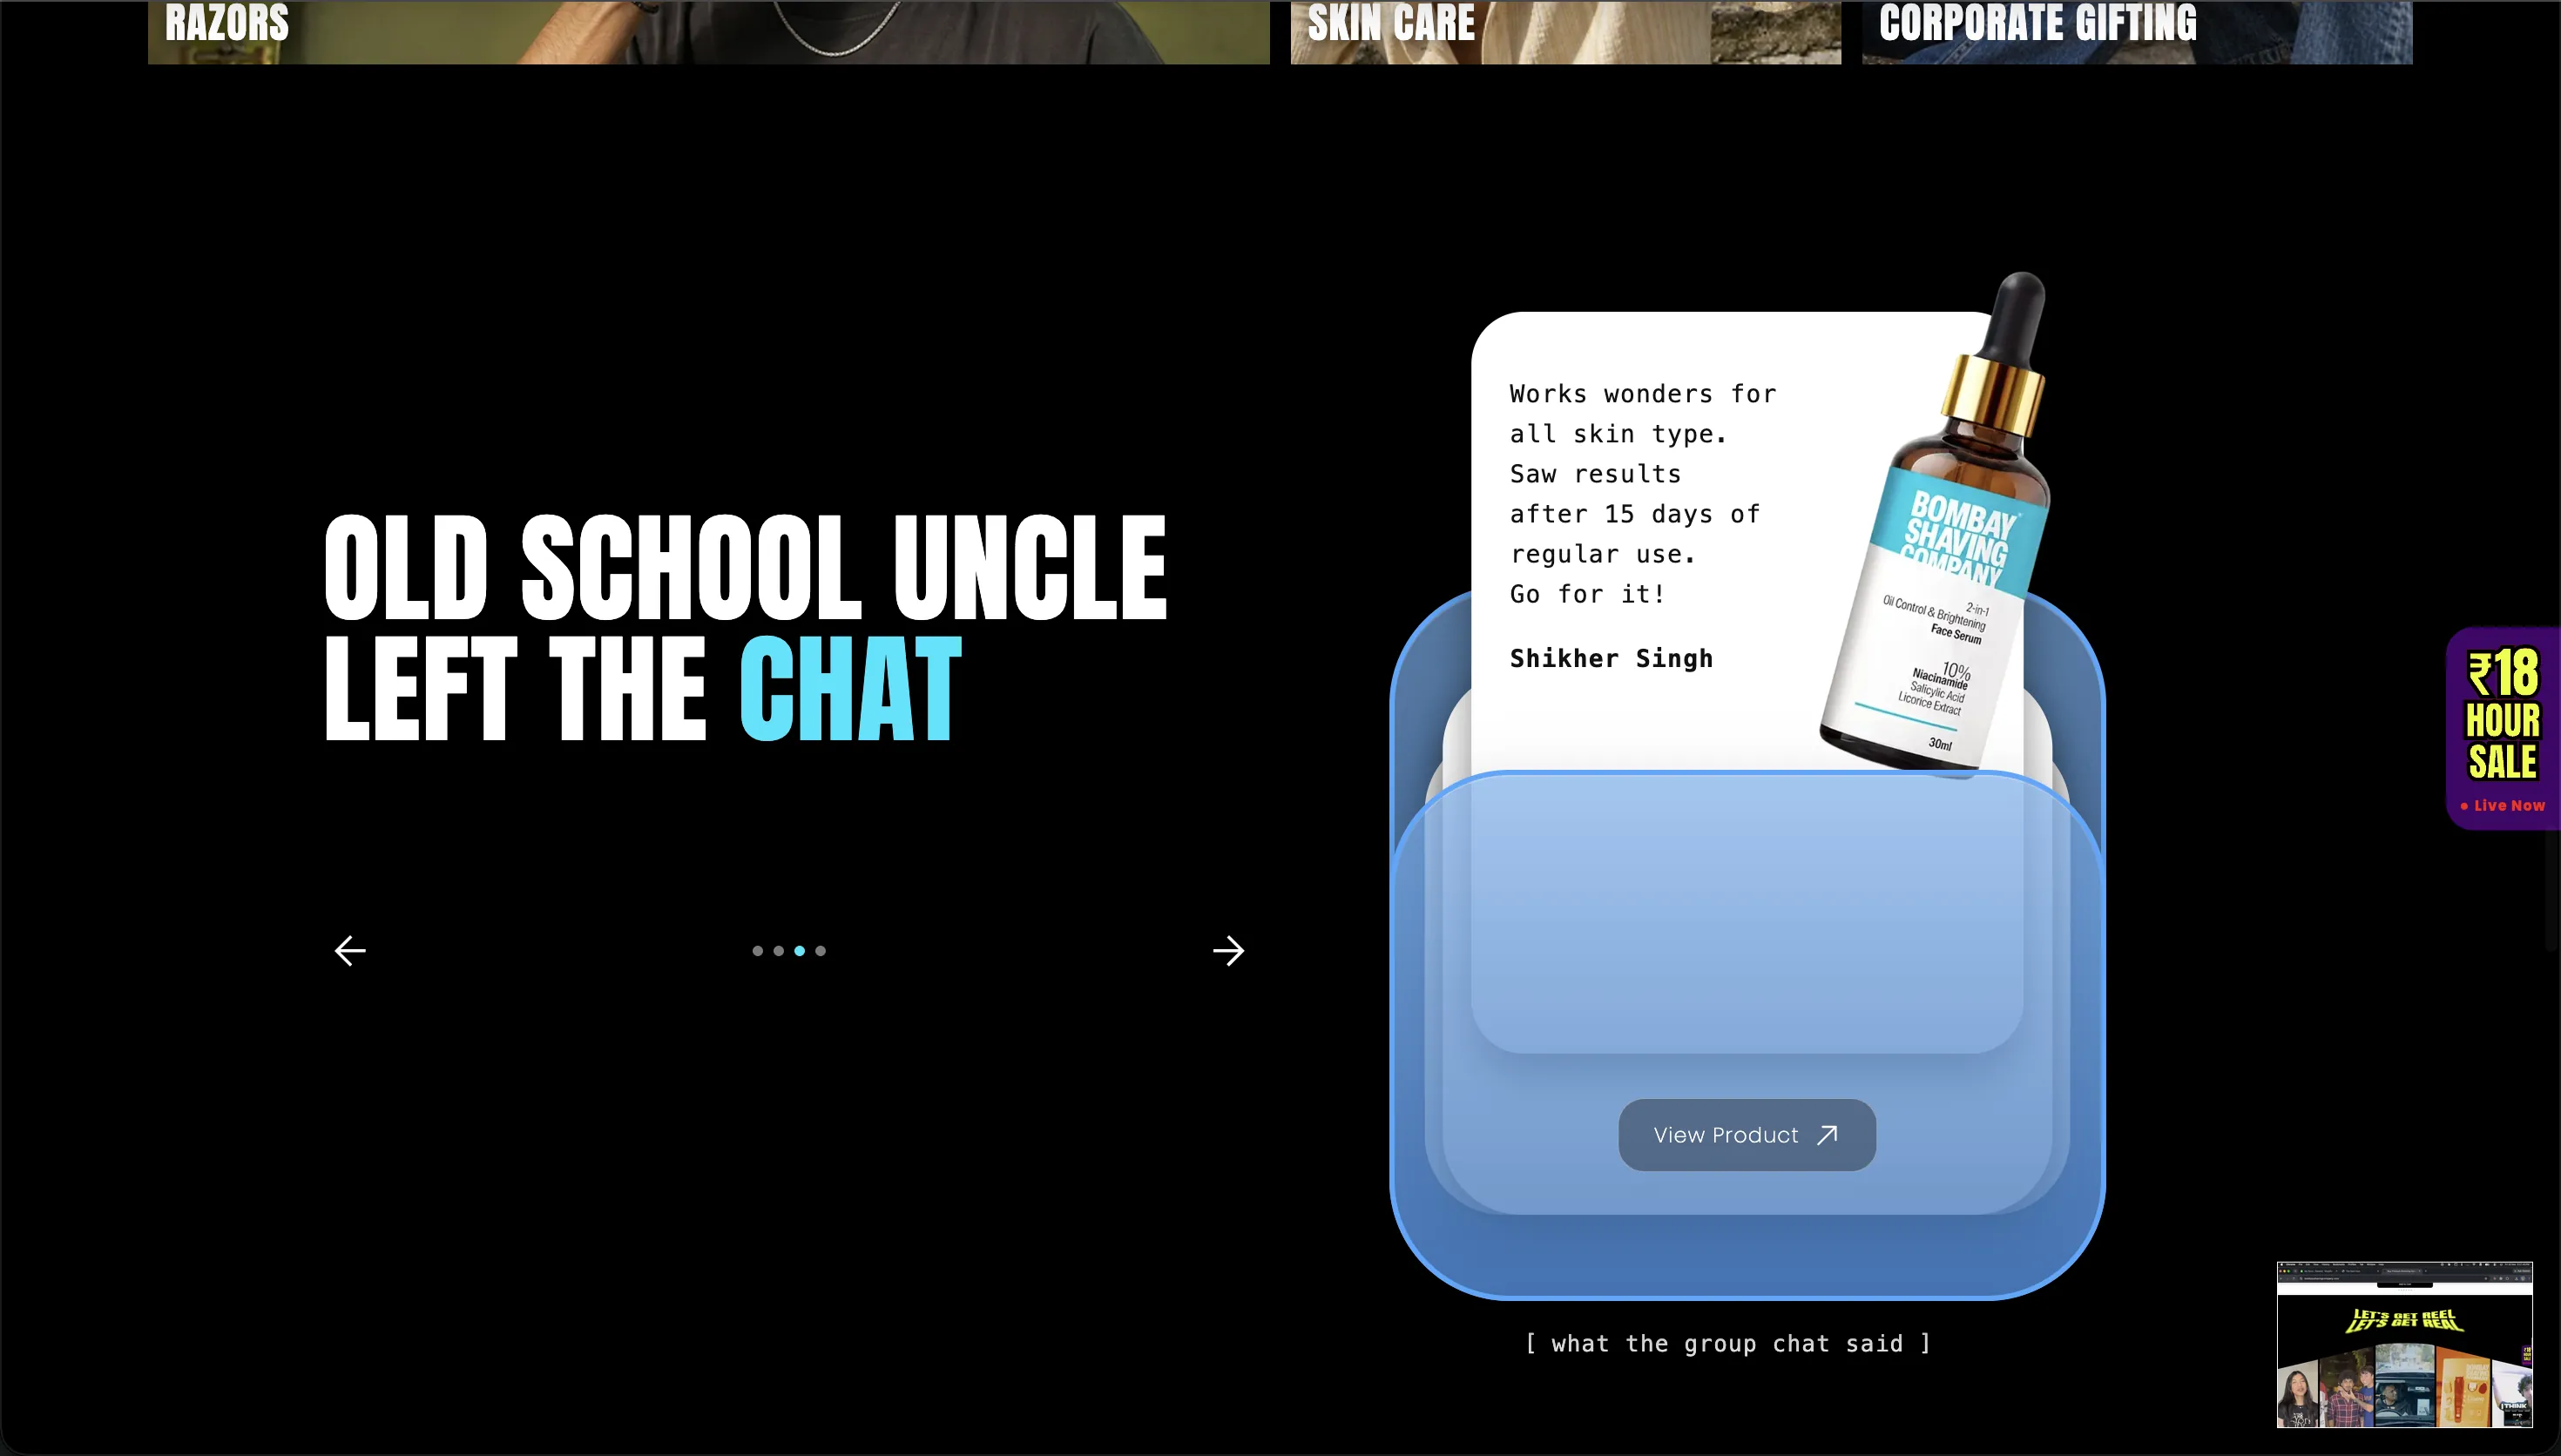
1Reference 1, Bombay Shaving Company: one giant promiseDisplay type, two colours, one line. Dheeraj gave ChatGPT this screenshot as a reference, not to copy.
2Proof as iconsYears, awards and customers, shown as big numbers a scrolling buyer takes in at a glance.
3A sale tab that stays on screenIt follows the buyer down the page, so the offer is never more than one tap away.
4A customer quote styled like a noteIt reads like a message from a friend, not a review widget. Only ever use real quotes on your own store.
5A headline that talks like the buyerDark Hour's "The city clocked out. We didn't." works the same way.
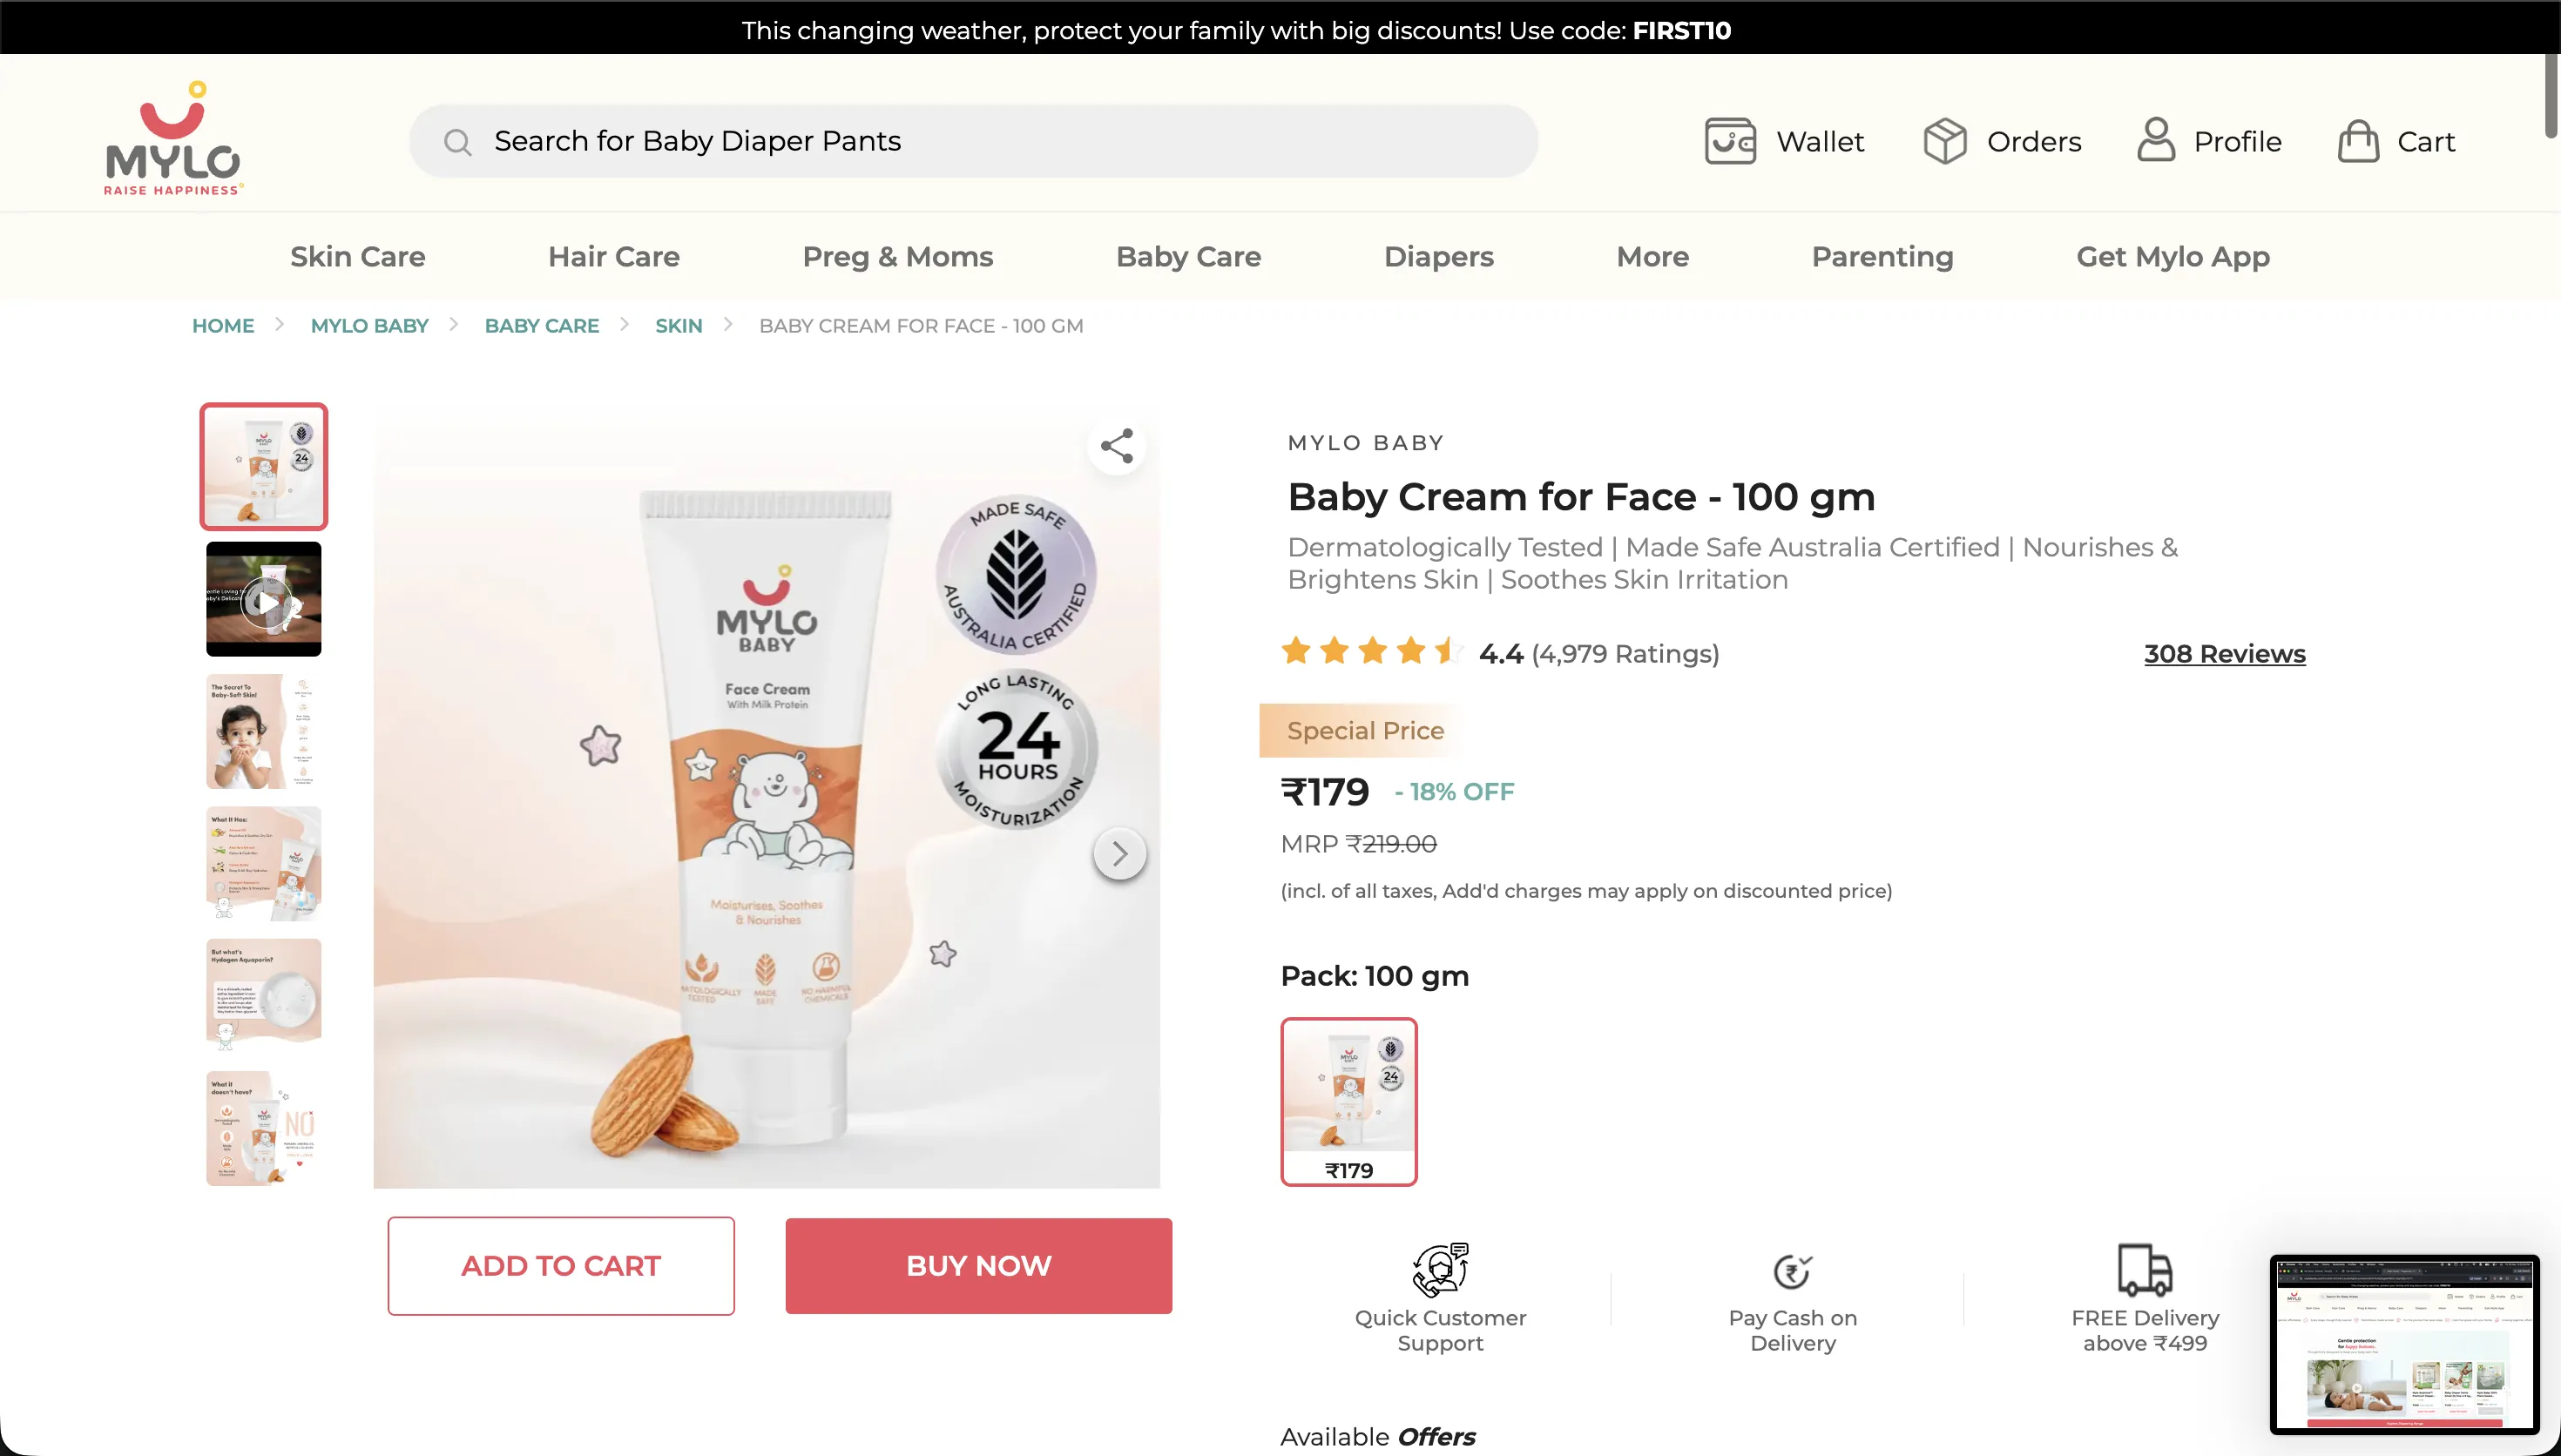
6Reference 2, Mylo: rating and review count by the nameProof sits exactly where the buyer is deciding.
7MRP struck out, with the percentage offUse it only when the MRP is real.
8Two buttons: Add to cart and Buy nowBuy now skips the cart for buyers who have already decided.
9A trust row under the priceSupport, cash on delivery and free delivery above ₹499 answer three doubts in one line.
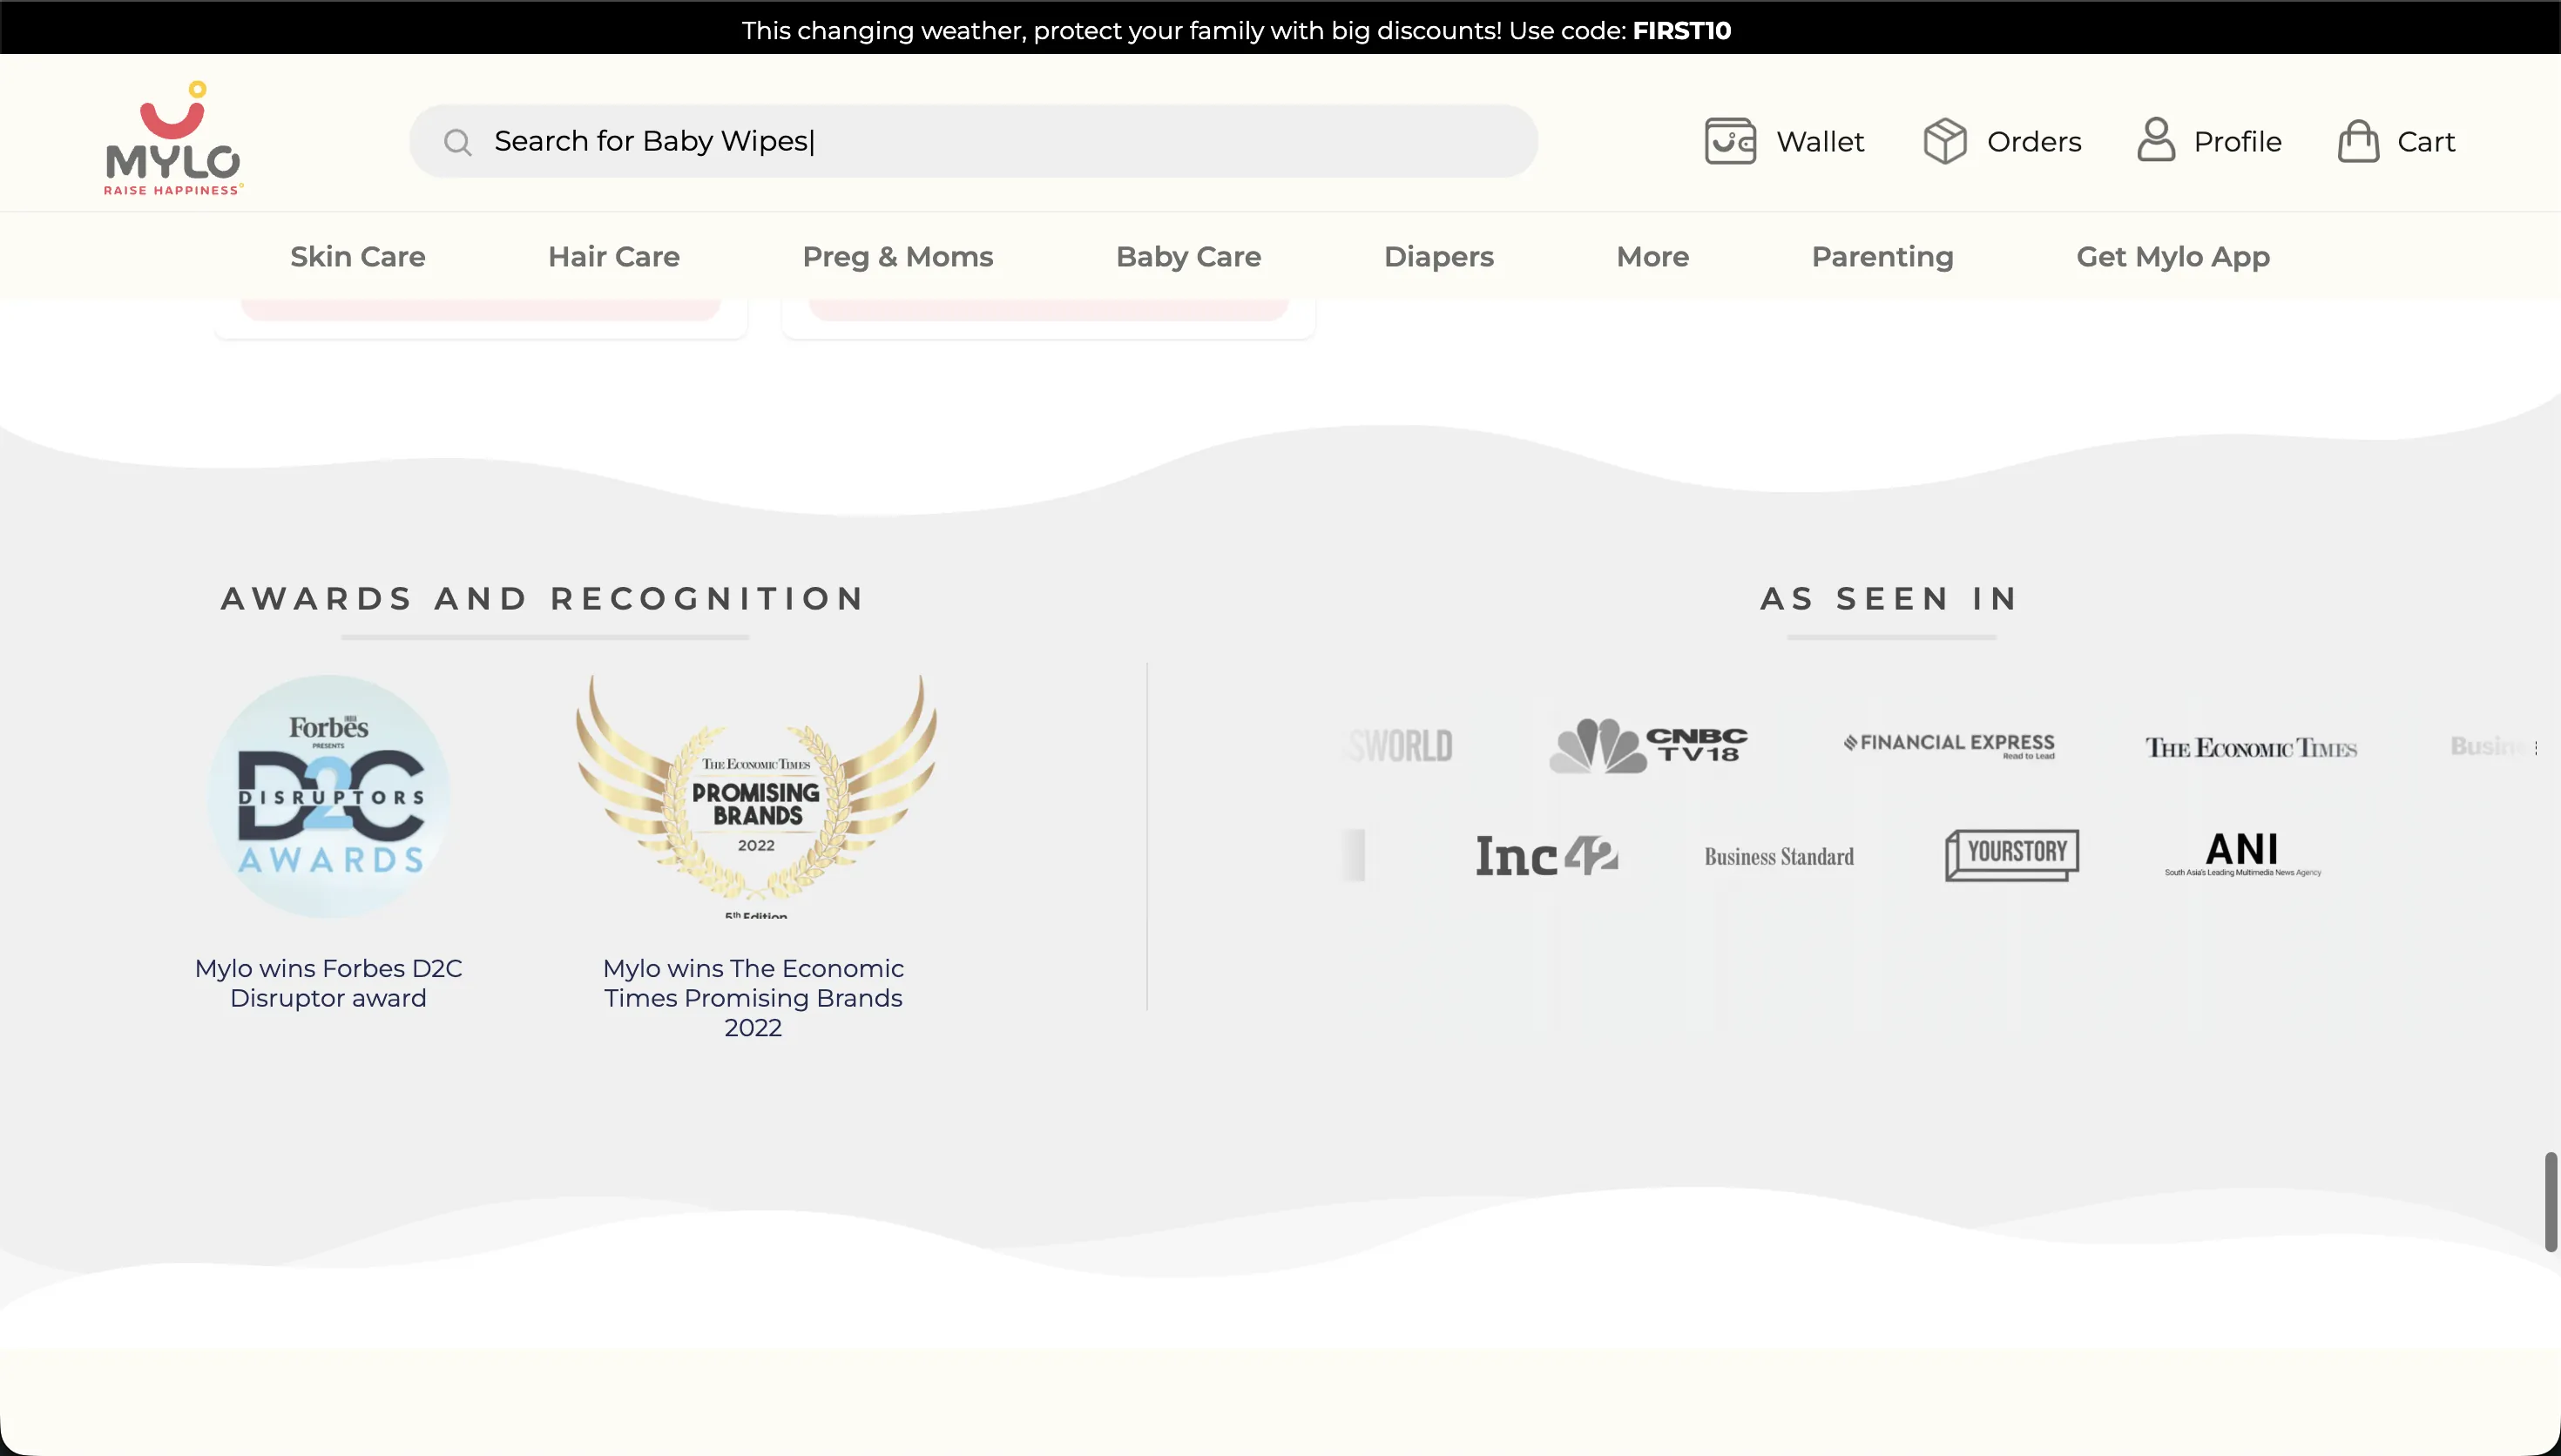
10Awards with the name of who gave themA logo alone means little. The award name makes it believable.
11Press logos under "As seen in"Show only coverage you really have. A new brand can skip this until it earns some.
The loop that took Dark Hour from boring to 9/10
Brief and build. ChatGPT built products, collections, pages and a theme in draft.
Honest feedback. Dheeraj replied: The store looks incredibly boring and has no real marketing calibre.
Feed references. He attached screenshots of Bombay Shaving Company and Mylo, and asked for quirky layouts, exciting imagery and reviews that make people want to buy.
Score it.Definitely better. But it is still 7/10 at best.
Ask for concepts before building.Please brainstorm and show me image concepts before we execute. ChatGPT returned three directions: The Night Jumps Out, Night Shift Transmission and The Group Chat Comes Alive.
Pick a hybrid, then publish.Create a hybrid of all 3 and execute. Publishing went live only after an explicit approval.
The Dark Hour testimonials are labelled as simulated because it is a classroom store. On your real store, use real reviews only. Judge.me collects them after delivery.
Why it mattersThe first version any AI builds is average by design. Quality comes from your references, a score and a request for options before it builds.
ChatGPT laneFill the [brackets], paste into ChatGPT
Step 9Your phone, in a private window
Audit your store against this checklist before you spend a rupee
Why it mattersA rupee spent sending people to a weak page is a rupee lost. Fix the page first, then buy traffic.
ChatGPT laneFill the [brackets], paste into ChatGPT
Checkpoint: before you move on
Part 3 · Session 5
Connect Meta and launch three ads at ₹1,000 a day
This is where Session 3's theory turns into settings. You connect Shopify to Meta so ads can see purchases, build one Sales campaign, set the audience with controls and suggestions, make three ads, and check everything before it goes live.
Step 1Shopify App Store → Facebook & Instagram by Meta
Connect Shopify to Meta so your ads can see who bought
1 / 5
Use ← → keys
1of 5
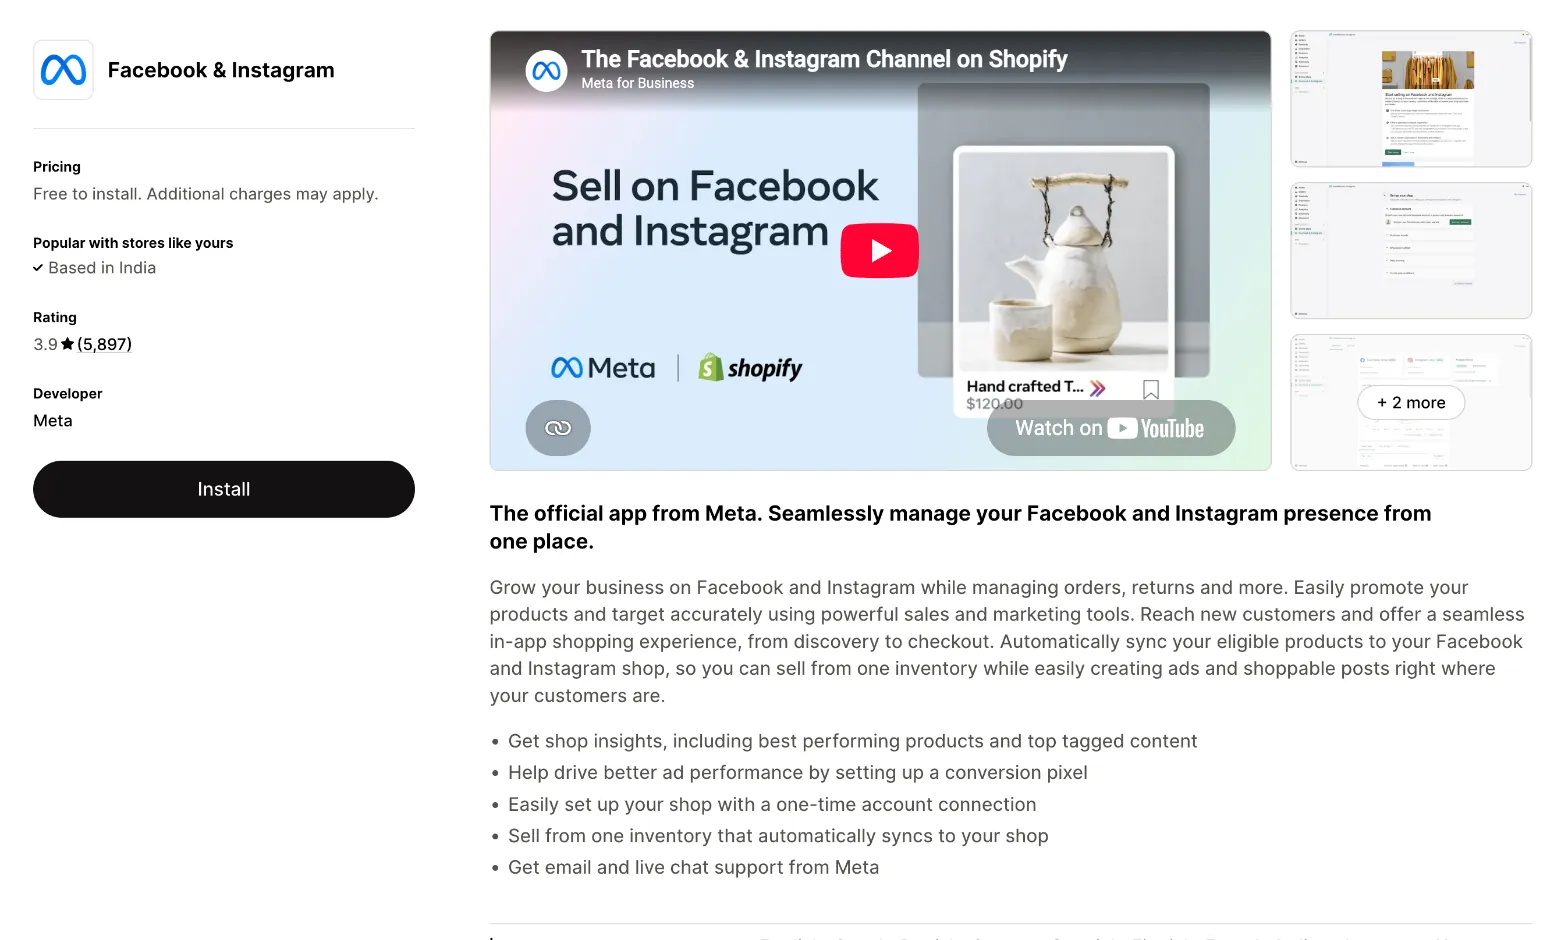
1In the Shopify App Store, find Facebook & InstagramIt is how your store talks to Meta: products, the pixel and your ad account.
2Check the developer is MetaMany look-alike apps exist. Only the one built by Meta is the official channel.
3The official app from MetaOne connection covers your Facebook Page, Instagram shop and ads.
4It sets up the conversion pixelThe pixel reports purchases back to Meta, so Ads Manager can see which ad sold.
5Press Install, then connect your accountsBusiness portfolio, Facebook Page, Instagram account and ad account. Turn on data sharing so the pixel goes live.
Have these ready first
A Facebook Page for the brand
An Instagram professional account linked to that Page
A Meta ad account with a payment method added
Your store set to Public
Why it mattersWithout the pixel, Meta cannot see who bought, so it cannot find more people like them. This is your first-party data from Session 3.
ChatGPT laneFill the [brackets], paste into ChatGPT
Step 2adsmanager.facebook.com
Read Ads Manager as three layers: campaign, ad set and ad
1 / 6
Use ← → keys
1of 6
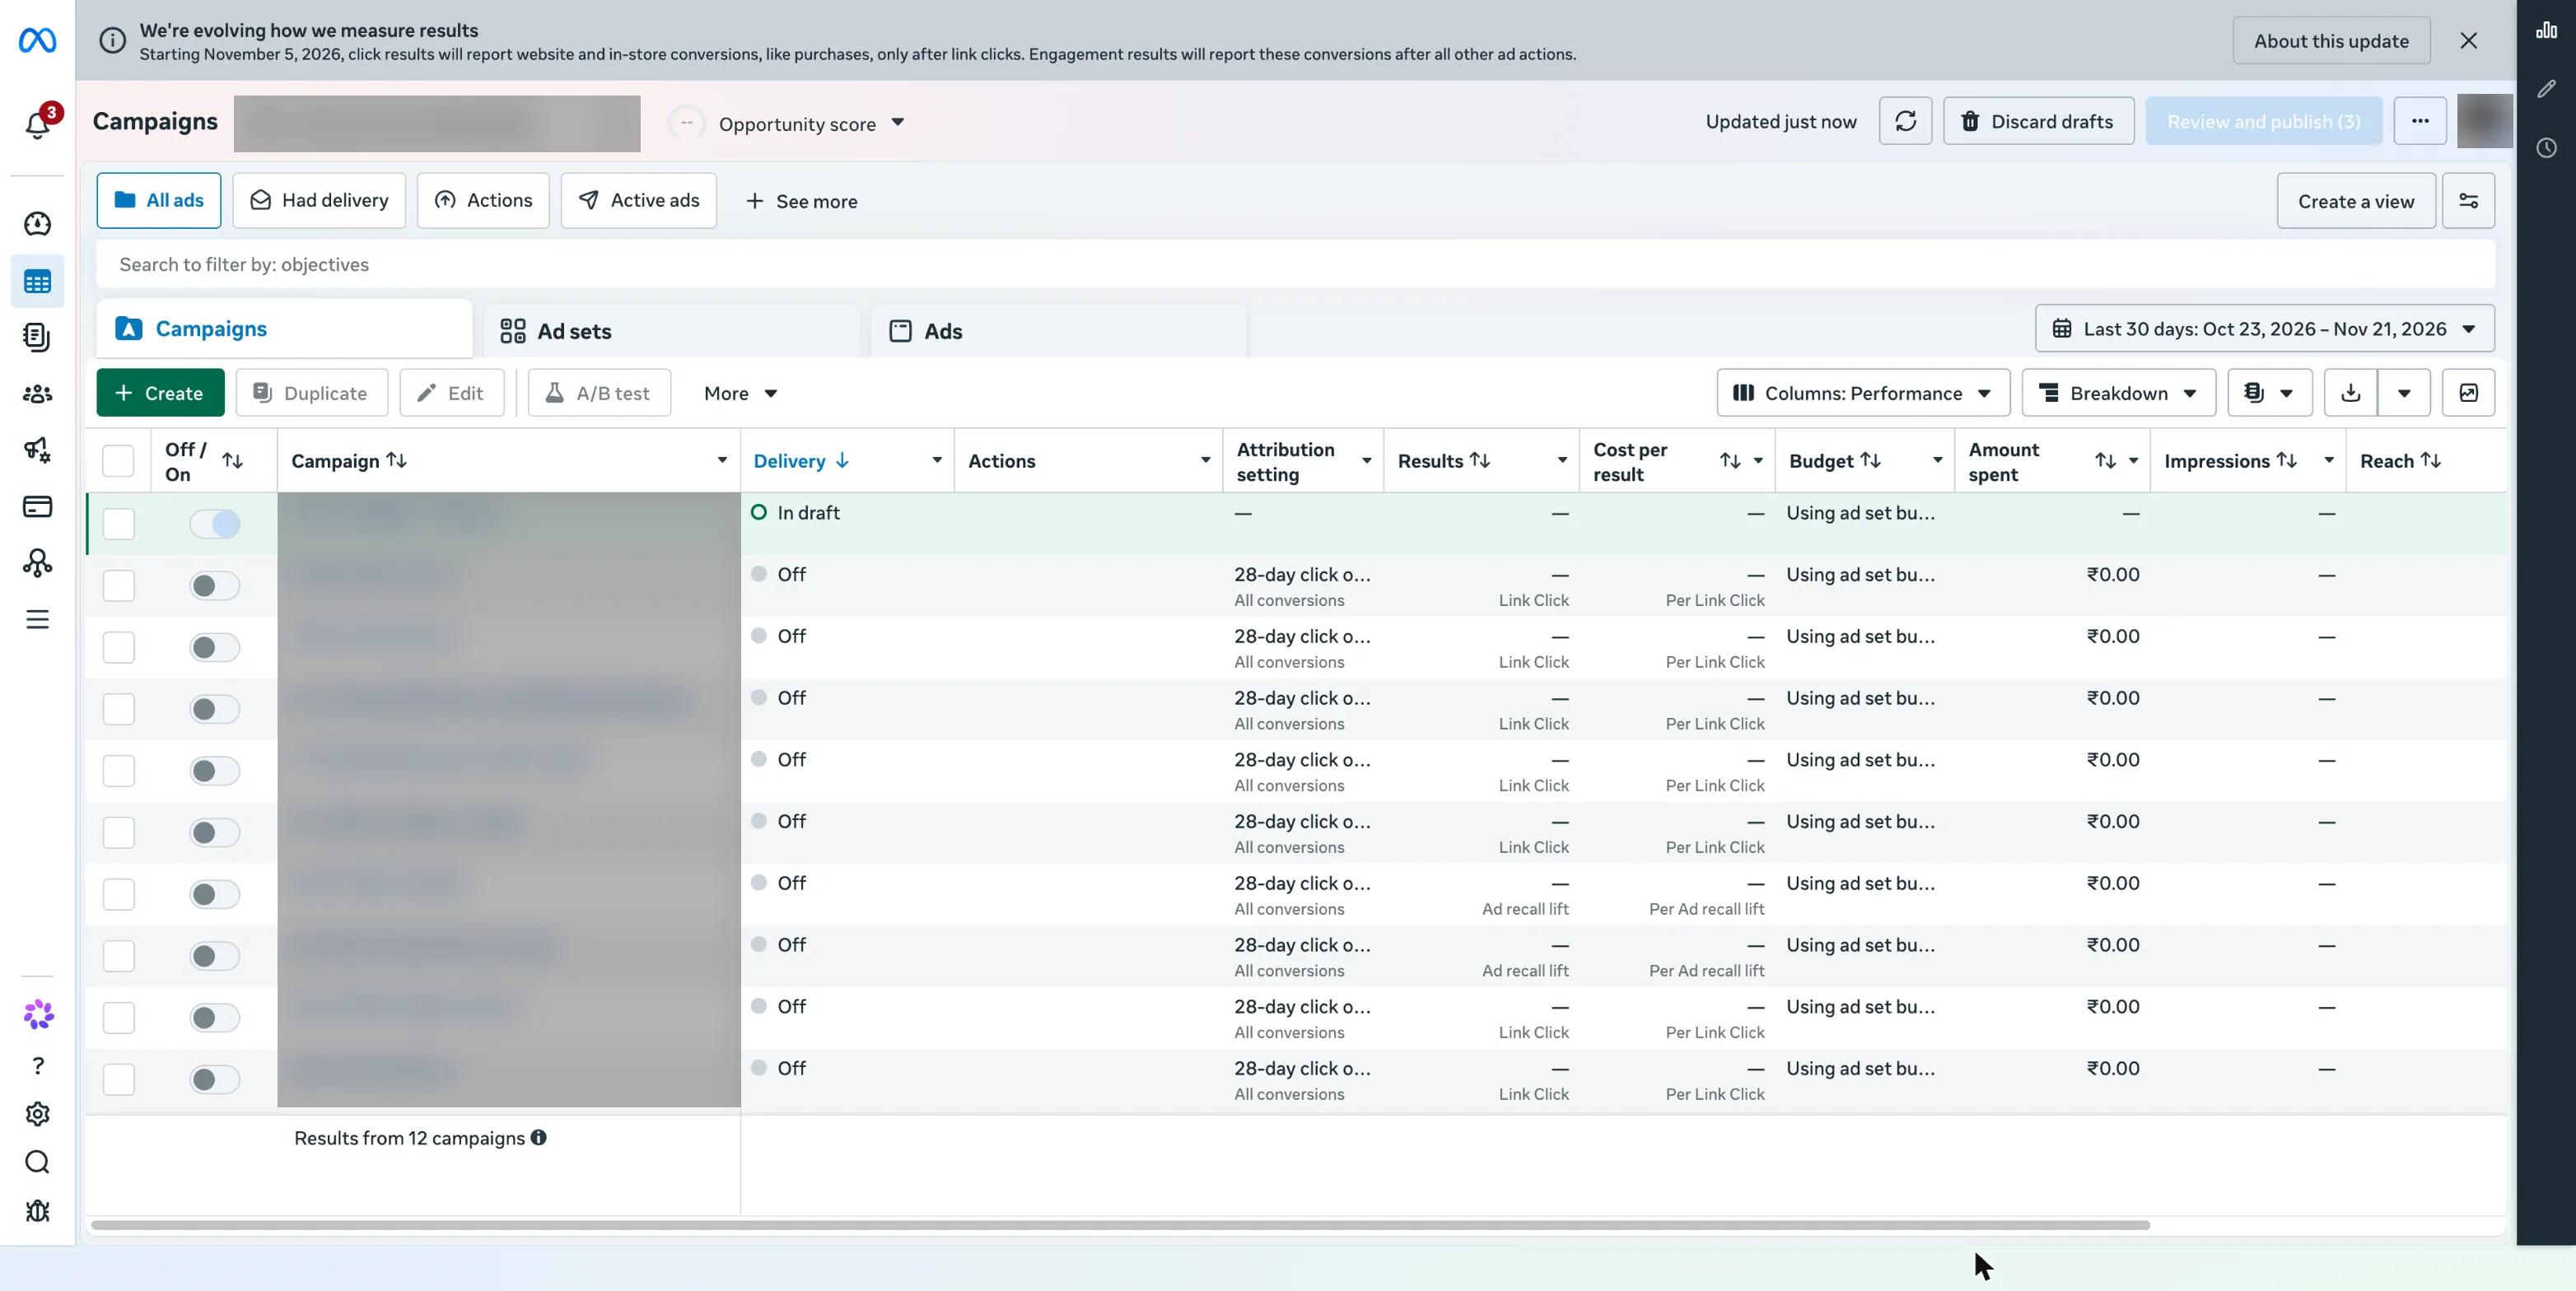
1Three tabs, three layersCampaign holds the goal and budget. Ad set holds who sees it, where and when. Ad holds what they see.
2Create starts a new campaignIt opens a draft. Nothing is live yet.
3Delivery shows each campaign's stateIn draft means not live and not spending. Off means paused. Names of client campaigns are blurred.
4Attribution setting decides which ad gets credit for a salePart 4 explains it, before you read your first results.
5Meta's notice: purchases now count only after link clicksFrom 5 November 2026, click results report website purchases only after a link click.
6Review and publish is the only button that puts ads liveEverything before it stays a draft, and nothing spends until you press it.
Why it mattersEvery setting you touch belongs to one layer. Knowing which saves you from editing the wrong one.
Step 3Create → Choose a campaign objective
Choose Sales as the objective, because you want purchases
1 / 5
Use ← → keys
1of 5
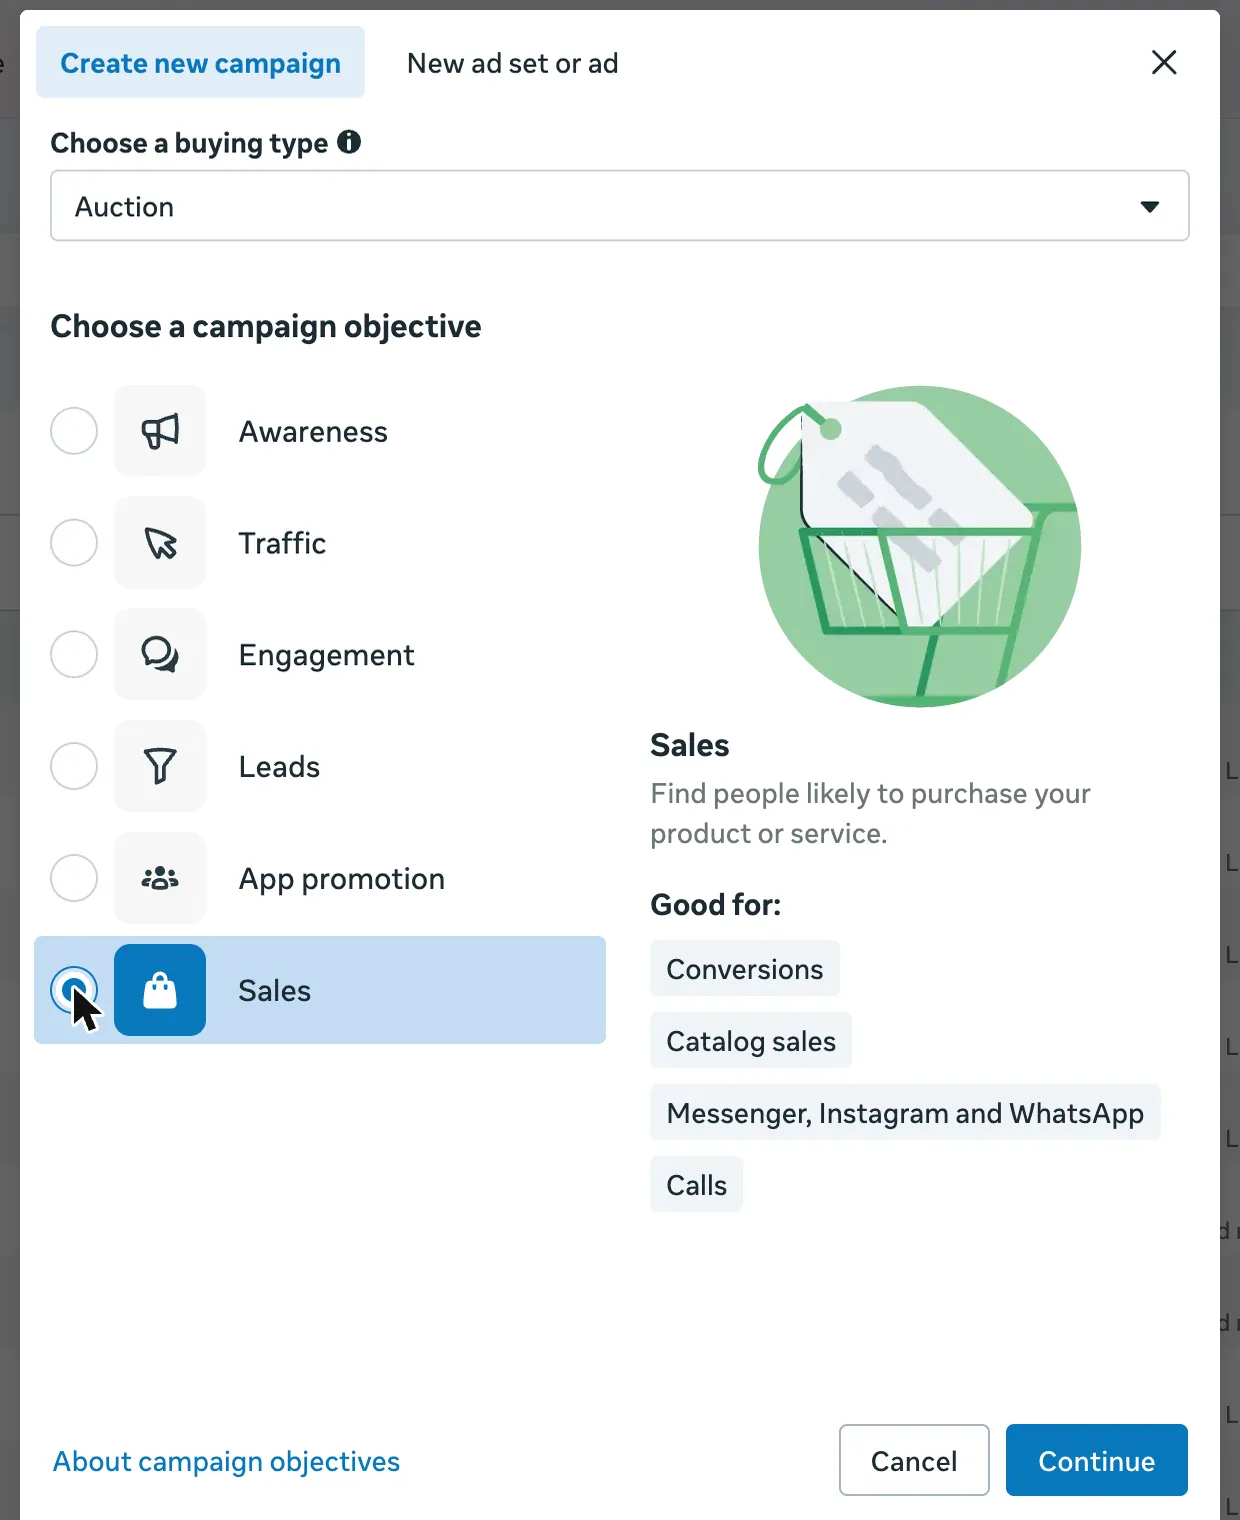
1Keep the buying type on AuctionYou bid for each view at the price the market sets. It suits small budgets.
2Six objectives, one question: what should people do?Each tells Meta which result to find for you.
3Choose SalesYou want purchases, so you ask Meta to find people likely to buy.
4Sales is built for conversionsA purchase on your website is a conversion. Catalogue sales and messaging can come later.
5Press ContinueMeta opens a draft at the campaign level.
Why not Traffic?
Traffic finds people who click, not people who buy. In Session 2, Ira's Reel B won the clicks and Reel C won the orders. Meta optimises for exactly what you choose.
Why it mattersThe objective tells Meta's system what success looks like. Pick the one that matches your goal.
Step 4Campaign level
Set the campaign budget to ₹1,000 a day, and read what Meta may spend
1 / 7
Use ← → keys
1of 7
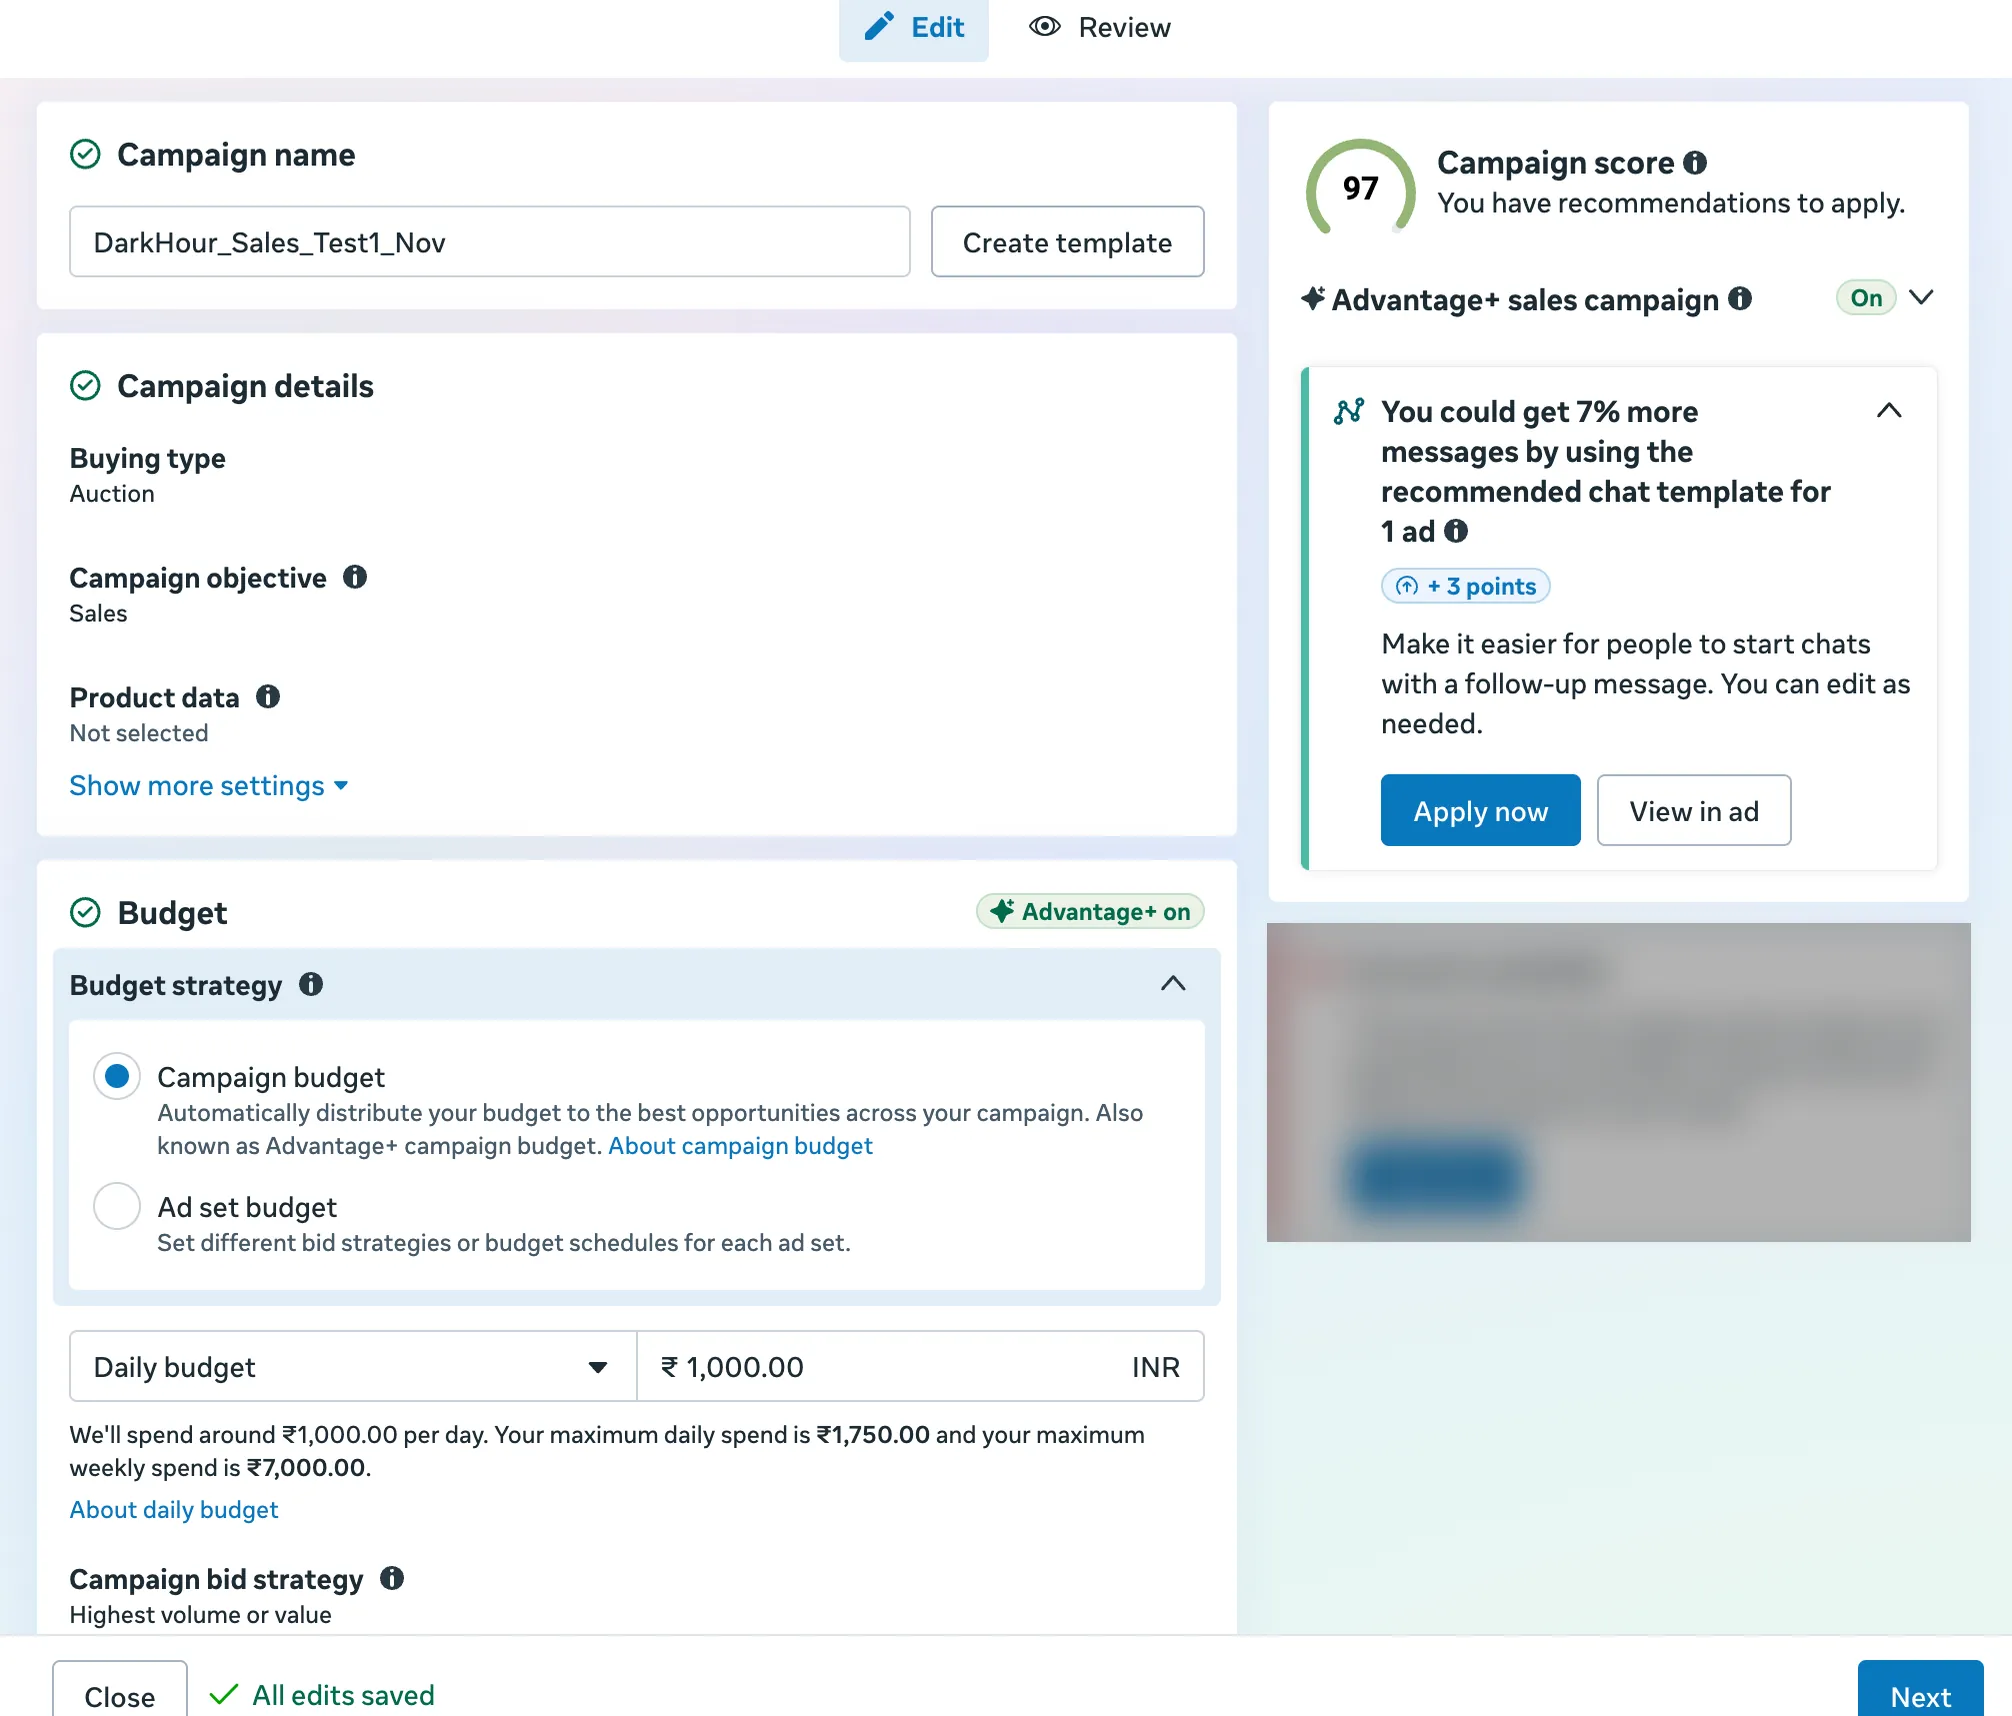
1Name the campaign so you can read it laterBrand, objective, test number and month. DarkHour_Sales_Test1_Nov is easy to find in a list of twenty.
2Check the objective says SalesIf it says anything else, close the draft and start again.
3Advantage+ sales campaign is OnMeta automates the audience and placements. For a small first test, leave it on.
4Choose Campaign budgetMeta moves the money to whichever ad set is working best.
5Set a daily budget of ₹1,000Your ₹3,000 to ₹5,000 then buys three to five days of learning.
6Read the line underneathMeta may spend up to ₹1,750 on one day, but never more than ₹7,000 in a week. It averages out to ₹1,000 a day.
7Press Next to set up the ad setThe draft saves as you go. "All edits saved" at the bottom confirms it.
Why it mattersA daily budget is an average, not a hard cap for each day. Plan your total spend from the weekly figure.
Step 5Ad set level → Conversion
At the ad set, send people to your website and optimise for Purchase
1 / 11
Use ← → keys
1of 11
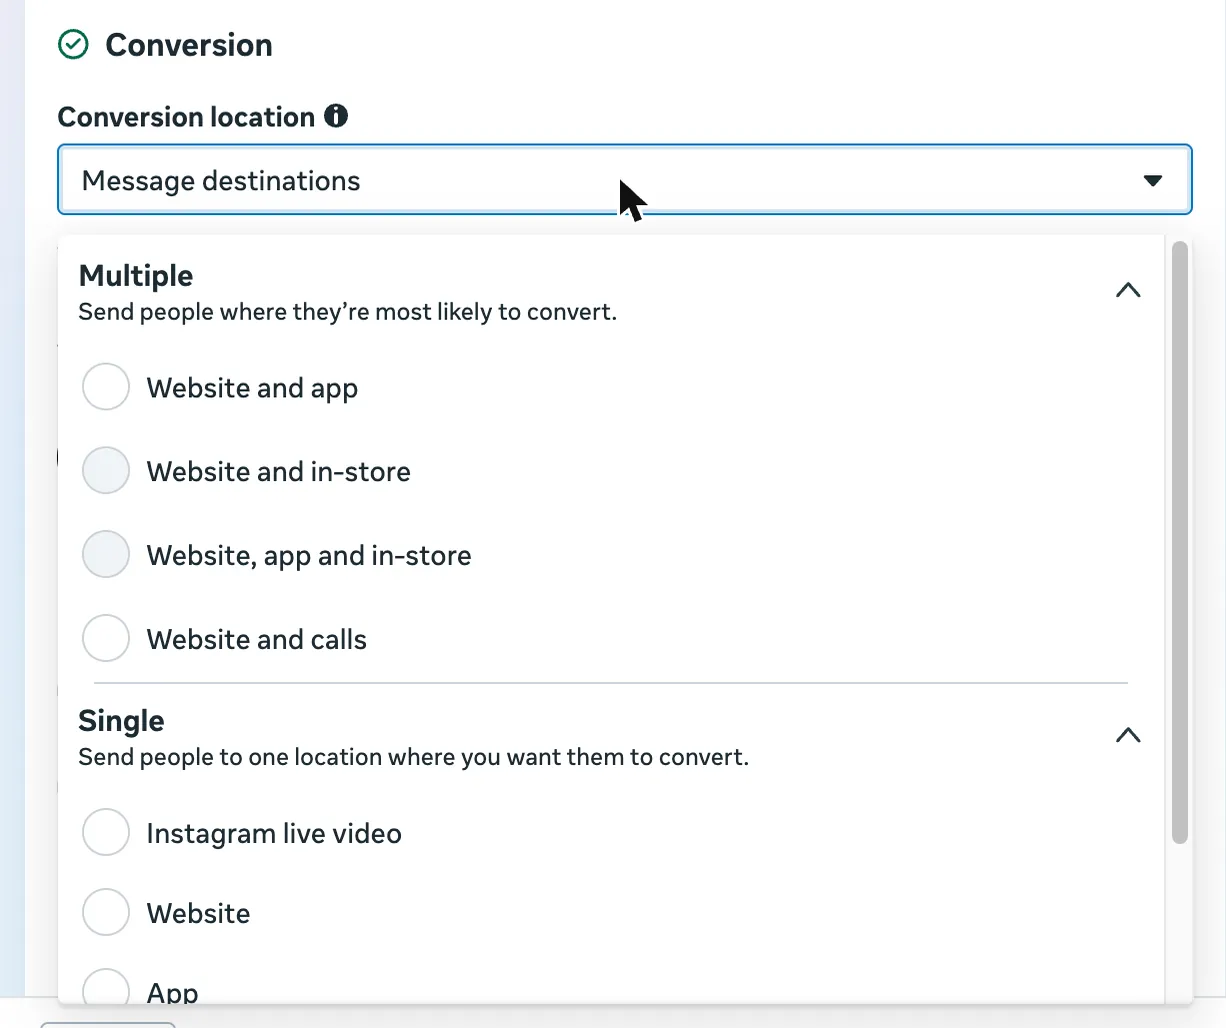
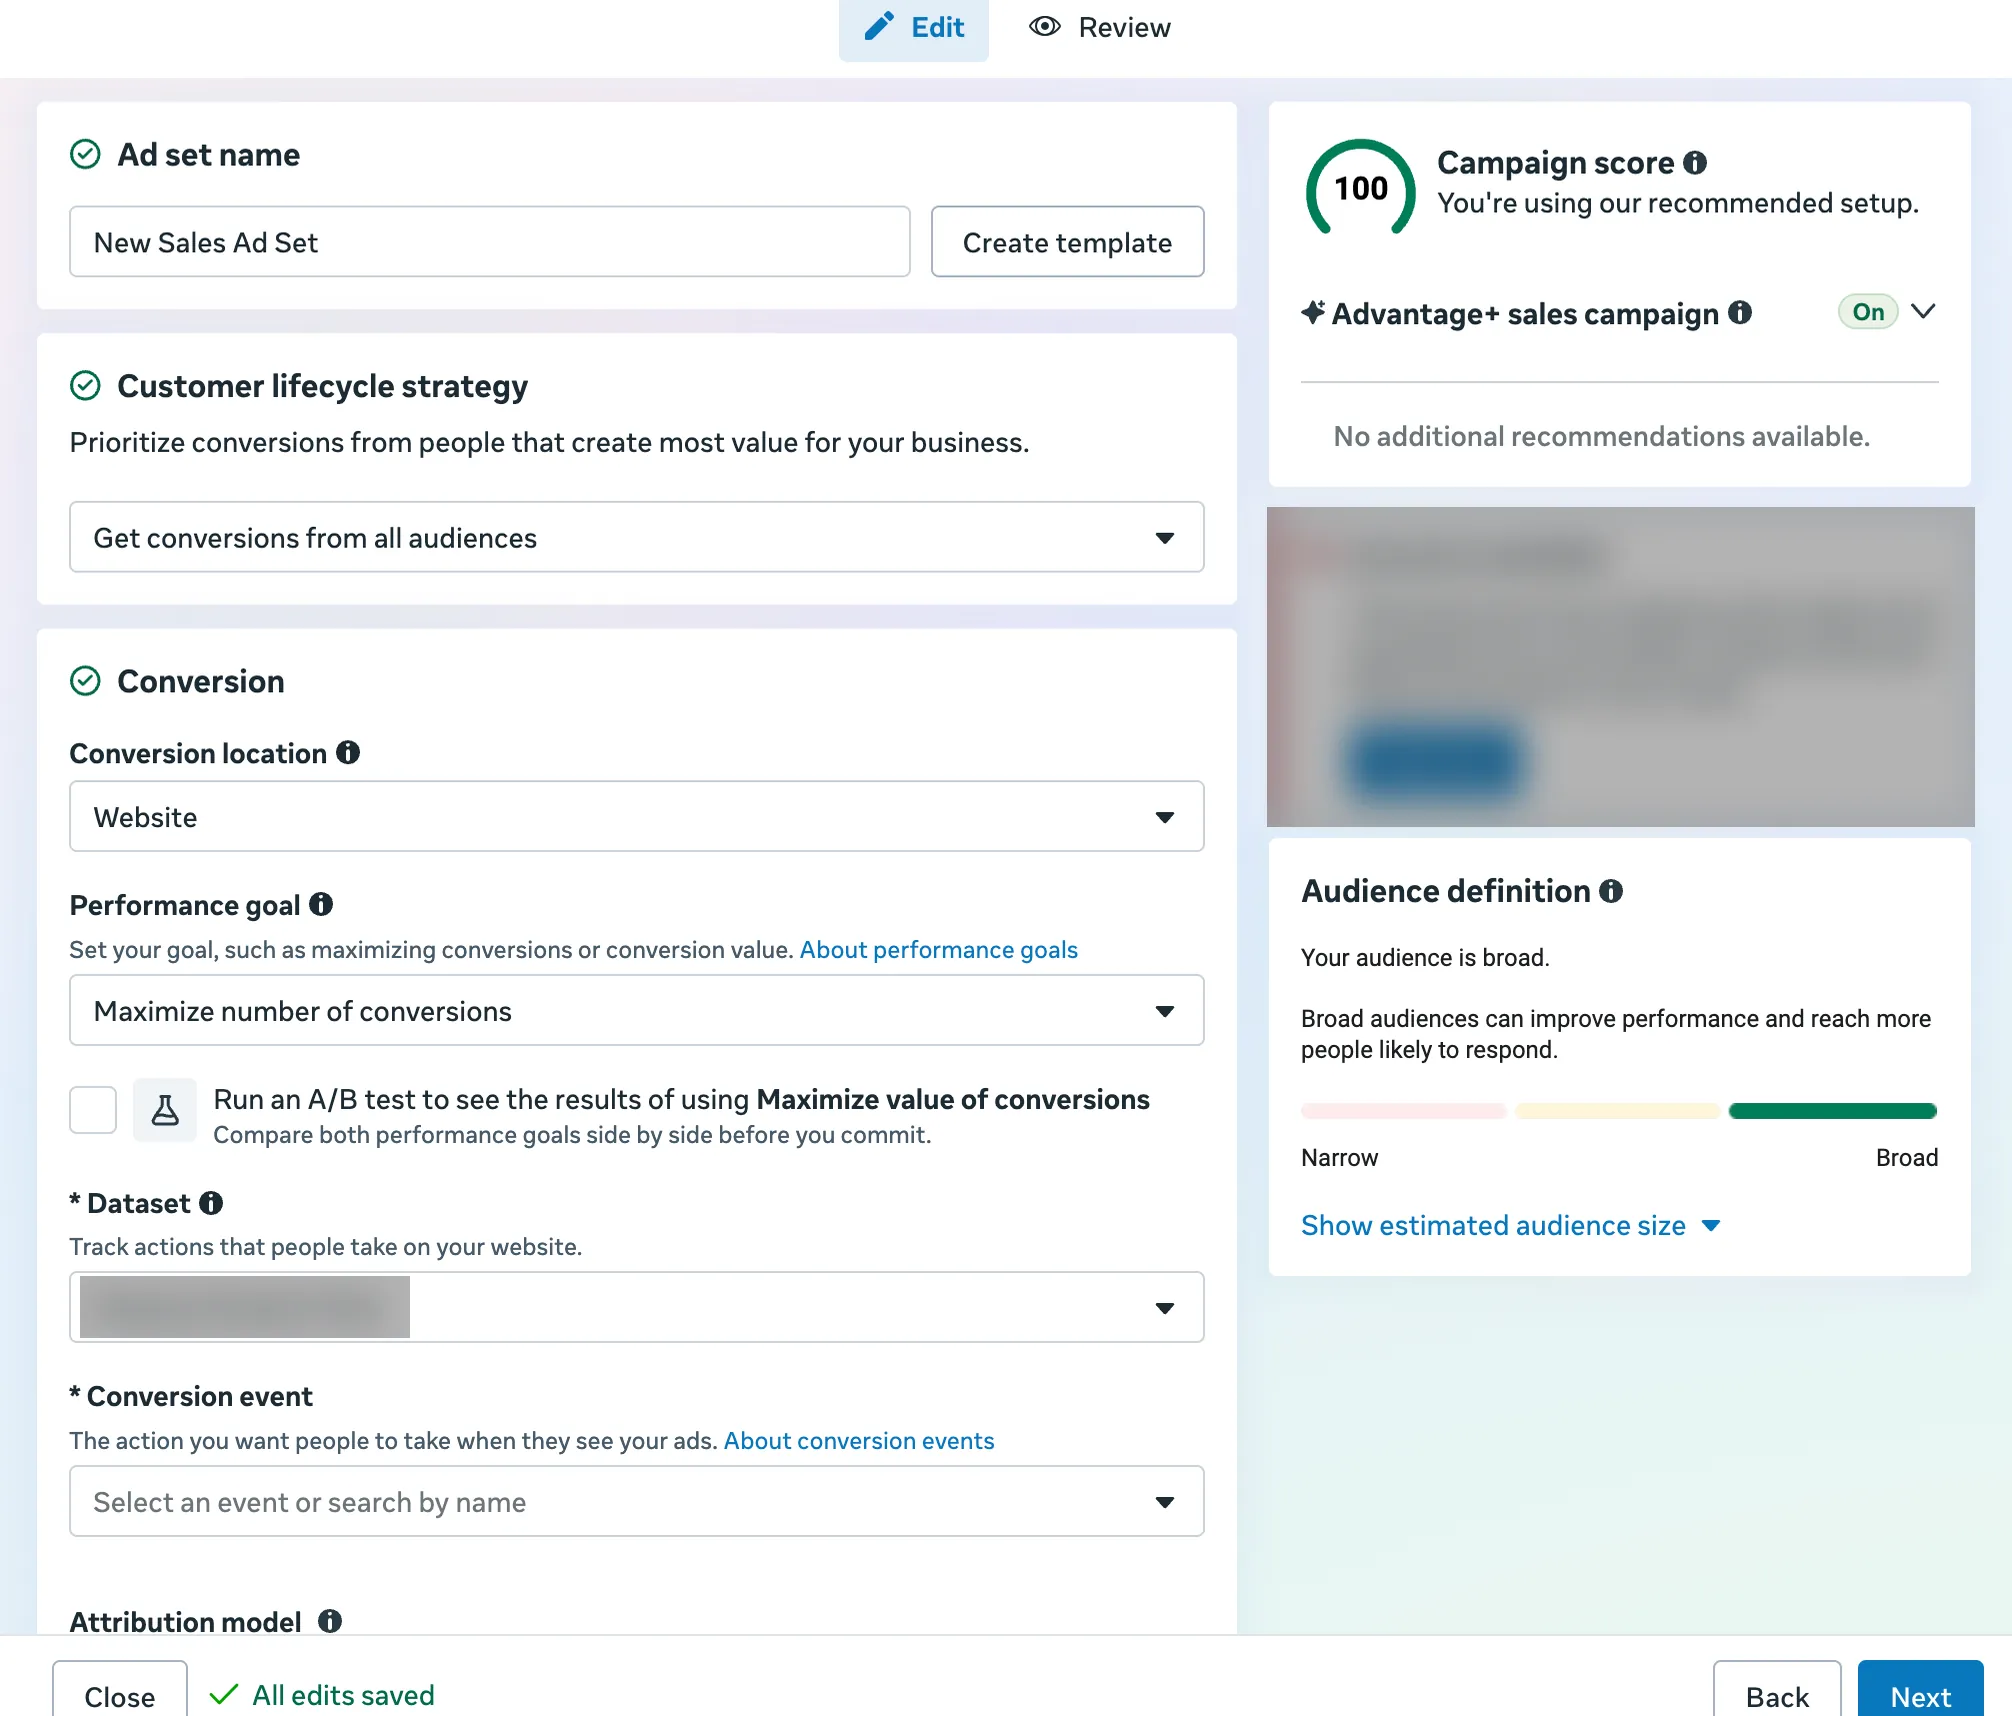
1Check the conversion location firstIn this draft Meta chose Message destinations by itself. Your sale happens on your website, so change it.
2Choose Website, under SingleOne place to send people: your store, where the purchase happens.
3Conversion location now reads WebsiteEvery other setting below depends on this one.
4Performance goal: Maximise number of conversionsMeta hunts for as many purchases as your budget allows.
5Dataset: the pixel from step 1The Facebook & Instagram app on Shopify creates it. The name is blurred here.
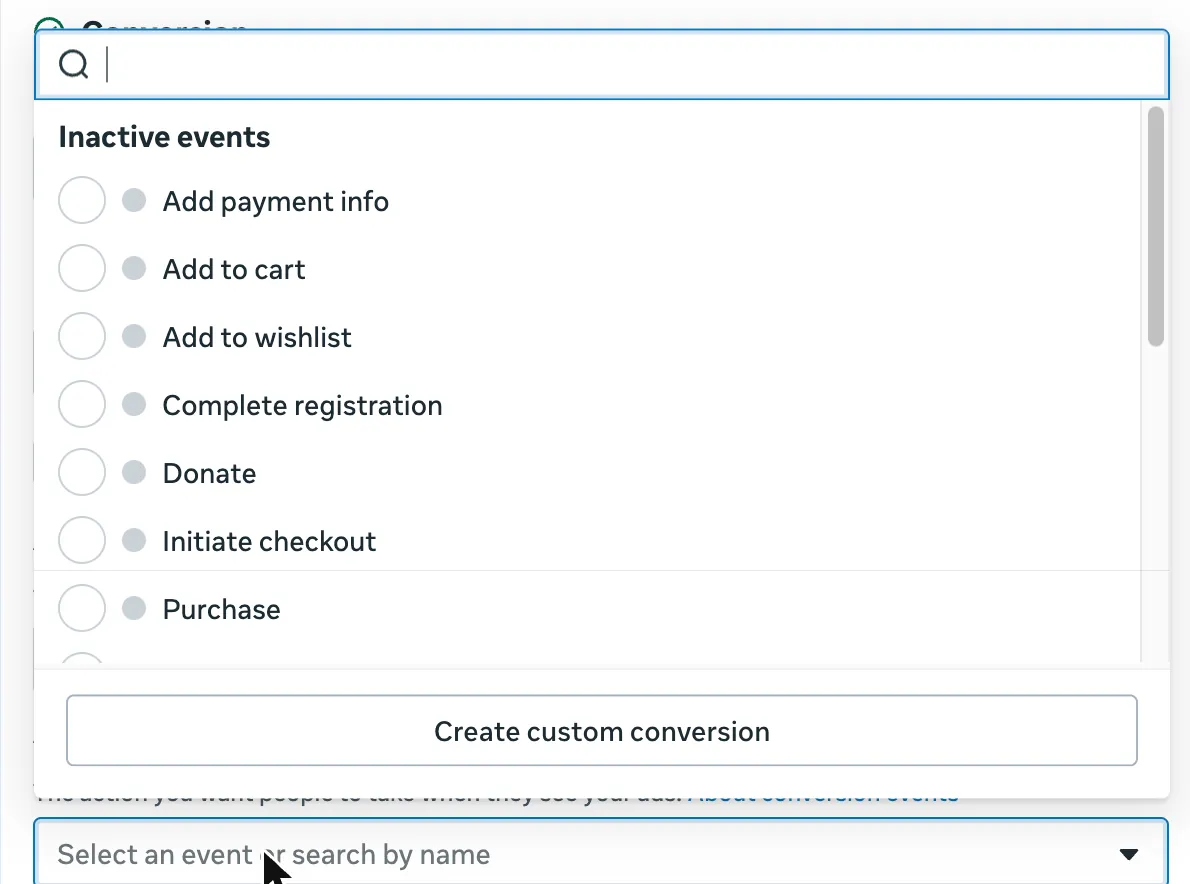
6Open Conversion eventThis tells Meta which action on your store counts as the result.
7Events show as inactive until your store sends themOne test purchase on your store activates them. A grey dot is normal on a new store.
8Choose PurchaseThe sale is the result you are paying for, so Meta optimises for buyers, not clickers.
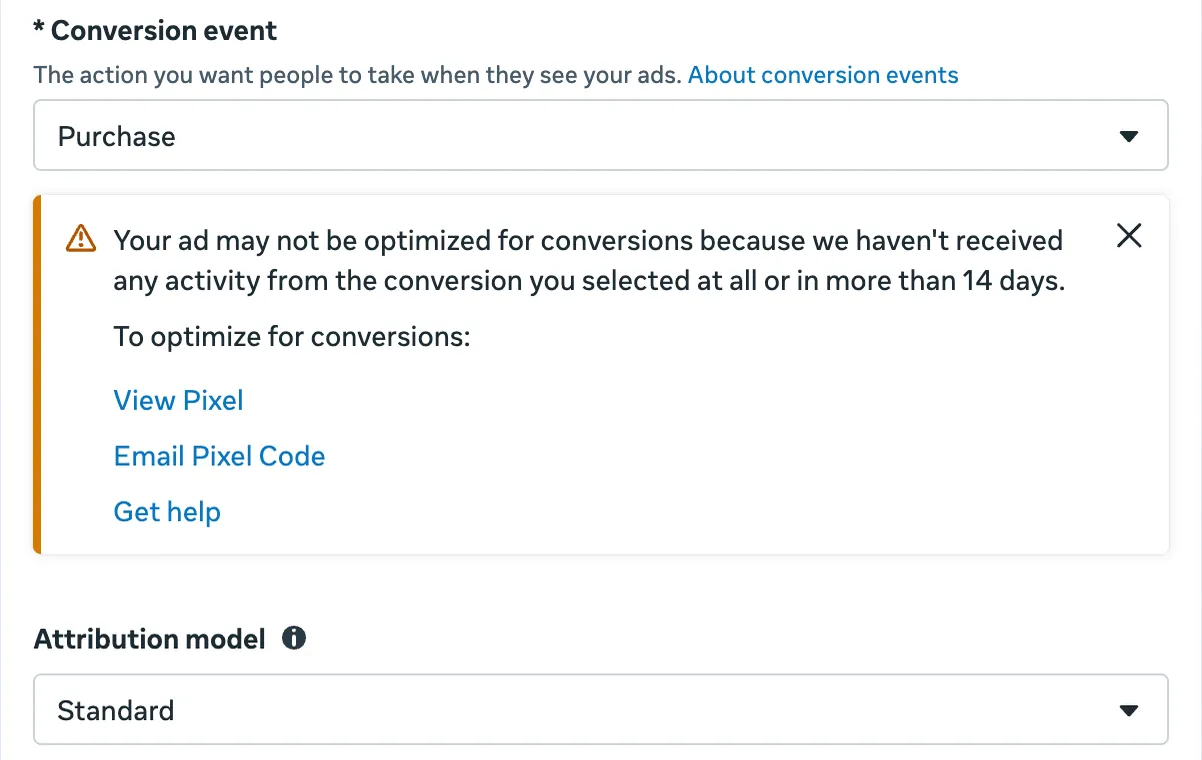
9Conversion event now reads PurchaseCheck it again before you publish. It is the single most important setting in the ad set.
10This warning means no purchase has reached Meta yetNormal on a new store. It clears once purchase events arrive. Check Events Manager after your first order.
11Leave the attribution model on StandardPart 4 explains how Meta decides which ad gets credit for a sale.
Why it mattersIf the conversion event is wrong, Meta looks for the wrong people.
Step 6Ad set level → Budget and schedule
Set a start date you can watch, and a fixed day to stop
1 / 3
Use ← → keys
1of 3
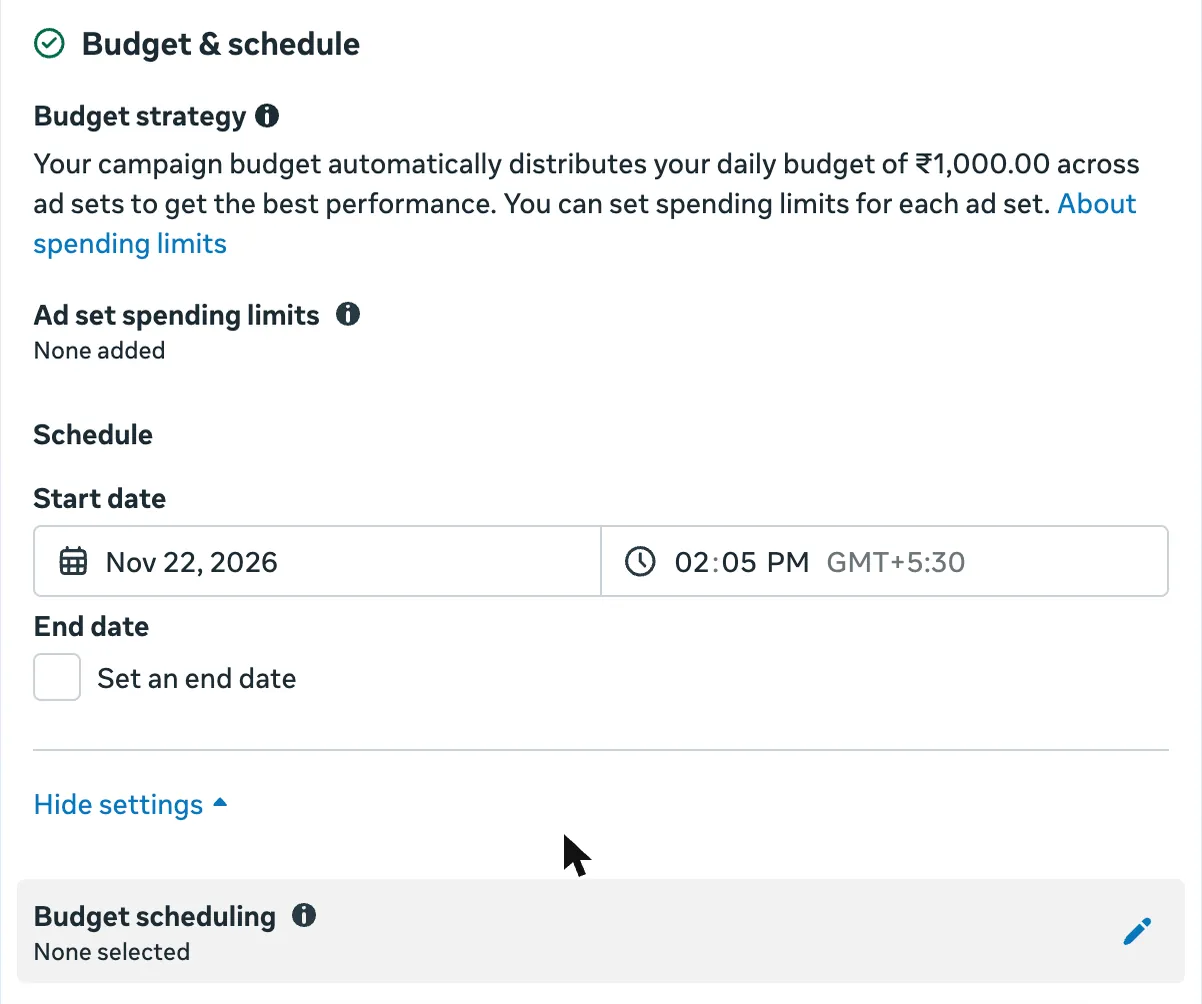
1The campaign budget is shared across ad setsMeta splits your ₹1,000 a day. With one ad set, all of it goes there.
2Start date: the morning after your launch checklist is doneThe default is right now. Pick a day you can watch the numbers.
3Set an end date, or write the stop day in your calendarA test needs a clear end. Three to five days fits a ₹3,000 to ₹5,000 budget.
Why it mattersYou can only learn from a test that starts clean and ends on a planned day.
Step 7Ad set level → Audience
Set hard controls first, then give Meta suggestions about your buyer
1 / 13
Use ← → keys
1of 13
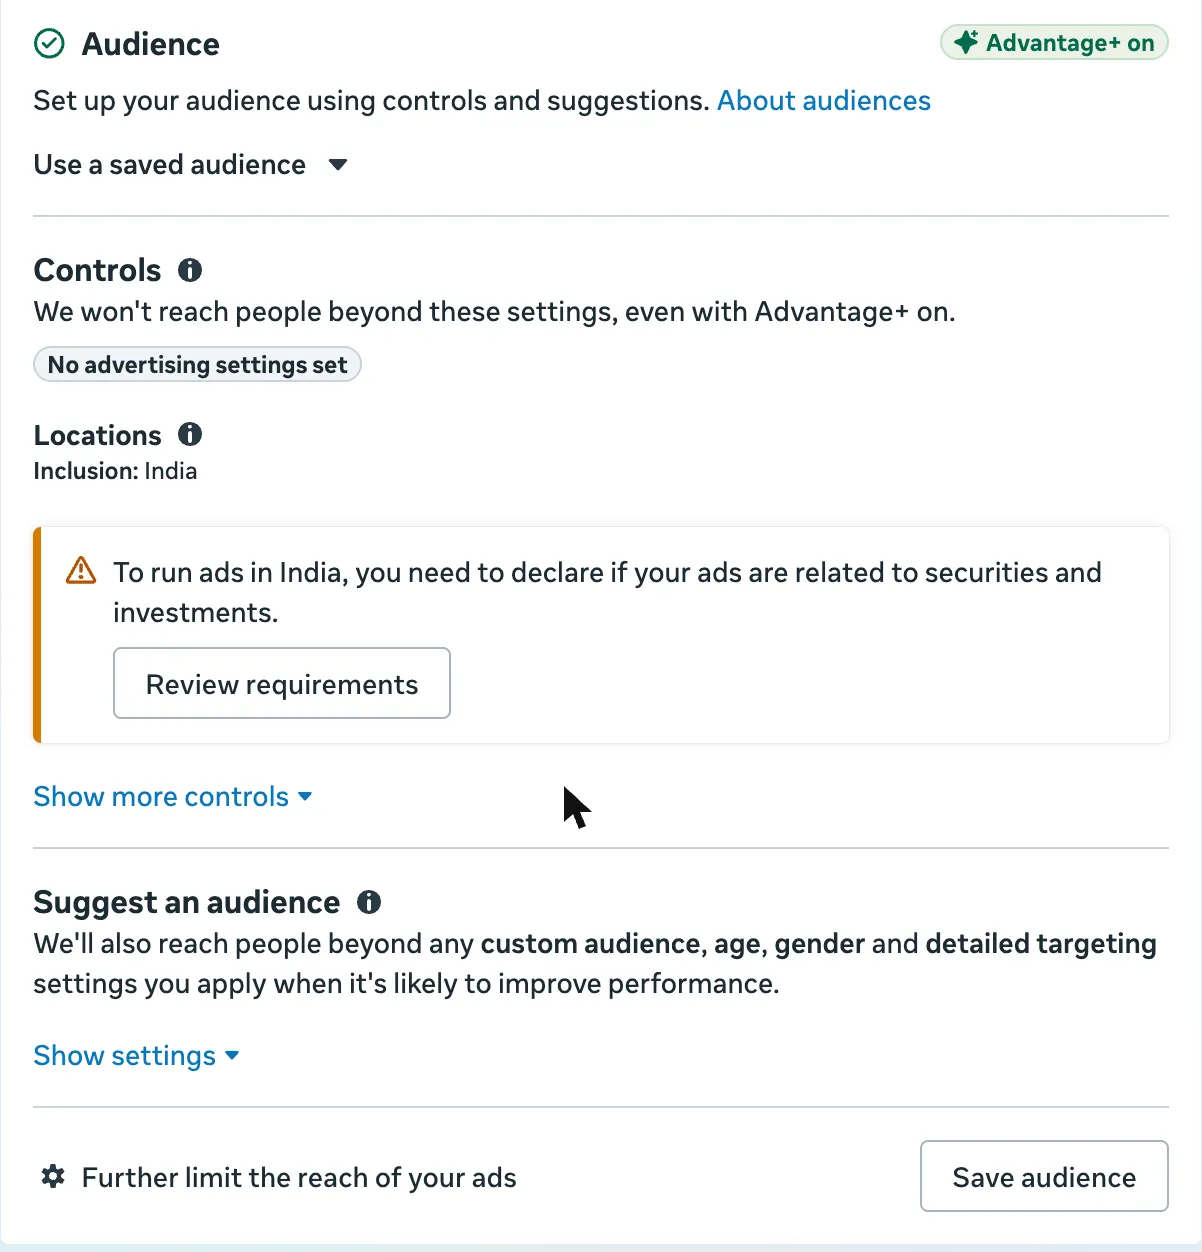
1Advantage+ audience is onMeta may go beyond your suggestions when it finds likely buyers. Your controls still hold.
2Controls are hard limits Meta never crossesEven with Advantage+ on. Set only what must be true, such as where you deliver.
3Location: India, or only the cities you deliver to fastClick it to edit. Leave out places your courier cannot reach in time.
4Answer the India declarationMeta asks every advertiser in India whether the ads relate to securities and investments. For a product store, the answer is no.
5Open Show more controlsMinimum age and exclusions live here. The next screen shows them.
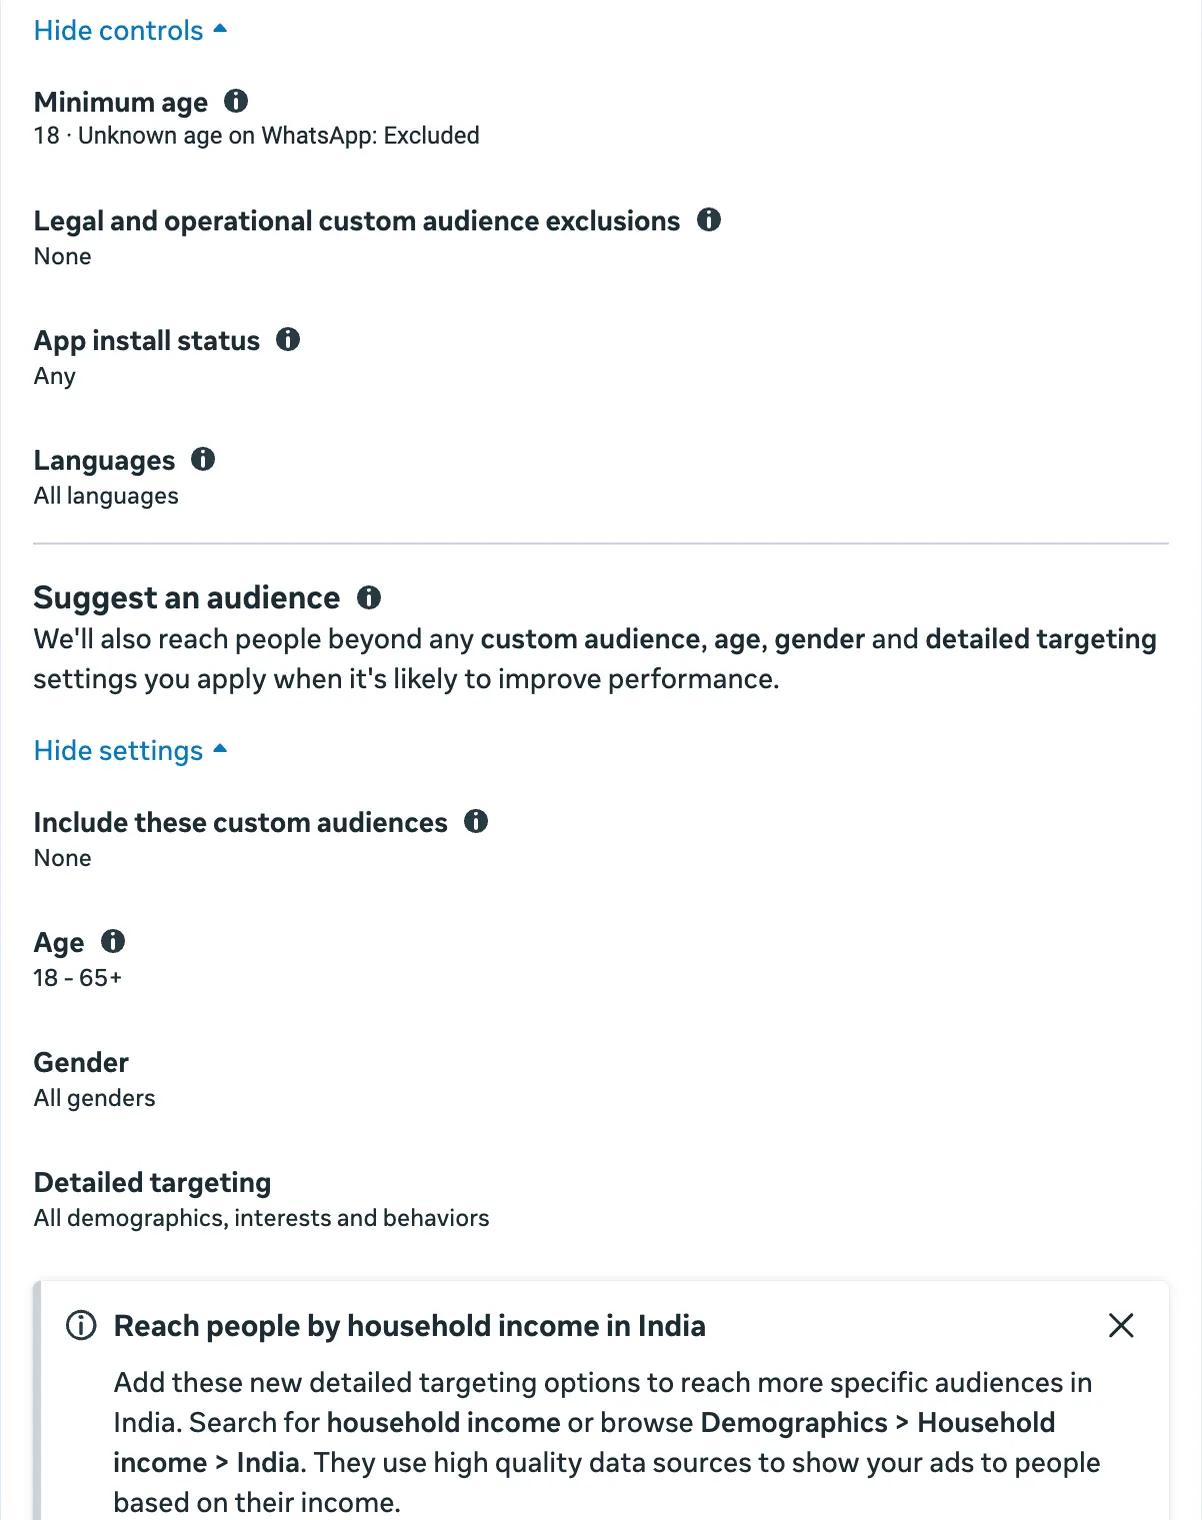
6Minimum age is a hard control: 18Meta already sets it. Keep it at 18.
7These exclusions are for legal or operational reasonsPeople you must not advertise to. Leave it at None for a first test.
8Suggest an audience: soft hints Meta may go beyondOpen Show settings to see the four hints.
9Custom audiences, as a suggestionSite visitors or a customer list, once you have them. You build them under Audiences in the Ads Manager menu.
10Age, as a suggestionFor college buyers, suggest 18 to 24. Meta may still show the ad to older people likely to buy.
11Detailed targeting: interests and behavioursAdd two or three that describe your buyer. With Advantage+ on, they are hints, not walls.
12New for India: household income targetingMeta now offers household income as a detailed targeting option in India.
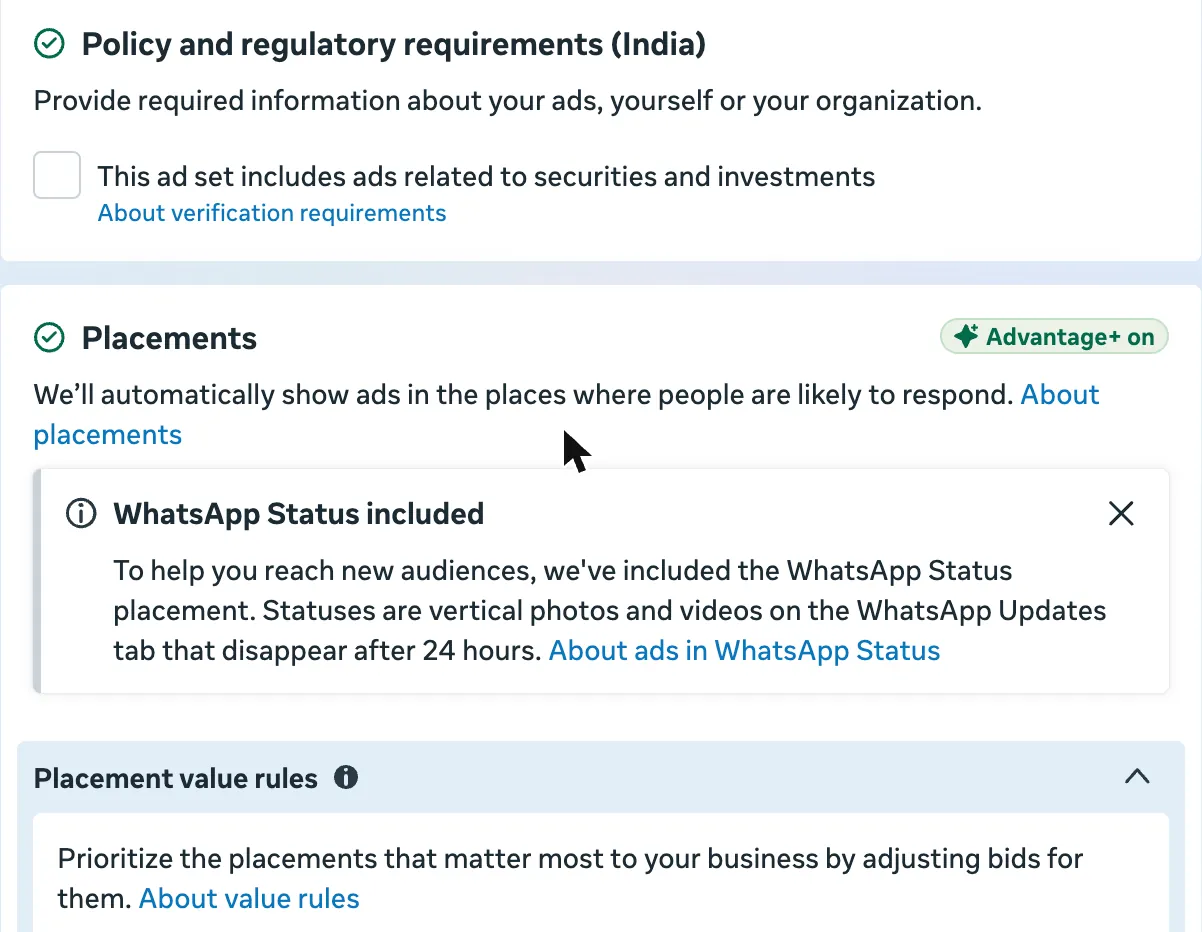
13The declaration itself: leave this box untickedTick it only if your ads are about securities or investments. A product store leaves it empty.
Why it mattersThis is Session 3 on screen. Cold people get prospecting, warm people get retargeting and existing customers get retention.
ChatGPT laneFill the [brackets], paste into ChatGPT
Step 8Ad set level → Placements
Leave placements on Advantage+, and make every creative vertical
1 / 3
Use ← → keys
1of 3
1Placements: leave Advantage+ onMeta shows the ad wherever results cost least across its apps. A small budget gains most from that freedom.
2WhatsApp Status is now includedStatuses are vertical and vanish after 24 hours. Make every creative 9:16 so it fits Reels, Stories and Status.
3Leave placement value rules alone for nowThey change bids for each placement. Useful later, not in a ₹1,000 a day test.
Why it mattersAt ₹1,000 a day, cutting placements usually raises your cost. Vertical creatives look right in every placement.
Step 9Ad level
Build the ad: identity, format, destination and creative
1 / 18
Use ← → keys
1of 18
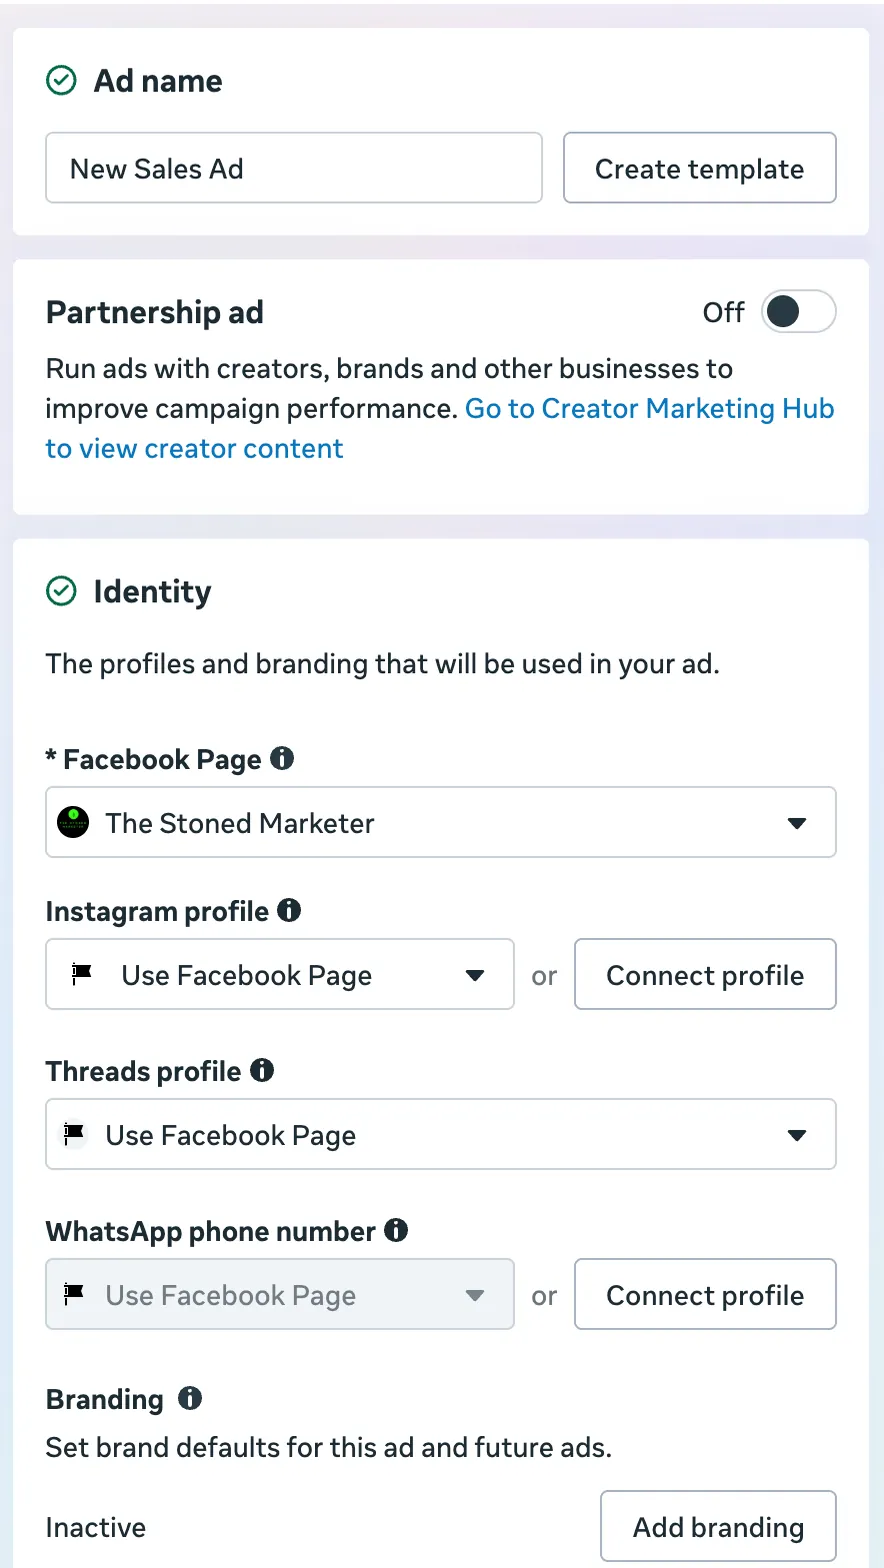
1Name each ad by its ideaFor example Hook_Gift_Reel or Proof_Review_Carousel, so your results read like a story.
2Partnership ad: leave it off for nowIt runs the ad through a creator's handle. Useful once you work with creators.
3Facebook Page: the brand Page that runs the adIts name and picture appear on top of the ad.
4Instagram profile: connect your brand accountWith "Use Facebook Page", Instagram comments do not reach your profile. Press Connect profile.
5WhatsApp number: optionalConnect one if you answer buyers on WhatsApp.
6Ad setup: Create adOr choose "Use existing post" to promote a post that already did well on Instagram.
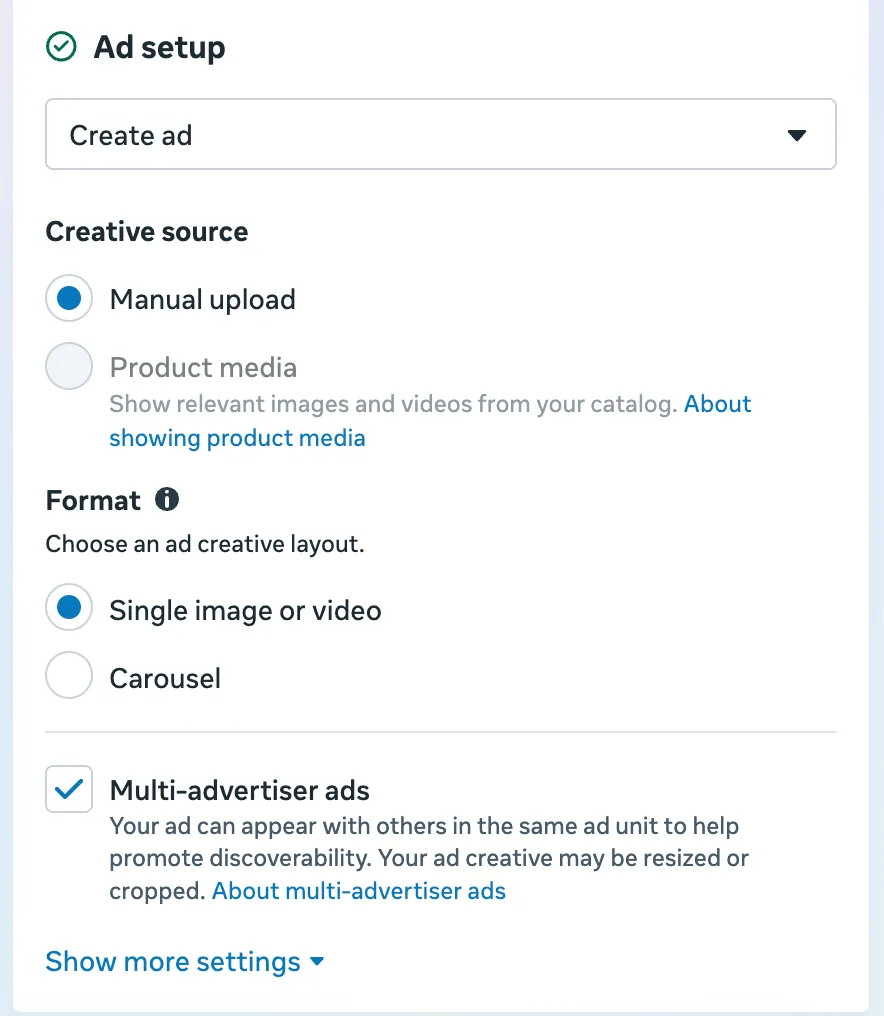
7Creative source: Manual uploadProduct media pulls from a catalogue. With one or two products, upload your own.
8Single image or video, for a reel or one imageMost of your three test ads will use this.
9Carousel, for 3 to 10 cardsGood for packs, flavours or a before-and-after story.
10Multi-advertiser ads is ticked by defaultYour ad may appear next to other brands and be resized. Untick it if you want full control of the look.
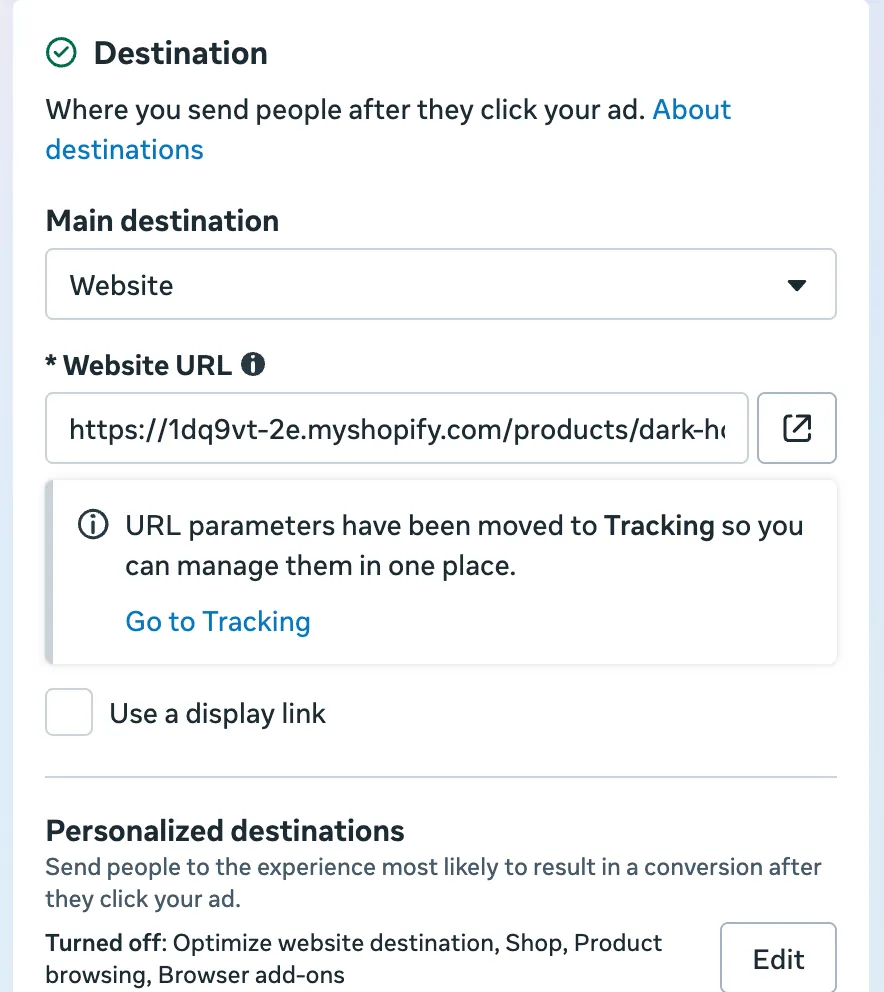
11Main destination: WebsiteIt matches the conversion location you chose in the ad set.
12Website URL: the exact product page, not your homepageEvery extra tap before Add to cart loses buyers.
13Meta moves your UTM tags to TrackingAdd utm_source=meta, utm_medium=paid and a campaign name there, so Shopify can report which ad sent each visitor.
14Personalised destinations: check what is onMeta may send some people to a different page. For a clean first test, keep the website destination off.
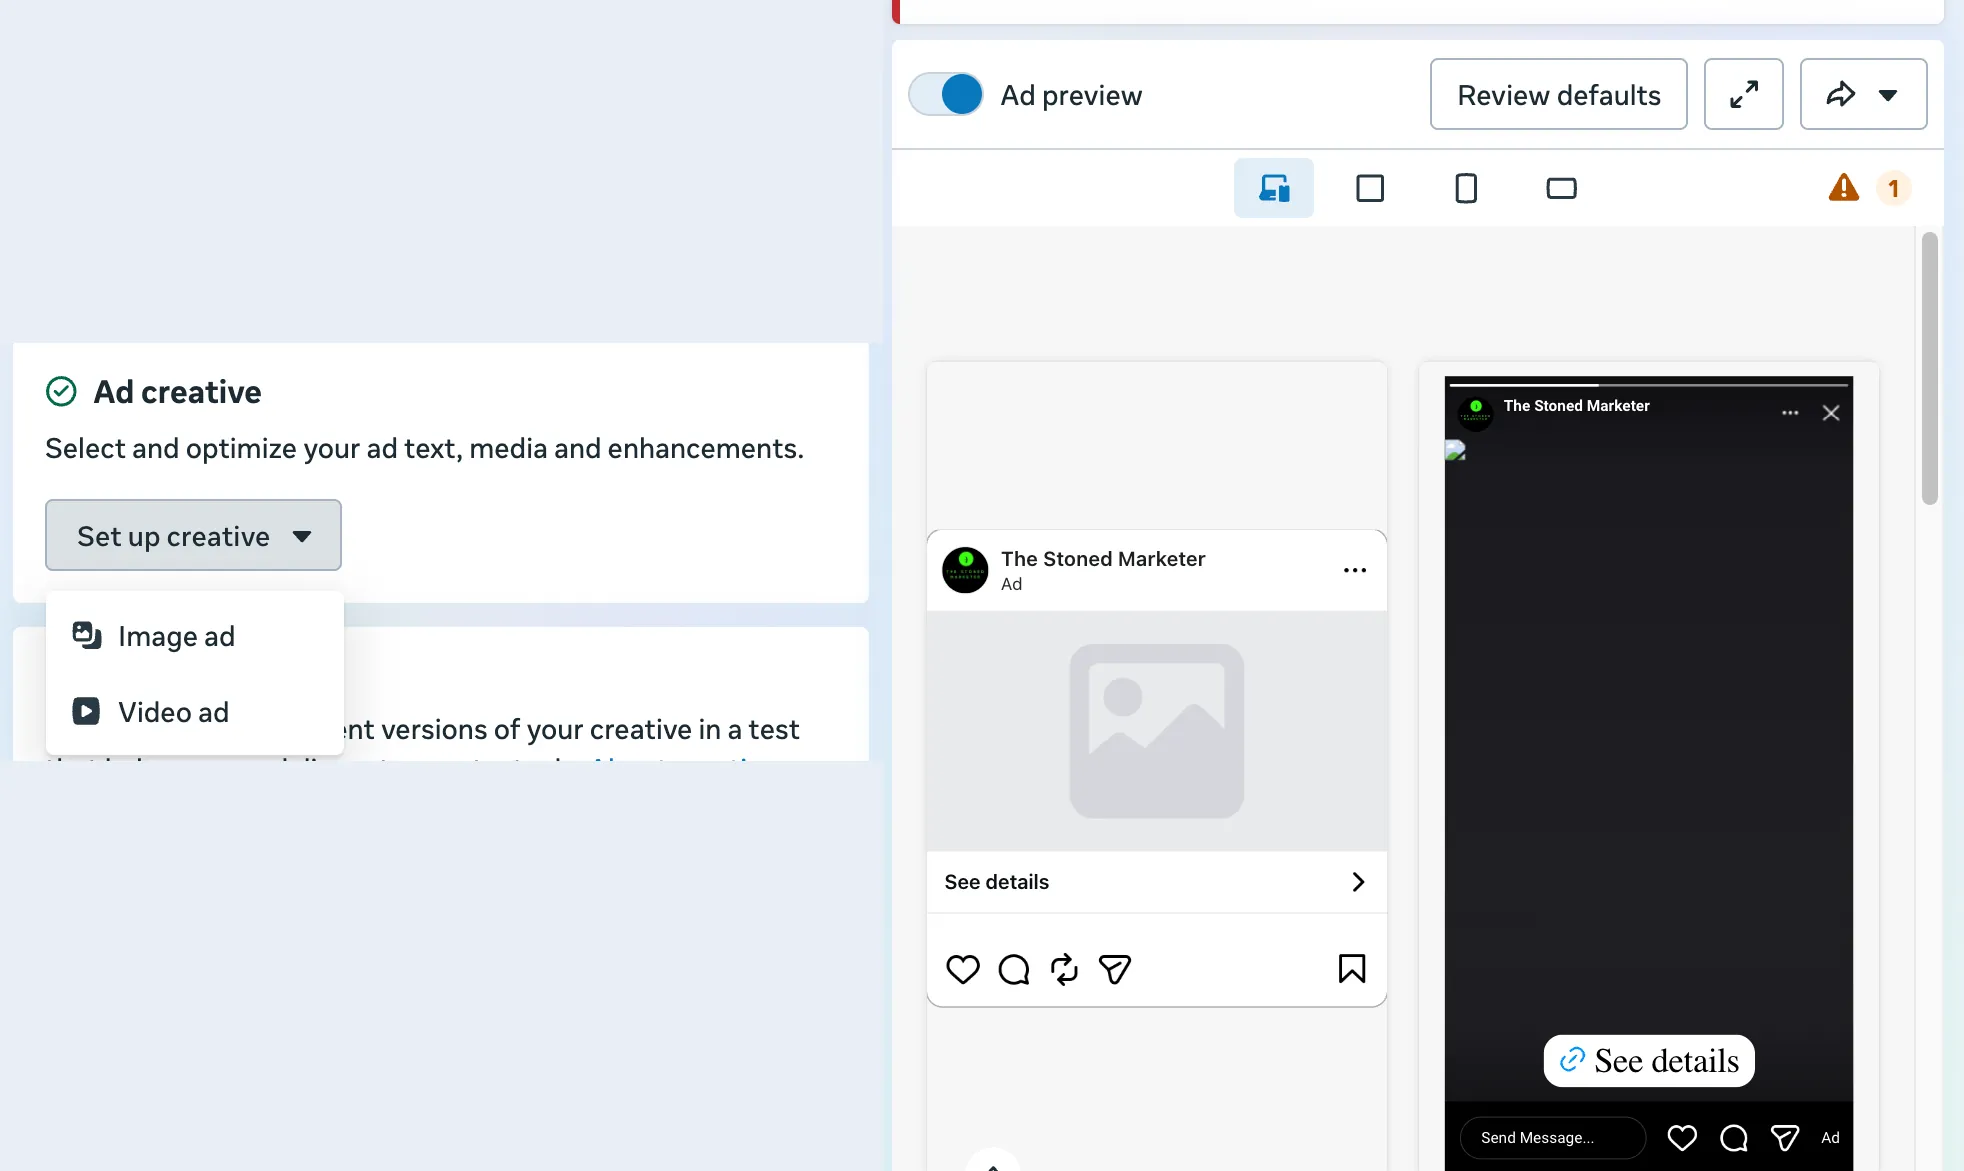
15Set up creative: Image ad or Video adUpload the file, then write the primary text, headline and call to action. Make the media 9:16.
16Turn on Ad previewCheck every placement before you publish. The warning icon flags anything that will not fit.
17The feed versionThe headline and the "See details" bar sit under your image.
18The Stories and Reels versionFull screen, with the link sticker at the bottom. Keep text away from the top and bottom edges.
Change utm_content for each ad, so Shopify tells you which ad brought each order.
Why it mattersOne ad should carry one creative idea. That is how you find out which idea sells.
ChatGPT laneFill the [brackets], paste into ChatGPT
Step 10facebook.com/ads/library · apify.com
Study what already works in your category before you shoot
1 / 12
Use ← → keys
1of 12
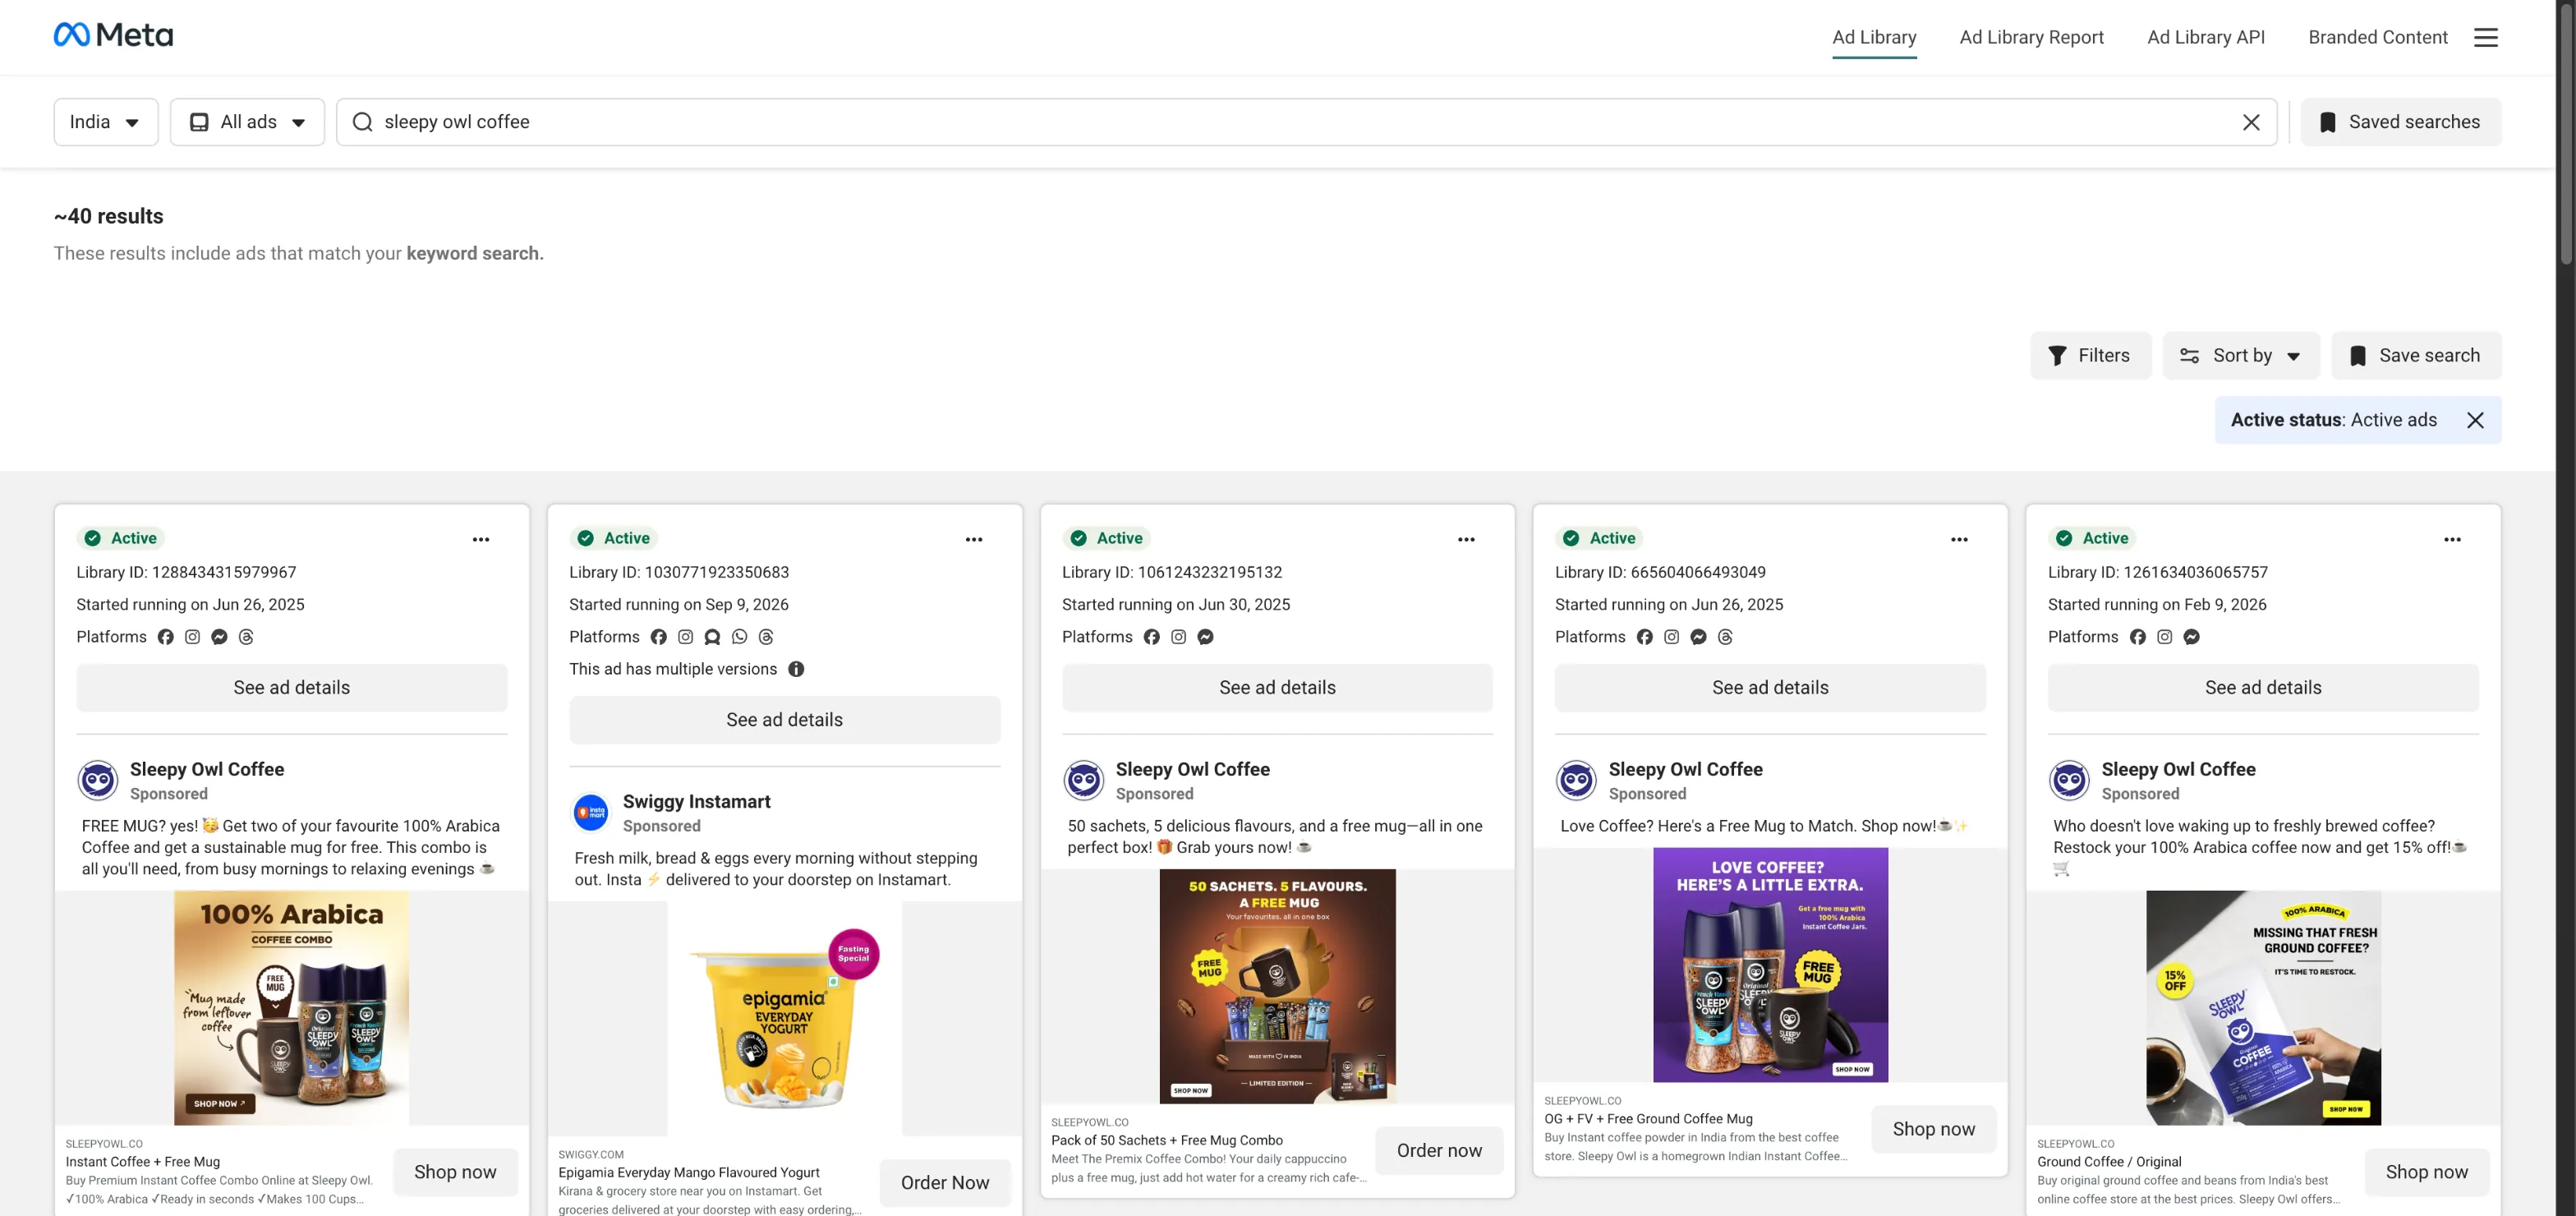
1Meta Ad Library: pick India and type a brand or keywordfacebook.com/ads/library is free and needs no ad account. These are Sleepy Owl's active ads on 22 November 2026.
2Sort by impressions and keep Active ads onThe ads shown most often rise to the top.
3Read the start date firstThis Sleepy Owl ad started on 26 June 2025 and is still running. Brands switch off ads that lose money, so a long run is a strong signal.
4Press See ad detailsIt shows every version of the ad and where it runs.
5Read the copy: it leads with the offer"FREE MUG? yes!" A gift beats a discount when the product is already priced well.
6The creative puts the product and the gift togetherLarge type, the jars, the mug and a hand-drawn note. One look tells the whole offer.
7The call to action: Shop nowThe button matches the goal of the campaign: a sale.
8A keyword search also shows other advertisersSwiggy Instamart appears here too. Search the brand's Page name to see its ads only.
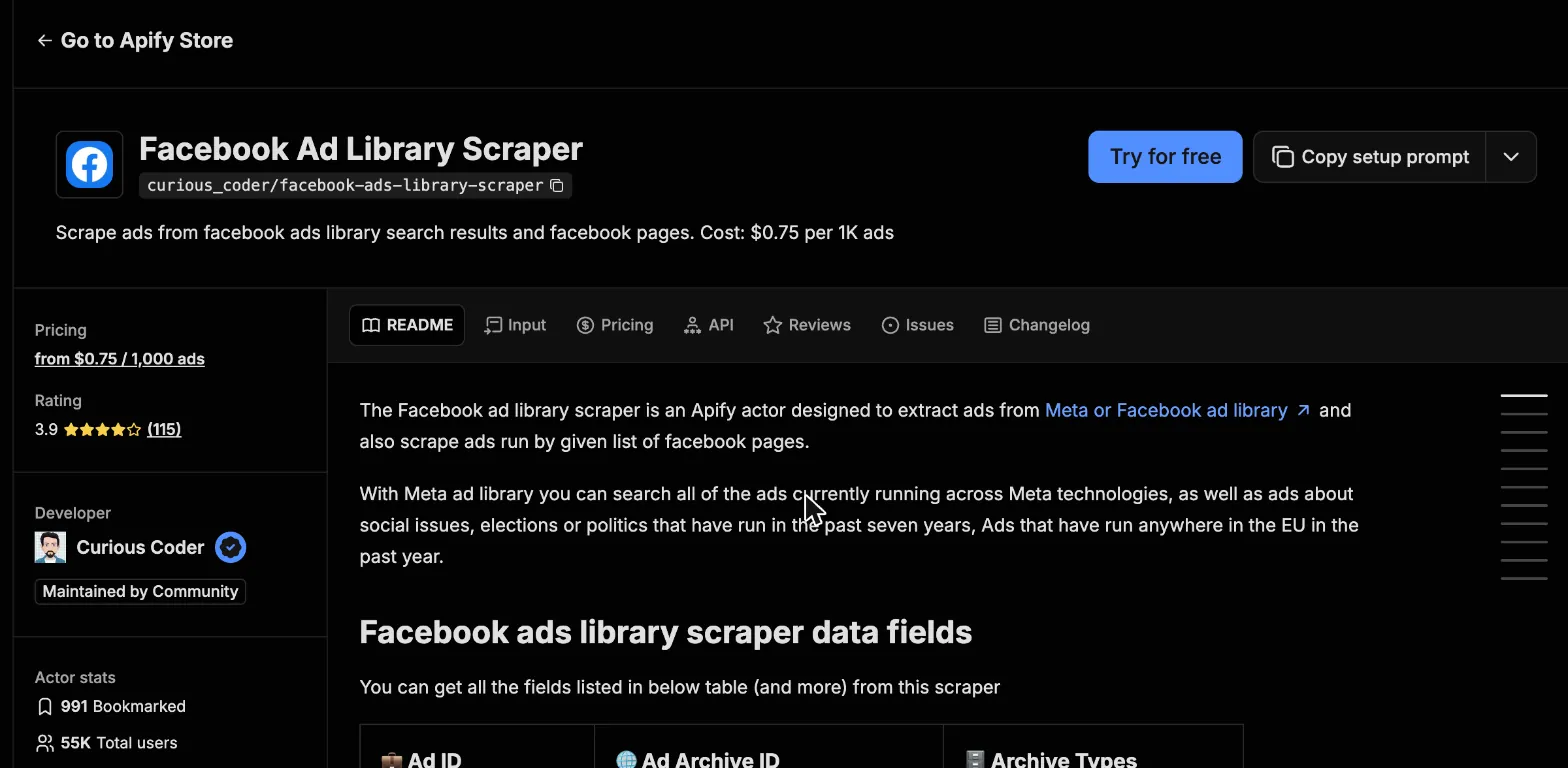
9To pull hundreds of ads into a sheet: ApifyThis Facebook Ad Library Scraper, by Curious Coder, exports every ad from a search or a list of Pages.
10Check the price before you run it$0.75 per 1,000 ads on the day we checked. Apify's free plan includes $5 of usage a month, so a few thousand ads cost nothing.
11Read the rating and the user countCommunity scrapers break when Meta changes its pages. 55K users and recent updates are a good sign.
12Press Try for free, then paste your Ad Library search URLExport the results to Excel, then fill in the content DNA sheet from the prompt pack.
Why it mattersLong-running competitor ads are free research: the hook, offer and format that already convert in your category.
ChatGPT lane
Open the prompt pack for the full ad breakdown method: the prompt pack
Step 11Your launch plan
Launch one campaign, one ad set and three ads at ₹1,000 a day
1 ad set · Website · Purchase · controls: location and minimum age 18 · suggestions: age range and interests · Advantage+ placements
Same audience for every ad, so the ads are compared fairly
Ads
3 ads: reel_a a vertical video, carousel_b 3 to 5 cards, image_c one image with the offer
Three different ideas. The numbers pick the winner
Length
₹3,000 budget: 3 days · ₹5,000 budget: 5 days · Meta's weekly maximum at ₹1,000 a day: ₹7,000
A planned end makes it a test, not a leak
Pre-launch checklist
Creative ideas, hooks and the content DNA breakdown for reels, carousels and single images are in the prompt pack.
Why it mattersA small test only teaches you something if it is structured: one variable per ad, the same audience, the same budget, a fixed end.
Checkpoint: before you move on
Part 4 · Session 6
Read the numbers, decide what to stop, and see how brands scale
Your ads run for a few days on a small budget. This part shows you how to read the results in funnel order, apply three stop, keep and scale rules, why Meta and Shopify disagree, and how a brand grows a winner. The numbers here are from a practice account.
Step 1Ads Manager → Columns → Customise columns
Read your results in funnel order and fix the first broken number
DO THIS
Add these columns in Ads Manager
Columns → Customise columns
Link clicks, CTR (link click-through rate), Landing page views, Adds to cart, Checkouts initiated, Purchases, Cost per purchase
Then: save it as a preset so you never rebuild it.
Practice account · 3 days · ₹3,000 spent
Count
Rate
Impressions
41,000
Link clicks
480
1.17% of impressions (CTR)
Landing page views
372
78% of clicks
Adds to cart
19
5.1% of page views
Checkouts initiated
8
42% of carts
Purchases
4
50% of checkouts
Cost per purchase
₹750
₹3,000 ÷ 4
Revenue and ROAS
₹2,796
4 × ₹699 · ROAS 0.93
Practice numbers, invented for this class. Clicks and page views are healthy here. Only 5 of every 100 visitors add to cart, the same leak Ira had, so the product page gets fixed before the ads are touched.
Where it breaks
What it usually means
What to change first
Few clicks for the impressions
The hook or creative is weak
A new first 3 seconds or a new image
Many clicks, far fewer page views
The page loads slowly or the link is wrong
Compress images, test the link on mobile data
Page views, few adds to cart
Product page, price or offer
Photos, price per unit, delivery promise (Part 2, step 5)
Carts, few checkouts
A cost surprise
Show delivery cost early, or add a free shipping threshold
Checkouts, few purchases
A payment problem
Test UPI and cards, check Razorpay
Why it mattersFixing a later step does nothing while an earlier step is broken. Read top to bottom and stop at the first problem.
Step 2Your break-even from Session 3
Decide to stop, keep or scale with three rules and one calculator
The class rules for a ₹1,000 a day test
Wait for 72 hours or ₹3,000 before judging, unless something is broken: no delivery after 24 hours, a rejected ad or a dead link.
Stop an ad that has spent twice your break-even cost per order with zero purchases.
Keep an ad whose cost per purchase is at or below break-even.
Scale only after 3 days in a row at or below break-even: raise the budget by about 20% every 2 to 3 days.
Change one thing at a time.
These are rules of thumb for this project, not Meta rules.
Break-even cost per order₹0
Your cost per purchase₹0
Why it mattersRules decided before the money is spent stop you from reacting to one good or bad day.
Step 3Ads Manager → Delivery column
Expect "Learning limited" at ₹1,000 a day, and keep your hands off
What Meta says
An ad set generally needs about 50 optimisation events within 7 days of its last significant edit to leave the learning phase. Until then results swing more, and after 7 days without enough events the Delivery column shows Learning limited.
Meta Business Help Centre, as summarised by PPC Land.
What it means at ₹1,000 a day
At a cost per purchase of about ₹400 you get roughly 17 purchases a week, well short of 50. Seeing Learning limited is expected. Judge by your funnel and the class rules, and do not keep editing: a new creative, an audience change, a new optimisation event or a big budget jump restarts learning.
Daily budget needed to reach 50 purchases in 7 days₹0
Why it mattersEvery significant edit sends the ad set back into learning. Small budgets need patience more than tweaks.
Step 4Ads Manager attribution · Shopify Analytics
Pick one source of truth, because Meta and Shopify count the same order differently
Meta counts
A purchase within 7 days after a click or 1 day after a view of the ad, by default. Since 5 November 2026, click results report website purchases only after link clicks.
Shopify counts
The last channel clicked before the order, ignoring direct visits, over 30 days.
One order, two reports
Sana clicks your Reel ad on Monday. On Thursday a friend sends her your product link on WhatsApp, and she buys. Meta counts the sale because she clicked its ad within 7 days. Shopify credits the WhatsApp link, because it was the last click. Both are right by their own rule. Never add them together.
The rule for your project
Shopify orders are your money truth. Use Meta's numbers to compare your ads with each other. UTM tags connect the two.
Why it mattersAdding Meta's purchases to Shopify's orders counts the same sale twice.
Step 5Practice numbers for Dark Hour
See how a brand scales a winner, in a practice ad account
Week
Move
Daily budget
Cost per purchase
Decision
1 · Test
3 ads, one ad set
₹1,000
reel_a ₹380 · carousel_b ₹460 · image_c none after ₹900
Stop image_c (₹900 is more than twice the ₹413 break-even). Keep reel_a.
2 · Vertical
More budget on the proven ad
₹1,000 → ₹1,200 → ₹1,440
₹395
About 20% every 3 days while cost stays under break-even
3 · Horizontal
A new ad set with a lookalike of buyers, a retargeting ad set for 14-day site visitors at about 15% of budget, and three new hooks on the winning angle
₹1,700
₹370 blended
New audiences and fresh creatives before the winner tires
4 · Retention
WhatsApp reminder to buyers around day 18, a bigger pack offered only to existing customers
₹2,000
Falls as repeat orders arrive
Session 2: the first order pays for the ad, repeat orders pay you
Practice numbers for Dark Hour, invented for this class. Break-even here is ₹699 minus ₹270 of costs minus a 2.36% payment fee, about ₹413.
Why it mattersScaling is a sequence of small, controlled steps: more budget for a proven ad, new audiences, then bringing buyers back.
Step 6Your final project submission
Send a one-page report that shows your thinking, not only your numbers
What your one page contains
What you sold, to whom, at what price, and your store link
The three ads, with the idea behind each
Total spend and the funnel from impressions to purchases, with the rate at each step
Cost per purchase against your break-even
What you stopped, what you kept, and why
One thing you learned about your buyer
What you would do with ₹50,000 next month
Why it mattersA clear report is what a founder or an agency lead reads. It shows you can turn data into a decision.
ChatGPT laneFill the [brackets], paste into ChatGPT
Checkpoint: before you move on
Help desk
Stuck at home? Find your doubt, then open the ready prompt
Every common question from the project has a section in the prompt pack: what to give the AI, the prompt to copy, the tools to connect, and an example of what you get back.